
This guide will help you learn how the Docker build cache works. We'll start with some optional Docker fundamentals about workflow and layers, dive into the details of the build cache, and then learn concepts and best practices for increasing cache efficiency. Because we all want faster builds, right?
Docker fundamentals
Learn something new or refresh your memory about the Docker workflow and how image layers work.
Docker workflow
Docker is a platform that lets you reliably run your app anywhere you need to. You package your application as an image and run it in an isolated container on your machine or in production or anywhere in between. This process is often called containerizing an application.
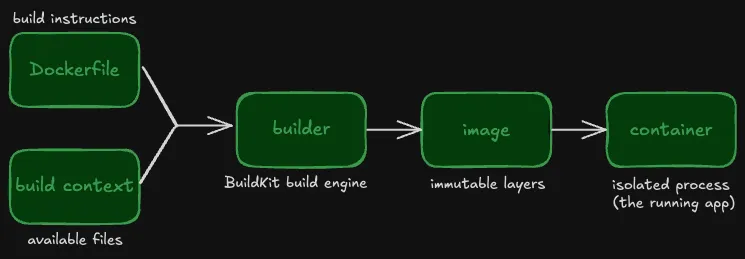
The high-level workflow from source code to a running app is as follows:
- You start with your build context and a Dockerfile.
- The builder uses the instructions in the Dockerfile to build an image.
- You run instances of your image in one or more containers.
The following diagram illustrates the workflow:
Key terms
Dockerfile: The instructions to build your image.
Build context: The files from the host machine that the builder can access during the image build. Primarily includes your application source code.
Builder: The build engine (BuildKit) that creates an image from your Dockerfile. To learn how BuildKit works, see BuildKit in depth: Docker's build engine explained.
Image: An immutable package built from a Dockerfile and build context. An image includes everything needed to run your application: source code, language runtime, dependencies, configuration files, and environment variables. You can use a single image to run multiple containers.
Container: A running instance of your image that provides an isolated environment for your application.
How the builder creates image layers from a Dockerfile
What are Docker image layers and how are they created? It’s the Dockerfile that determines precisely how to layer and build an image.
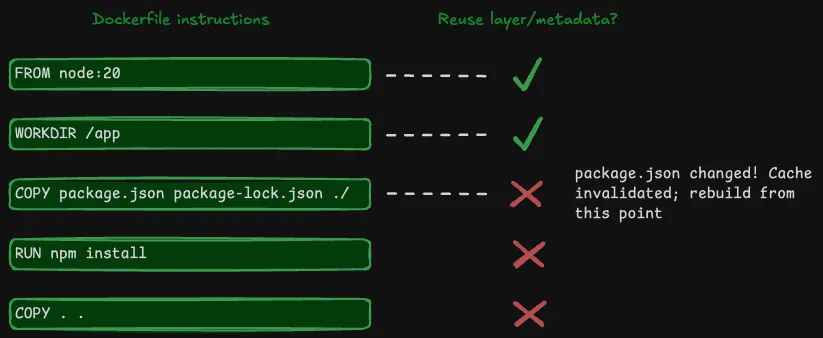
A Dockerfile is a text file that contains a series of ordered instructions for building an image. The following example is part of a Dockerfile for a Node.js application:
FROM node:20
WORKDIR /app
COPY package.json package-lock.json ./
RUN npm install
COPY . .To build an image, the builder executes the instructions in the order they appear in the Dockerfile.
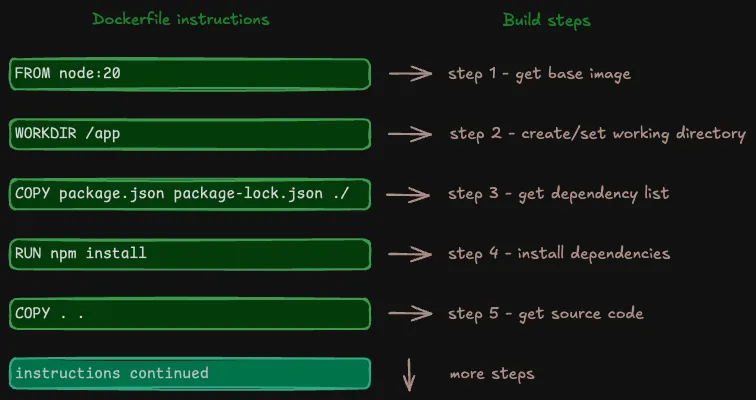
Depending on the instruction, a build step results in one or both of:
- a filesystem layer
- metadata
These individual layers and metadata become part of the final Docker image.
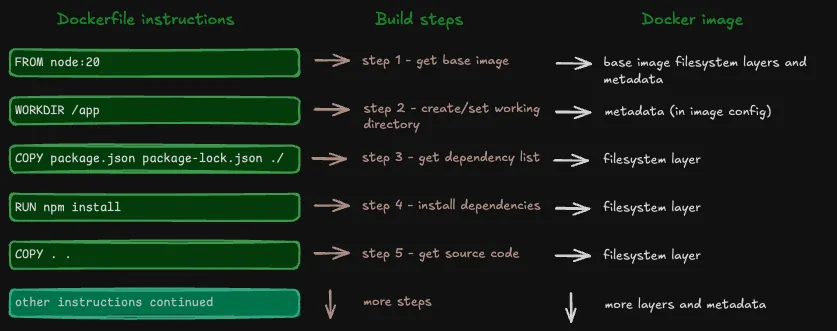
But a Docker image isn’t just filesystem layers and metadata. Every image includes an image configuration JSON file that keeps track of layer references for build cache and image history, along with the metadata.
Instructions become image layers and metadata
COPY, RUN, and ADD instructions result in filesystem layers that Docker stores within the image.
Other instructions, like ENV, EXPOSE, and CMD, result in metadata that Docker stores in the image configuration JSON file.
Note: A WORKDIR instruction creates the specified directory if it doesn’t exist. The builder stores this change as metadata in the image config rather than creating a filesystem layer.
How (and why!) layers stack together
In the previous section, you saw how Dockerfile instructions become either filesystem layers or metadata in a Docker image through the build process. You learned that the instructions are ordered and the builder executes the steps in order. But why is order important?
Every step in the image build depends on and adds to the previous step. This version of the image build diagram shows how the filesystem layers get stacked.
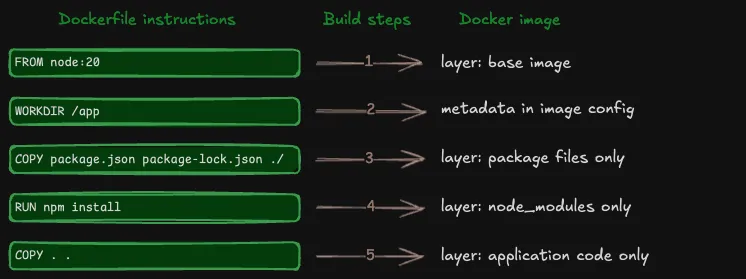
Each layer in a Docker image stores only what changed from the previous layer. For example, if one layer has files A and B, and the next layer adds file C, then the new layer only stores file C, not A, B, and C. Subsequent layers continue to build on previous layers in the same way.
Finally, when you run your image in a container, Docker takes the filesystem layers, stacks them together in order, merges them, and presents a single unified filesystem for the container to run.
(Another Docker component, containerd, reads the config and applies the settings to the container environment.)
A Docker image’s individual stacked layers are perfect for reusing in subsequent builds and sharing between images (something Docker does automatically for identical instructions). The rest of this post focuses on reuse in subsequent builds via the Docker build cache.
For a deeper dive into the image layer format, see Building containers from scratch: Layers.
Understanding Docker build cache
The build cache reuses image layers and metadata to make builds faster. When you rebuild an image with no or minimal changes, the builder reuses work from the previous build. When developers use the term layer caching, they're referring to the process of creating and then reusing image layers.
About caching
Caching, in memory on your computer or in databases like Postgres, uses temporary fast storage for frequently accessed data. Cached data is ready to grab quickly. The build cache works a little differently. The build cache tracks changes so that the builder can reuse work it has already done. The image itself stores the layers. This means less redundant work and faster subsequent builds.
By the way, If you want to learn a ton about caching concepts in a fun, interactive way, see Planetscale’s post about Caching.
How Docker build cache works
When you rebuild an image, the builder steps through the Dockerfile instructions in order, just like it did for the first build. But now, instead of executing each instruction, the builder checks instructions against the current image layers and metadata.
The build cache works across builds like this:
- First build of the image: The builder does the work (copying files, running commands). The build cache keeps track of the work.
- Subsequent builds of the same image: The builder uses the build cache to check whether anything has changed from the previous build:
- No change: Reuse the previous work.
- Change: Redo the work from that point forward (cache invalidation).
Here’s an illustrated example of how build cache works across builds:
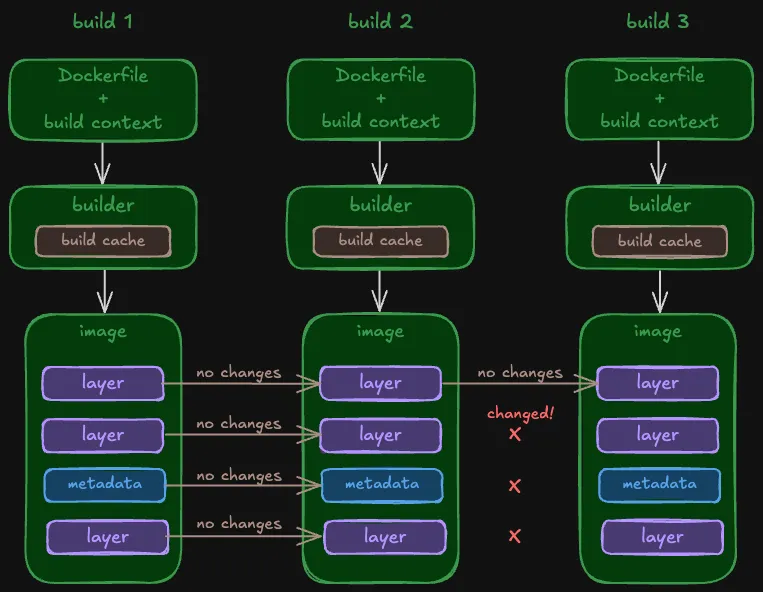
If an instruction matches the previous image, then the builder skips execution and continues to the next step. When all the instructions match, nothing needs to be rebuilt. The builder just creates a new image config that references and reuses the layers of the previous image.
If an instruction doesn’t match the image, then the builder executes the instruction and creates a new layer or updates the image config with the new metadata. The first changed instruction invalidates the cache.
Cache invalidation in-depth
Cache invalidation means the builder can’t reuse layers and has to redo the work. This is because layers are immutable; they can’t be updated. The builder invalidates the cache when it reaches an instruction in a Dockerfile that’s changed from the previous build.
The first changed instruction invalidates the cache for that instruction and all the instructions that follow it in the Dockerfile. Cache invalidation works like this because each layer contains only what changed from the previous step. Each layer depends on the previous layer to create a coherent final filesystem to run in a container.
Cache invalidation doesn’t mean your build fails. The build continues, but the builder must execute commands, create layers, and store metadata from scratch for the changed instruction and everything that follows.
The build cache behavior differs depending on the Dockerfile instruction. The following sections explain some of the behaviors that might not be obvious at first.
Cache invalidation for configuration-only instructions
Some Dockerfile instructions, including ENV, EXPOSE, WORKDIR, and CMD, only add or change metadata in the image configuration, and don’t create filesystem layers.
The builder invalidates the cache for these instructions when the instruction string changes. For example, changing ENV NODE_ENV=development to ENV NODE_ENV=production invalidates the cache. If the instruction string is unchanged, the builder reuses the metadata from the previous build.
Cache invalidation for ADD and COPY instructions
ADD and COPY instructions move files into an image. The builder calculates a cache checksum from all the files to determine if it can reuse the layer. If any file changes, the builder invalidates the cache at that step.
One file change that doesn’t affect the cache is modification time (mtime). The builder doesn’t consider a change to only mtime as an invalidating change.
Cache invalidation for RUN instructions
The build cache behavior for RUN instructions can be surprising at first. The builder checks for changes to only the RUN instruction string. The builder doesn’t check for changes to the external references fetched by the instruction.
For example:
- January 1: You build an image for the first time. A
RUN apt-get updateinstruction fetches the current package list and the build cache caches the layer. - January 9: New security packages released.
- January 10: You rebuild the image. The build cache shows the
RUN apt-get updateinstruction is unchanged. The builder reuses the cache layer with the package list from January 1st instead of fetching the new security packages.
External references can include resources fetched by OS package managers like apt or apk, direct downloads, and git clones.
To force the builder to fetch fresh external resources, you need to invalidate the cache before or at that RUN instruction. Common approaches for "cache busting" include:
- Use build arguments that change between builds. Add an
ARGto define an argument before theRUNinstruction and update the argument when you build:docker build --build-arg INVCACHE="new string". - Add a comment with a date or version number to the end of the RUN instruction string.
- Combine
apt-get updateandapt-get installin a single instruction to ensure thatupdatealways runs when you change the installed packages. You can also include the package version in the instruction to invalidate the cache when versions change. For example:RUN apt-get update && apt-get install -y package=1.2
To start over completely, build with the --no-cache option to skip all cached layers. For more details, see Build a Docker image with no cache.
Note: A RUN instruction with bind mounts is the exception to this rule. For RUN instructions with bind mounts, the builder calculates a cache checksum from the mounted files to determine whether cache is valid just like it does for ADD and COPY instructions. We’ll cover this later in Bind mounts and cache invalidation.
Where the builder stores build cache
By default, the builder stores the build cache and images locally on your computer.
You don't need to access the cache directories directly because the builder handles cache storage and retrieval for you. Although you can access and retrieve data through Docker commands like docker inspect and docker save.
When you delete an image, the cache retains layers still in use by other images. To clear old cache data, see Manually clear the build cache.
For CI/CD pipelines or builds across multiple machines, the builder supports exporting cache to remote storage. For details on remote caching options, see Cache storage backends in the Docker docs.
Optimizing Docker image builds for reuse
When you optimize your Docker image build to make efficient use of the build cache, you make the first and subsequent builds faster. The following sections provide an overview of optimizations that impact the build cache.
For more ways to optimize your Docker builds, see How to speed up your Docker builds and How to reduce your Docker image size.
Use a logical order in your Dockerfile
Now that you know how the build cache works, you probably have a good idea why the order of instructions in your Dockerfile matters. Always order your Dockerfile instructions from least to most likely to change to make sure the builder can reuse the maximum number of layers before cache invalidation.
A best practice for faster builds, especially for languages like JavaScript and Python, is to install dependencies before copying source code.
For Node.js:
COPY package*.json .  # copy package.json
RUN npm install       # install dependencies
COPY . . # copy source codeFor Python:
COPY requirements.txt .             # copy requirements.txt
RUN pip install -r requirements.txt # install dependencies
COPY . . # copy source codeWhy does moving dependencies earlier in the Dockerfile have such a huge impact on your build speed? This optimization works because:
- Dependencies change less frequently than source code
- Installing dependencies is slow
Minimize build context and image layers
To keep builds fast and layers small, you should only give the builder access to the files it needs and only COPY the required source code files into your Docker image layers.
To start, you should always begin with the smallest possible build context to limit the number of files that might change between builds and avoid cache invalidation.
The build context consists of all the files that the build can access. You specify the build context in the docker build or depot build command, usually as a directory path or a remote URL to a repository or file.
In many examples, you’ll see the build command specify the current directory (.) as the build context, which makes the entire current directory available to the builder:
docker build -t example-app:latest .If you use the current directory as your build context, make sure it doesn’t include unnecessary files.
Exclude unnecessary files with .dockerignore
You can probably think of a few files in your working directory or repository that aren’t needed at build time (when the builder creates the image) or at run time (when your app runs in a container).
You should use a .dockerignore file to exclude files from the build context. Exclude files the builder doesn’t need and exclude artifacts that will get generated during the build anyway.
For a Node.js app, the .dockerignore might look like this:
node_modules    # Dependencies rebuilt during build (can be huge)
.git            # Version control (not needed for image, also potentially huge)
.gitignore      # Git config (not needed for image)
README.md       # Documentation (not needed for image)
dist/* # Build artifacts rebuilt during buildIn addition to creating smaller layers, excluding files with a .dockerignore file helps avoid invalidating the cache because it prevents copying unwanted changed files into the layers.
Use multi-stage builds to limit the impact of cache invalidation
Multi-stage builds have quite a few benefits:
- Dockerfiles are more organized and easier to maintain
- Build times are faster because of parallelization.
- Image sizes are smaller
- The build cache is more efficient
We won’t get into all the details of how multi-stage builds are different from the linear builds you learned about at the beginning of this post. But here’s the short version of how to organize multi-stage builds and make the build cache more efficient:
- Organize the build into stages, with each stage having a specific purpose. It’s a common practice to have a stage for building the application (build time) and another for building the image (run time).
- Each stage starts with a FROM instruction.
- Changes in one stage of the build don’t automatically invalidate the cache in other stages that follow.
The important part for the cache when you use stages to separate build time and run time dependencies is that you can update your build-time environment without invalidating other layers.
Learn more about Docker multi-stage builds and see our optimal Dockerfiles for examples.
Build a Docker image without using the cache
So far you’ve learned how beneficial the build cache is for optimizing your builds. Why would you want to build without it?
Maybe you’re debugging an issue and need to start from scratch. Or you need to force Docker to update the cache for an external resource. Or you’re following the Docker best practice to rebuild your image often to keep it up-to-date and secure.
To build an image without using the build cache, use the --no-cache option:
docker build --no-cache .For multi-stage builds, to ignore the build cache for one or more stages in the build process, use the no-cache-filter option:
docker buildx build --no-cache-filter stage2 .For more about rebuilding your image, see Docker build with no cache.
Advanced features for cache optimization
The builder includes caching features beyond the standard build cache to get smaller images and faster builds: bind mounts and cache mounts.
Bind mounts and cache mounts provide different ways for the builder to access files during the build via a RUN instruction, without including those files in an image layer.
Bind mounts for temporary file access
Use bind mounts to optimize caching when your build needs temporary access to source code to generate an artifact for the final image.
Pair a bind mount with a RUN instruction to make files from your build context temporarily available to only that RUN instruction without adding those files to an image layer. Bind mount targets must exist in your build context. They’re read-only, and ephemeral; the builder unmounts bind mount targets when the RUN instruction completes.
Note: You can also use bind mounts when you run a container with docker run to share files between your host and the container (but running containers isn't the focus of this post).
Bind mounts are especially useful for optimizing build cache in builds for compiled languages.
For Go or Rust projects for example, you only need the compiled binary in your final image, not all of the source code. You can use a bind mount to temporarily give the builder access to the source code to compile the binary, without including all those source files in the layer. Here’s an example for Go:
# Instead of:
COPY . .			    	# adds source code to an image layer
RUN go build -o /app 		# compiles binary from source code

# Use a bind mount to temporarily include the source code for the go build command:
RUN --mount=type=bind,target=. go build -o /appInstead of a COPY instruction followed by a RUN in your Dockerfile, you mount the target directory with your source code to the RUN instruction. And you just avoided adding a large unnecessary layer to your image.
Bind mounts help make builds faster, reduce cache invalidation from source code changes, and result in a smaller image size.
Bind mounts and cache invalidation
Unlike regular RUN instructions, when you use a bind mount, the builder calculates a cache checksum from the metadata of the mounted files. If any file changes, the builder invalidates the cache at the RUN step.
The cache invalidation behavior for RUN instructions with bind mounts is the same as for ADD and COPY instructions.
Cache mounts for persistent storage
Use cache mounts to create a persistent cache for tools, like package managers, that can validate their own cache.
Cache mounts let you specify a persistent cache location, separate from the image layers, that the builder can read and write to multiple times across builds.
Unlike the regular build cache that invalidates when instructions or related files change, cache mounts persist while the package manager uses its own validation logic to determine which packages can be reused.
Package manager cache example: npm
Our optimal Dockerfiles for Depot use cache mounts to persist the package manager's cache outside of the Docker build cache. When dependencies change, the package manager needs to download only the new or updated packages.
Just like with bind mounts, you pair the cache mount with a RUN instruction. Here’s an example from a Dockerfile for a Node.js app that uses the npm package manager:
RUN --mount=type=cache,target=/root/.npm \
npm ci --no-audit --no-fundThe --mount=type=cache,target=/root/.npm option tells the builder to mount a cache at npm's cache directory that persists across builds. When dependencies change, npm reuses unchanged packages from this cache instead of downloading everything all over again.
Package manager cache example: Go modules
Cache mounts are useful for multi-stage builds because the mounted cache makes the same dependencies available across build, test, and other stages. The following Dockerfile excerpt shows a cache mount for a Go app:
FROM base AS test
RUN --mount=target=. \
    --mount=type=cache,target=/go/pkg/mod \
go test .The --mount=type=cache,target=/go/pkg/mod option tells the builder to mount a cache for Go modules that persists across builds. Each stage that requires dependencies can access the Go modules cache and reuse unchanged packages.
Note: Cache mounts persist across builds on the same builder instance, but aren’t automatically shared between builder machines or CI/CD runs unless configured to do so.
Cache mounts improve build performance because the builder doesn’t need to re-download dependencies. Learn more about using cache mounts to speed up your builds and using cache mounts in continuous integration (CI).
Free up more disk space from Docker
When you use Docker often, unused images, containers, and volumes accumulate and need tidying up.
Check current disk usage
The first step is to run docker system df to get a summary of disk space each kind of object is using and how much can be reclaimed. Here’s what that summary looks like:
$ docker system df
TYPE            TOTAL     ACTIVE    SIZE      RECLAIMABLE
Images          138       34        36.18GB   34.15GB (94%)
Containers      74        18        834.8kB   834.6kB (99%)
Local Volumes   118       6         15.31GB   15.14GB (98%)
Build Cache 245 0 1.13GB 1.13GBOnce you know what’s reclaimable, you can use the Docker prune commands for the various objects to free up lots of disk space.
To learn how to use all the Docker prune commands for cleaning up non-cache objects, see How to clear Docker cache and free up space on your system.
Build cache garbage collection
The builder runs garbage collection periodically in the background to automatically prune the cache. Default garbage collection policies define when and how the builder cleans up unused cache or cache that exceeds the build cache size limit. Docker lists the default garbage collection policies in their Build garbage collection docs.
If you’re managing large-scale builds or using self-managed builders, consider customizing your garbage collection policies, since you’ll likely need more frequent collection or a larger build cache size limit.
Manually clear the build cache
Docker has a prune command for everything, including the build cache. The docker buildx prune command options can help you customize your clean up. Here’s a round-up of common commands.
Remove only intermediate layers that aren’t referenced in any builds (also known as “dangling” layers):
docker buildx pruneRemove all unused build cache:
docker buildx prune --allSpecify a builder other than the current builder and remove dangling layers from the cache:
docker buildx --builder builder-name pruneTo specify a timespan after which you want to remove cache, use the --filter option with an until flag. This command removes cache older than 2 days:
docker buildx prune --filter until=48hTo free up space but reserve a specific amount for your most recent work, use the --keep-storage option. This command keeps 10GB of the most recently used cache and deletes the rest:
docker buildx prune --keep-storage 10GBFor details about the options and flags to help you customize your cache pruning activities, see the docker buildx prune reference documentation.
How Depot optimizes Docker cache
Even with an optimized Dockerfile and advanced caching, default build cache only helps on the machine where you built the image. When you build in different environments, whether that’s your CI/CD pipeline or your teammate’s machine, you start over.
Depot container builds keep your build cache on fast storage near where your builds run, so you don't need to transfer cache over the network between builds. The cache persists automatically and is shared across your entire team and your CI builds.
Anywhere you run docker build, you can switch to depot build and share cache across machines and environments.
What's next
You've built the foundation of your Docker build cache knowledge. Docker and the build cache are big topics and there's always more to explore:
- The complete guide to getting started with building Docker images
- Docker multi-stage builds explained
FAQ
How does Docker decide whether to reuse a cached layer or rebuild it?
The builder compares each Dockerfile instruction against the previous build. For metadata instructions like ENV or CMD, it checks if the instruction string changed. For COPY and ADD, it calculates a checksum from the files being copied. For RUN instructions, it only checks if the instruction string changed, not whether external resources it fetches have been updated. The first instruction that doesn't match invalidates the cache for that step and everything after it.
Why does changing one file in my COPY instruction rebuild all subsequent layers?
Each layer in a Docker image stores only what changed from the previous layer, and every layer depends on the previous
layer to create the final filesystem. When the builder invalidates the cache at a COPY instruction because a file
changed, it has to rebuild that layer and all following layers from scratch because those layers were built on top of
the now-outdated layer. This is why instruction order matters so much for cache efficiency.
When should I use bind mounts versus cache mounts in my Dockerfile?
Use bind mounts when you need temporary read-only access to source code during a RUN instruction without adding
those files to an image layer. This is perfect for compiled languages where you only need the binary in the final
image. Use cache mounts when you want persistent storage for tools like package managers that can validate their own
cache. Cache mounts persist across builds and let the package manager determine which cached items are still valid,
even when dependencies change.
Why does my RUN apt-get update instruction not fetch new packages after I rebuild?
The builder only checks if the RUN instruction string changed, not whether the external resources it fetches have been updated. If the instruction text is identical to the previous build, the builder reuses the cached layer with the old package list. To force fresh external resources, you need to invalidate the cache by changing the instruction string, adding a build argument, or building with the --no-cache option.
Related posts
If you’re looking for more about remote cache and Docker images in production, check out the following posts:
- How to use Docker layer caching in GitHub Actions
- How to use BuildKit cache mounts in CI providers
- Faster Gradle builds with remote cache
- Go 1.24 remote caching explained
- Guide to faster Rust builds in CI
