Multi-stage Docker image builds ultimately result in faster builds, while also making Dockerfiles clearer and more manageable. Let’s have a look at how exactly multi-stage builds work and what the best practices are when using them.
Multi-stage Docker builds 101
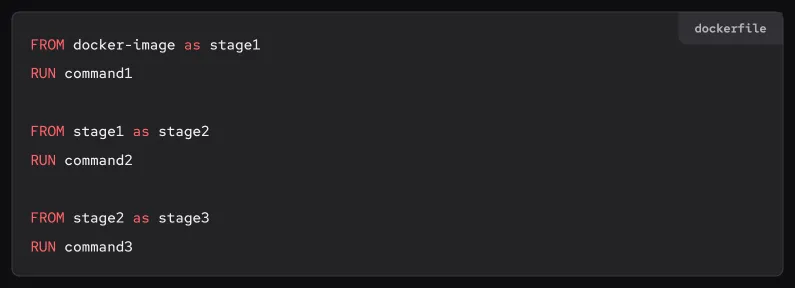
A Dockerfile can consist of multiple build stages, each of which can contain one or more steps. A stage starts with a FROM statement and continues until you reach another FROM statement. A multi-stage build happens when you build a Dockerfile with multiple stages defined in it.
It's worth noting that the steps within a stage run in a linear order, as written in the Dockerfile, but the order in which stages run may not be linear. To determine the order in which stages will be run, BuildKit (the build engine Docker uses internally) detects dependencies between stages.
To determine the stage that another stage depends on, we can look at the word after the FROM keyword. In the example above, FROM docker-image as stage1 means that the stage1 stage depends on the Docker image from Docker Hub, and FROM stage1 as stage2 means that the stage2 stage depends on the stage1 stage. It's possible to chain many stages together in this way.
As we already mentioned, Docker will determine the dependencies between each stage in the build process. If two stages can be run in parallel, they will be. Stages are a great way to break your Docker image build up into parallelizable sections — for example, you could install your dependencies, and then build an application server and an application client in parallel with the dependencies already installed:
FROM docker-image as stage1
RUN commands-that-builds-dependencies

FROM stage1 as stage2
RUN command-that-builds-app-server

FROM stage1 as stage3
RUN command-that-builds-app-clientWe discuss this approach in more detail below.
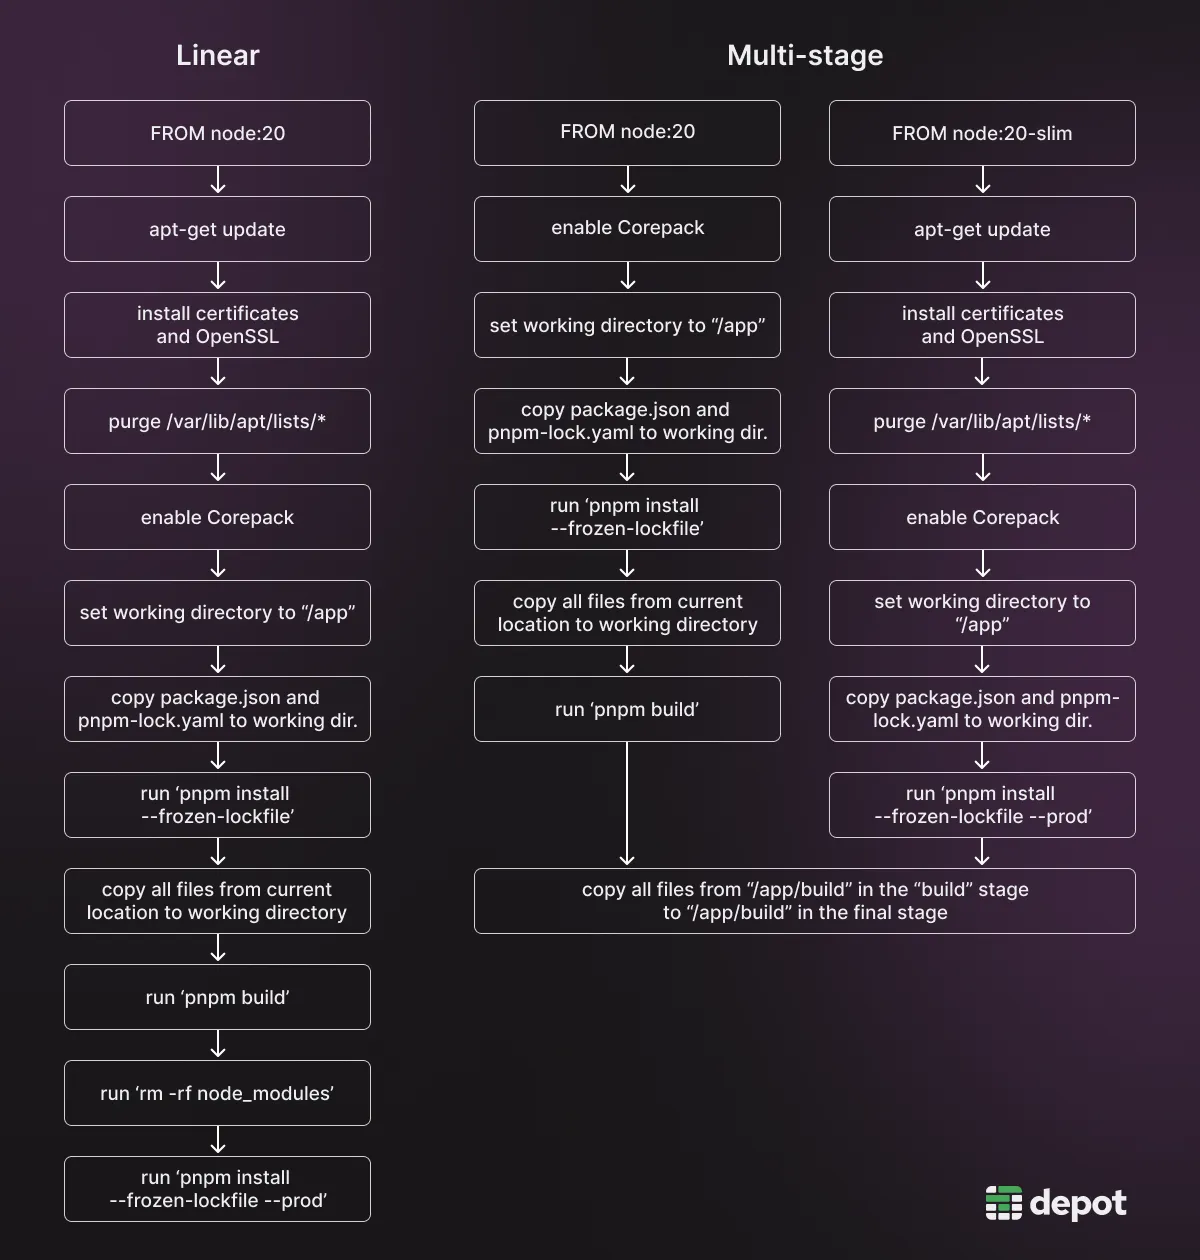
Linear Dockerfile vs. multi-stage Dockerfile side-by-side
Here’s an example of a linear Dockerfile for building and running a Node.js application and its multi-stage variant:
Linear
FROM node:20
WORKDIR /app
COPY . .
RUN npm install
RUN npm run build
CMD ["node", "./index.js"]Multi-stage
FROM node:20 AS base

FROM base AS deps
WORKDIR /app
COPY package.json package-lock.json ./
RUN npm install --production

FROM base AS build
WORKDIR /app
COPY . .
RUN npm install --dev
RUN npm run build

FROM base
WORKDIR /app
COPY --from=deps /app/node_modules ./node_modules
COPY --from=build /app/dist ./dist
CMD ["node", "./index.js"]In the multi-stage version, we split the build into three stages: install dependencies, build, and “run,” although the “run” stage is unnamed — that’s the naming convention for the final stage in a Dockerfile.
The outcome of both Dockerfile variants is the same: at the end, we get an image that runs the node ./index.js command. However, the linear approach builds everything serially in one stage, while the multi-stage approach builds two stages in parallel.
In this specific example, the multi-stage build will be faster, as we’ve split the single npm install step into two and are running them in parallel (each in its own stage). In addition, developers may find the multi-stage Dockerfile structure clearer as it’s explicit about the dependencies needed in each stage.
Note the COPY statements that copy directories into the final image from previous stages. The way Docker keeps track of dependencies between build stages is actually in graph form, and a command like COPY --from="stage-name" creates a node in the dependency graph. Docker will therefore run everything in the final stage up until the COPY statements, and will then wait for the other stages being built in parallel to finish before it can do the copying of the relevant directories.
Benefits of multi-stage Docker builds
The key reasons why developers might want to use multi-stage builds over linear builds are: clarity and maintainability, parallelization and performance, and better layer caching.
Using multi-stage builds can increase clarity and maintainability of Dockerfiles

A single linear Dockerfile can be challenging to understand, especially if comments are sparse and if there are numerous commands needed to build the final container.
Breaking a Dockerfile into multiple stages can make it clearer what each part of the Dockerfile is for, where a specific section starts and ends, and what the dependencies are between different sections.
This additional clarity is particularly important with complex Dockerfiles that multiple people may work on, but is also helpful for smaller teams that move fast.
Multi-stage builds use parallelization to reduce build times
If structured correctly, a multi-stage build will be faster than a linear build because the stages are run in parallel. Even if the speedup from switching from a linear build to a multi-stage build for a single developer is small, the speed improvements will add up when builds are run multiple times in your CI system. Shaving 10% off the total build time by using parallelization might save hours of developer time for the entire team.
Dependency installation is one of the actions that can be extracted into its own stage(s) for almost all builds, regardless of the programming language and toolchain used, which would achieve at least some parallelization. So it’s very likely that your Docker builds can become faster through the use of multiple stages.
Multi-stage builds can reduce the final container image size
Each instruction in a Dockerfile creates a layer in the final image. Think of these layers as building blocks, each adding new content on top of the previous layers.
Multi-stage builds break up the build into smaller chunks to be built in parallel. When one of these chunks is, say, a dependency installation stage, it is a best practice to use a COPY step to copy the resulting dependencies folder from a layer in the dependency installation stage into a layer in your final image.
By using COPY, you’re only copying the contents of your dependencies folder into your final image, and the rest of the layers in other stages where the dependencies were getting built aren’t included, making your final image smaller in size.
Multi-stage builds facilitate better use of Docker layer caching
The layer cache allows Docker to reuse the layers that have already been built previously and that don’t need to be updated, saving you the time that would be needed to build those layers from scratch.
While linear builds can also take advantage of the cache, the use of multi-stage builds makes it more likely that you’ll use the cache more efficiently. Smaller layers (as we mentioned above) can mean more cache hits, which will help speed up your Docker builds.
In addition, multi-stage builds allow fine-grained caching for each stage and limit the impact of cache invalidations.
Best practices for getting the most out of multi-stage Docker builds
While multi-stage builds can be beneficial when it comes to clarity, build times, and caching, you won’t automatically get those benefits — you need to do some work to structure your Dockerfiles to take maximum advantage of multi-stage builds. Here are a few tips.
Separate build-time dependencies from runtime dependencies by creating separate stages for them
When using multiple stages, you can separate the dependencies you use at run time (likely fewer) from those that you need at build time (likely more). To achieve this, you can follow the examples we provided above and have:
- a dependencies stage that builds all necessary dependencies, some of which might not be necessary at run time but are required at build time;
- a final stage that copies only the necessary dependencies into the production image.
The resulting image will be more compact than if it contained all dependencies, including the ones not necessary at run time.
Use stages to reduce duplicate work and keep Dockerfiles DRY
When using multi-stage builds, you can extract common steps into a “base” stage, or multiple base stages, to keep things DRY and reduce duplicate work. We show how to do this in our best-practice Rust Dockerfile. Here, the base image includes the cargo-chef dependency, and the other stages can then start with this image, rather than having to install the dependency in each stage:
FROM rust:1.75 AS base
RUN cargo install --locked cargo-chef sccache
ENV RUSTC_WRAPPER=sccache SCCACHE_DIR=/sccache

FROM base AS planner
WORKDIR /app
COPY . .
RUN cargo chef prepare --recipe-path recipe.json

FROM base as builder
WORKDIR /app
COPY --from=planner /app/recipe.json recipe.json
RUN --mount=type=cache,target=/usr/local/cargo/registry \
--mount=type=cache,target=/usr/local/cargo/git \
--mount=type=cache,target=$SCCACHE_DIR,sharing=locked \
cargo chef cook --release --recipe-path recipe.json
COPY . .
RUN --mount=type=cache,target=/usr/local/cargo/registry \
--mount=type=cache,target=/usr/local/cargo/git \
--mount=type=cache,target=$SCCACHE_DIR,sharing=locked \
cargo buildUse parallelization to speed up Docker builds
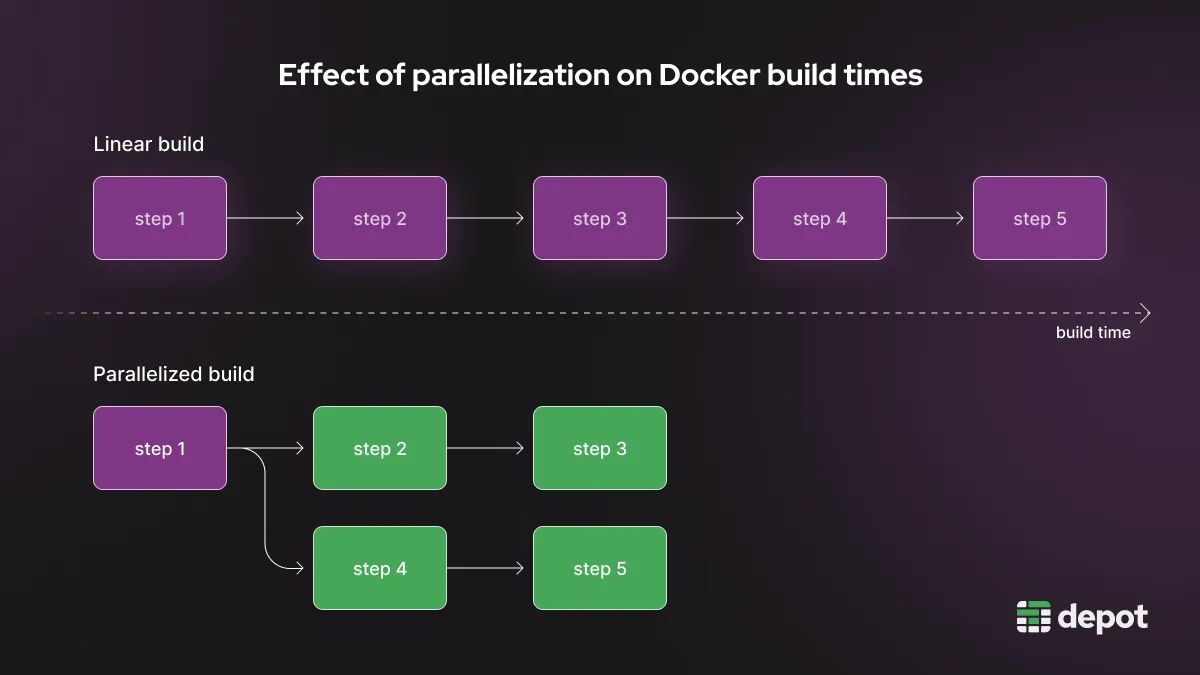
We already mentioned above that splitting a single stage into multiple stages enables BuildKit to run certain steps of the build in parallel, reducing the total build time. You can see in more detail how that happens in our BuildKit in depth article.
One of the illustrations we showed there is this difference between a linear Dockerfile and a multi-stage one:
You can see that, thanks to parallelization, the build will complete in less time overall. This effect can be quite pronounced if you structure the stages to do the most work independently and minimize dependencies between stages.
Take advantage of multi-stage builds in CI
Multi-stage builds can be particularly useful in continuous integration (CI) environments: if you’re building images repeatedly — perhaps multiple times a day — then the time savings you can get from parallelization and improved caching can be significant. To use multi-stage Docker builds in CI, you need to make sure that your CI supports BuildKit, and that BuildKit is turned on for your build, if the provider requires doing that explicitly. We discuss CI providers and their level of BuildKit support in our Best CI for Docker article, in case you’re looking for more detail.
Another consideration in CI is the Docker layer caching availability and cache size. Most cloud-based CI providers, such as GitHub Actions and CircleCI, use ephemeral machines for CI builds, meaning that the Docker layer cache is not automatically persisted between your CI builds. Some CI providers offer caching functionality, so make sure to configure that if it’s available with your provider.
Depot makes running multi-stage Docker builds a breeze
Depot makes it straightforward to run multi-stage Docker builds, both locally and in CI, with no additional configuration required. You can focus on writing the best possible Dockerfiles and let us build them efficiently for you.
Depot is a remote Docker build service that can build container images up to 40x faster. We run an optimized version of BuildKit on cloud VMs with automatic persistent layer caching backed by NVMe SSDs.
In addition to multi-stage Docker builds, Depot supports native multi-platform builds as well — meaning that you can build for multiple architectures, such as Intel and ARM, in parallel and without emulation.
Try Depot today.
FAQ
What are Docker multi-stage builds?
A multi-stage build uses multiple FROM statements in a Dockerfile, where each FROM starts a new stage. Stages can contain multiple steps that run linearly, but BuildKit detects dependencies between stages and runs independent stages in parallel. For example, you can split dependency installation and application building into separate stages that run simultaneously.
Why should I use multi-stage builds instead of a linear Dockerfile?
Multi-stage builds offer three main benefits: they make Dockerfiles clearer and more maintainable by separating concerns, they enable parallelization which speeds up builds, and they reduce final image size by letting you copy only what you need from build stages into the final image. Even a 10% speedup adds up when builds run multiple times in CI.
When should I use multi-stage builds?
Use multi-stage builds when you can split your build into parallelizable sections, like separating dependency installation from application building. They're especially valuable in CI environments where builds run repeatedly, or when you have build-time dependencies that don't need to be in the final image. If your Dockerfile is simple and linear, a single-stage build may be simpler.
How does BuildKit know which stages to run in parallel?
BuildKit creates a dependency graph by looking at FROM statements and COPY --from commands. If stage2 uses FROM stage1, then stage2 depends on stage1. Stages without dependencies between them run in parallel. For maximum parallelization, minimize dependencies by having multiple stages depend on a common base stage rather than chaining stages sequentially.
Related posts
- The ultimate guide to Docker build cache
- How to build ARM and multi-architecture containers today
- Build Docker images faster using build cache
- The best CI provider for fast Docker builds
