In this post, we'll explore how to configure Gradle to leverage a remote cache. We'll start by walking through how remote caching works in Gradle. Then, we'll take a look at the prerequisites and setup required to enable remote caching in your Gradle project. Next, we'll dive into some of the limitations of Gradle's remote cache. Finally, we'll discuss how to optimize your Gradle builds using a remote cache service like Depot Cache.
Why remote caching is important
The benefits of caching are well understood in the context of CI/CD pipelines. If you're using something like GitHub Actions and the actions/cache action, you're likely already saving and restoring your Gradle build cache. In CI, the runners are ephemeral, so saving and loading your build cache will help you avoid building your project from scratch in subsequent runs. But unfortunately that build cache must travel over the network, which can be slow, especially in GitHub Actions.
This CI build cache is also locked within the CI provider and inaccessible from your local machine. This means that every time you switch branches, or pull down changes, you're building those changes from scratch. This can be a huge waste of time, especially on large projects.
What if we could share build artifacts across all environments, local development and CI alike? This is what a centralized remote cache for Gradle outside of your CI cache gives you. Every build, regardless of where it runs, contributes to this shared cache, so you'll see faster builds across the board.
How incremental builds in Gradle work
At it's core, Gradle's build cache saves you time by reusing outputs produced by previous builds. The cache can exist locally on your laptop or remotely (as we will see shortly), and Gradle will read and write to it as it executes a build.
Like most build tools, Gradle works off of a DAG (Directed Acyclic Graph) to know what needs to be built and even what tests need to rerun because an artifact has changed.
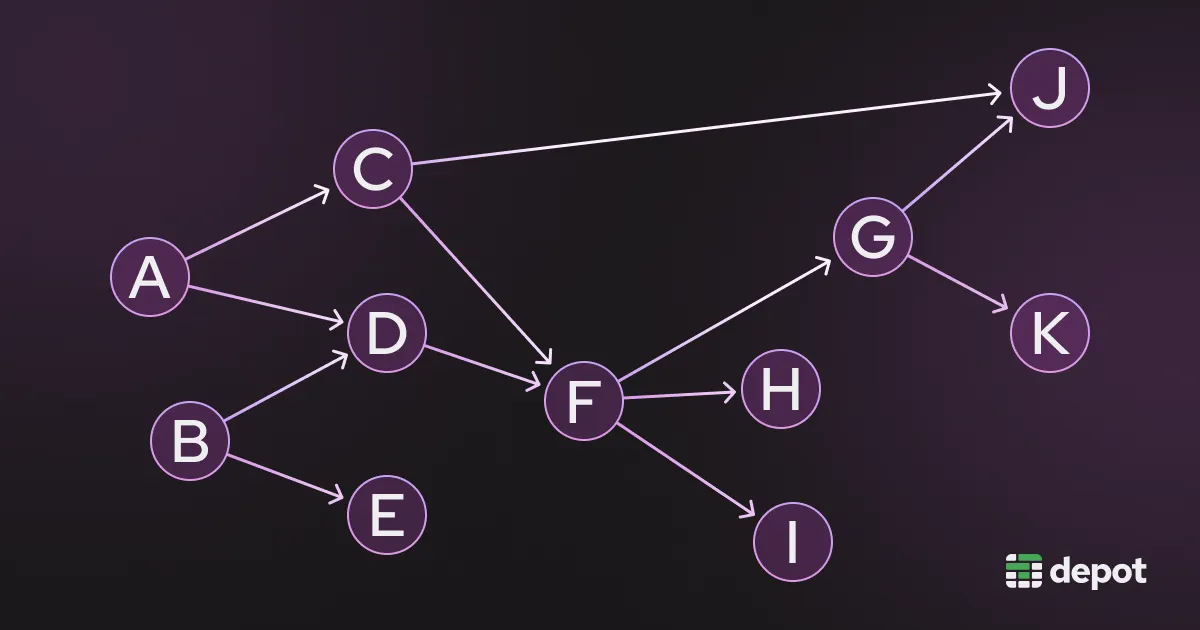
The DAG is a representation of the tasks that need to be executed to build your project, structured in a way that ensures tasks are executed in the correct order, only once, and in parallel where possible.
Gradle's build system has three phases:
-
During the
initializationphase, Gradle detects the included projects and builds. It first looks at the settings file viasettings.gradle(.kts)and creates aSettingsobject. Then, Gradle createsProjectobjects for each project in the build. -
In the
configurationphase, Gradle actually starts constructing the DAG, or in Gradle terms, the task execution graph. -
During
execution, Gradle runs the tasks in the DAG.
At it's foundation, Gradle is built around the task execution graph. When a task is executed, Gradle will first check the cache to see if the task has previously been executed with the same inputs. If so, Gradle will reuse the cached output instead of running the task again.
Gradle has its own heuristics to decide whether a task has changed and thus whether its output is cached. To unlock perfectly incremental builds, Gradle needs our help to refine those heuristics by clearly specifying inputs and outputs for each task. If a task output depends on a task property, then it should be marked as an input. On the flip side, if a property doesn't change the output, then it should not be marked as an input.
Enabling remote cache in Gradle
By default, Gradle disables the build cache. You need to enable the build cache in one of two ways:
- Run your build with the
--build-cacheCLI flag, and Gradle will use the cache for that build only. - Add
org.gradle.caching=trueto yourgradle.propertiesfile to enable the cache for all builds.
To enable the remote cache, also known as the HTTP build cache, you need to add the following to your settings.gradle file:
buildCache {
    remote(HttpBuildCache) {
        url = 'https://your-remote-cache'
        // Optional: Set the cache credentials to authenticate with the cache
        credentials {
            username = 'build-cache-user'
            password = 'some-complicated-password'
        }
    }
}When Gradle needs an entry from the remote cache, it issues a GET request for the specified cache key. The cache server then needs to return a 200 with the cache entry in the body, or send back a 404 if that cache entry doesn't exist.
During a build Gradle can save entries to the remote cache by issuing a PUT request with the specified key. The cache server will then store the entry and return a 200 if successful.
Fully managed Gradle remote cache with Depot Cache
There are a number of ways that you can run your own Gradle remote cache server. But, running your own cache server can be a hassle. You need to manage the server, handle authentication, keep the artifacts secure, keep latency low, and more.
So we've built a fully managed remote cache for Gradle with Depot Cache.
With Depot Cache, you don't need to worry about managing your own cache server or dealing with authentication, security, and cache latency. Depot Cache handles all of that for you, so you can focus on writing code and building your projects. We deploy Depot Cache behind a global CDN so that you have fast cache access no matter where you or your CI runners are located.
Configuring Gradle remote cache to use Depot Cache locally
By default, our Depot GitHub Actions Runners come pre-configured with all of the settings to enable Gradle remote cache automatically for you. We also give you the option to disable that automatic configuration if you need to via our Organization Settings.
You can use Depot Cache for your local Gradle builds as well. To get started with Depot Cache, you need to sign up for an account and create a free trial organization. Once you have an organization, you need to generate an API token from your Organization Settings page.

Once you have an API token for Depot, you can configure your Gradle project to use Depot Cache by specifying your organization ID and API token in your settings.gradle file:
buildCache {
    remote(HttpBuildCache) {
        url = 'https://cache.depot.dev'
        enabled = true
        push = true
        credentials {
            username = 'DEPOT_ORG_ID'
            password = 'DEPOT_TOKEN'
        }
    }
}Conclusion
Build cache is what unlocks perfectly incremental builds. Gradle has this concept baked into the execution engine and makes it super easy to get started with it.
But local cache is isolated, and CI cache is ephemeral. By using Depot Cache, you can share build artifacts across all environments. This means that every build, regardless of where it runs, contributes to this shared cache, so you'll see faster builds across the board.
If you're looking to try out Depot Cache, you can sign up for a 7-day free trial and make your Gradle builds faster today.
