Note: This article was first published in 2023. It has been updated to reflect current information and developments.
In Docker layer caching for GitHub Actions, we covered using the existing layer cache is fundamental to speeding up Docker image builds. The less work we have to redo across builds, the faster our builds will be.
But, leveraging the cache is only one part of the equation for making docker build as fast as possible.
Another part of the equation is reducing the overall image size to improve build time. This post will look at reducing the overall image size to improve build time and the other benefits of keeping images small. We will use a popular open-source project, dive, to help analyze a Docker image, stepping through each individual layer to see what files it adds to the image and how it impacts the total image size.
Our example Docker image
We will use an example Node project with an ordinary Dockerfile someone may write when getting started. It has the following directory structure:
.
├── Dockerfile
├── LICENSE
├── README.md
├── depot.json
├── dist
│   ├── index.js
│   └── routes
├── node_modules
├── package.json
├── src
│   ├── index.ts
│   └── routes
├── tsconfig.json
└── yarn.lockThere is a src folder, a node_modules folder, a package.json file, a Dockerfile file, and a dist folder that contains the build output of yarn build. Here is an unoptimized Dockerfile for this project that we may write.
FROM node:20
WORKDIR /app
RUN apt-get update
RUN apt-get install -y build-essential gcc g++ python3 make cmake meson ffmpeg
COPY . .
RUN yarn install --immutable
RUN yarn build
CMD ["node", "./dist/index.js"]We often see Dockerfiles like this in the wild. However, if we build the image and then check its final size using the following commands, we see that the image size is 694 MB:
docker build -t example-image .
docker inspect example-image -f "{{ .Size }}" | numfmt --to si --format "%1.3f"
693.742MThat seems quite large for this example Node application and our Dockerfile above.
Why is my Docker image so large?
It's a common question once you start seeing eye opening image sizes for seemingly innocent Dockerfiles. Luckily, there are tools to help answer this question.
The open-source project dive is an excellent tool for analyzing a Docker image. It allows us to view each layer of an image, including the layer size and what files are inside.
We can use dive on the example-image we just built:
dive example-image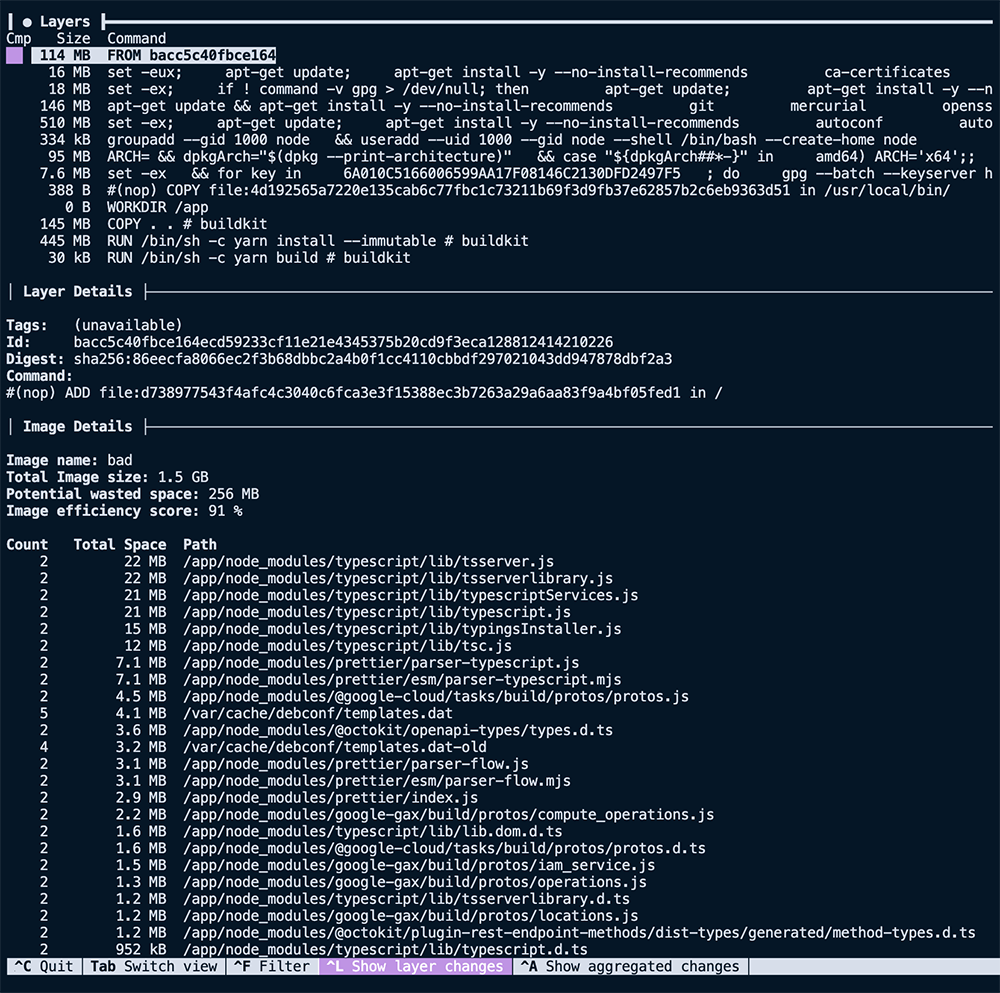
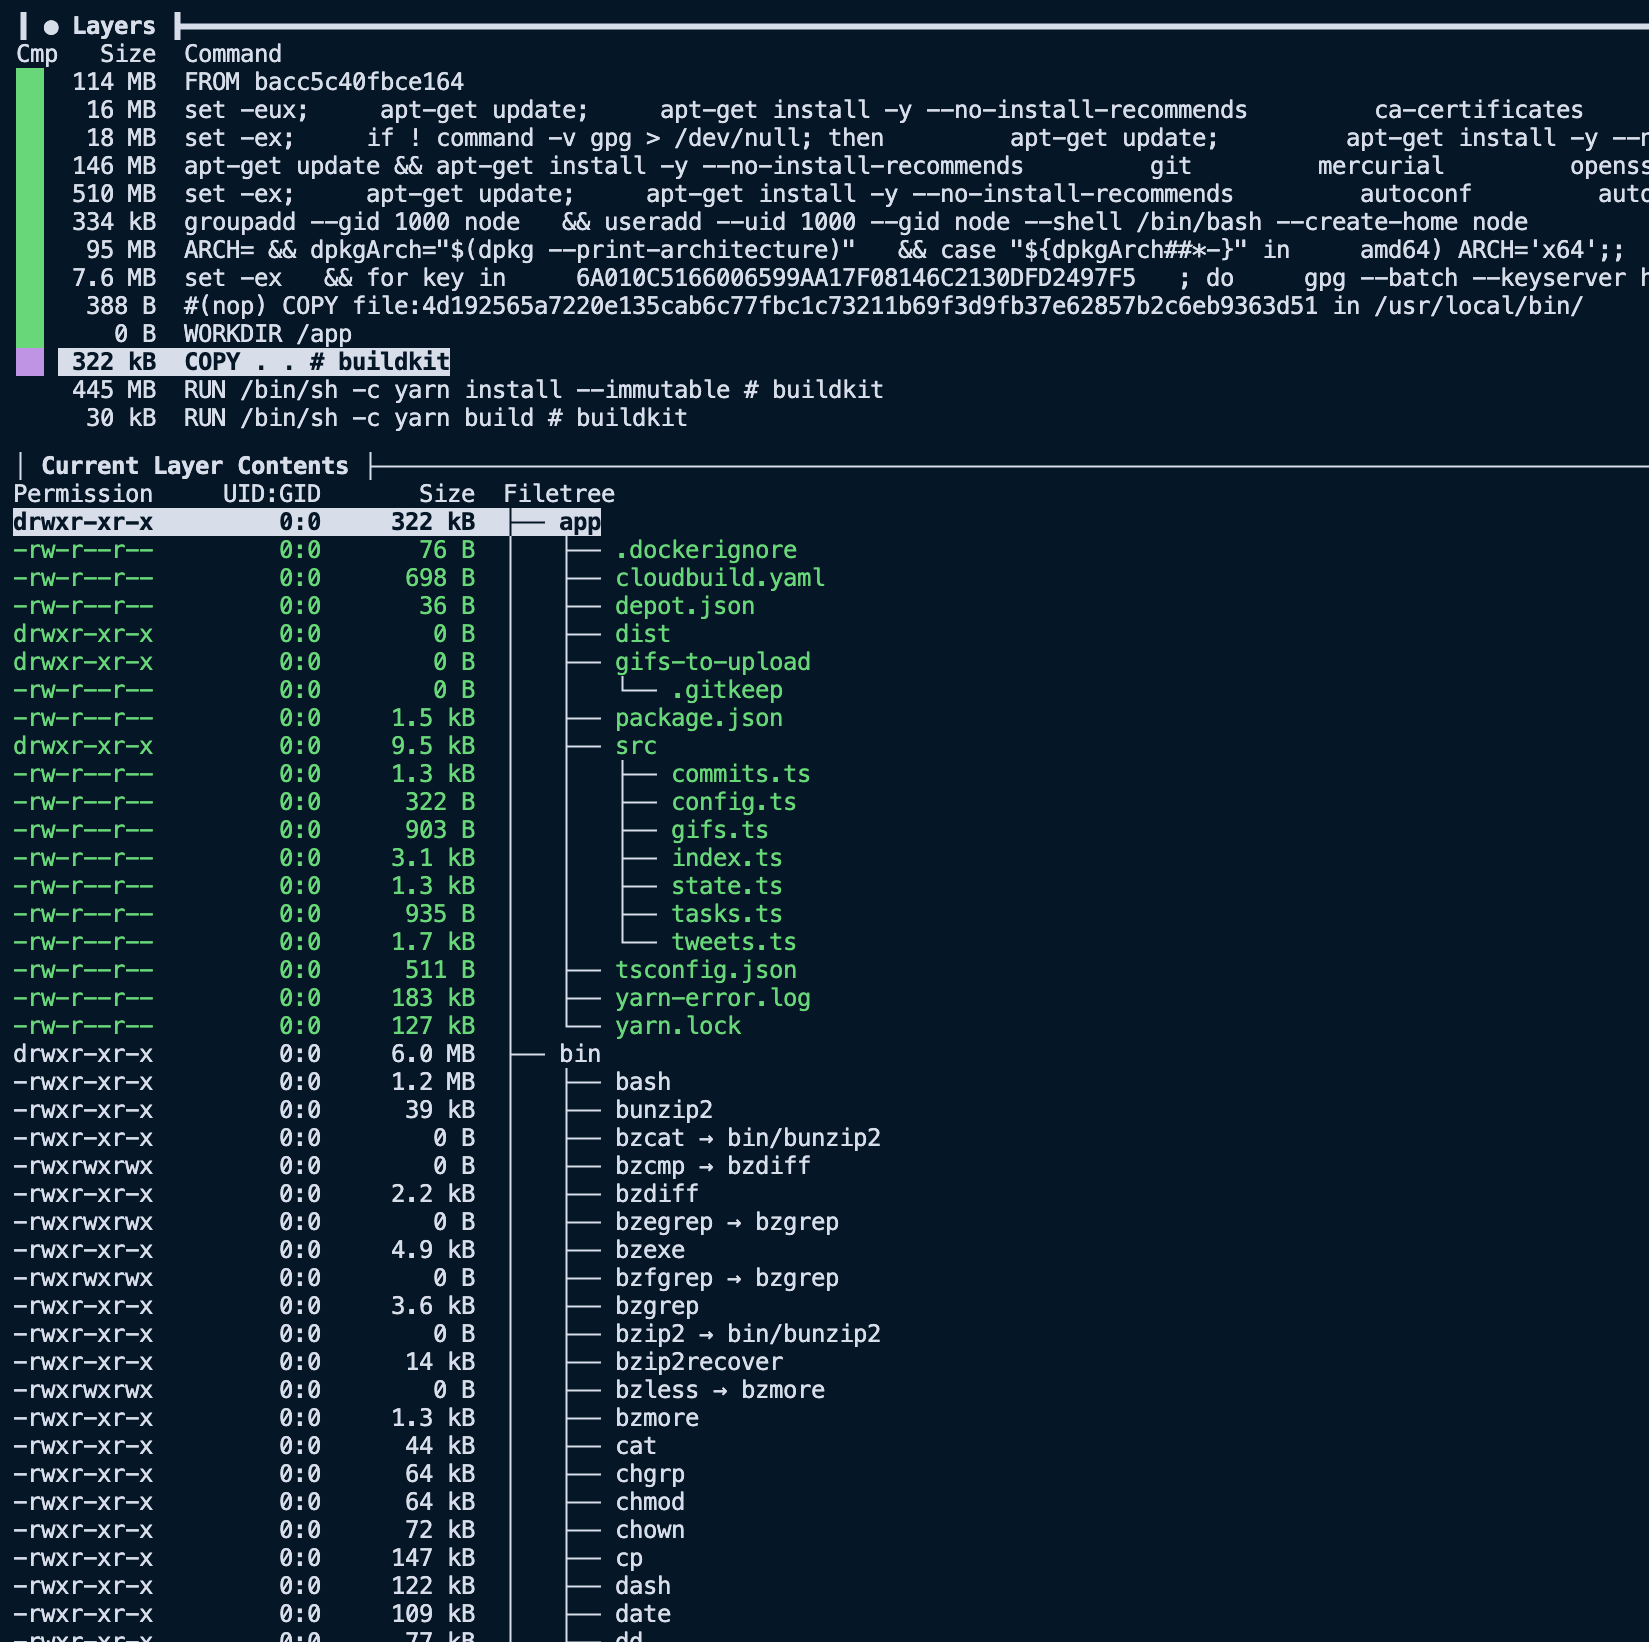
As seen above, the terminal UI of dive shows us the layers that make up the image on the left-hand side.
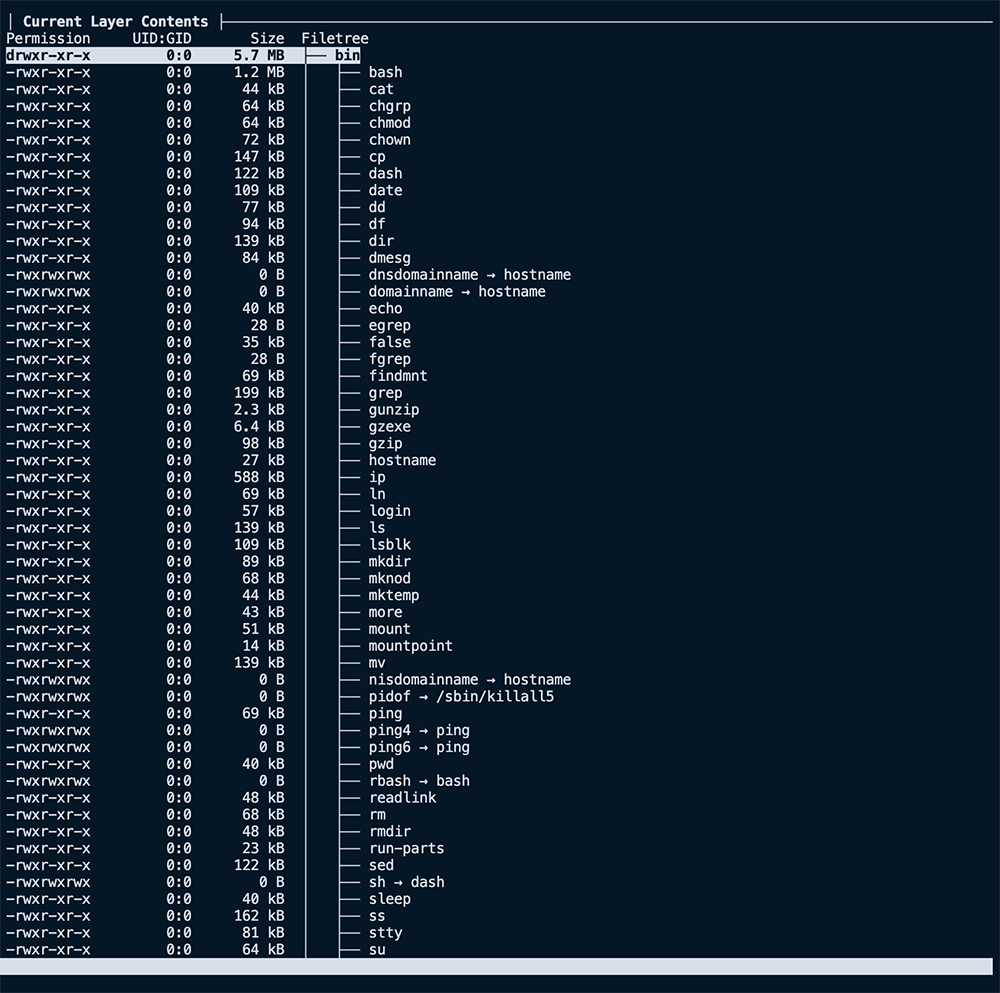
The right side, as seen here, shows us the filesystem of the selected layer. It shows what files were added, removed, or modified between the layer selected and the parent before it.
Our first image above shows that the first nine layers are all related to the base image, FROM node:20, for a summed size of ~1.1 GB. That's large but not surprising, considering we use the node:20 image as our base.
The next interesting layer is the eleventh one, where we COPY . ., it has a total size of 145 MB. Considering the project we are building, it is much larger than expected. Using the filesystem pane of dive, we can see the files added to that layer via that command.
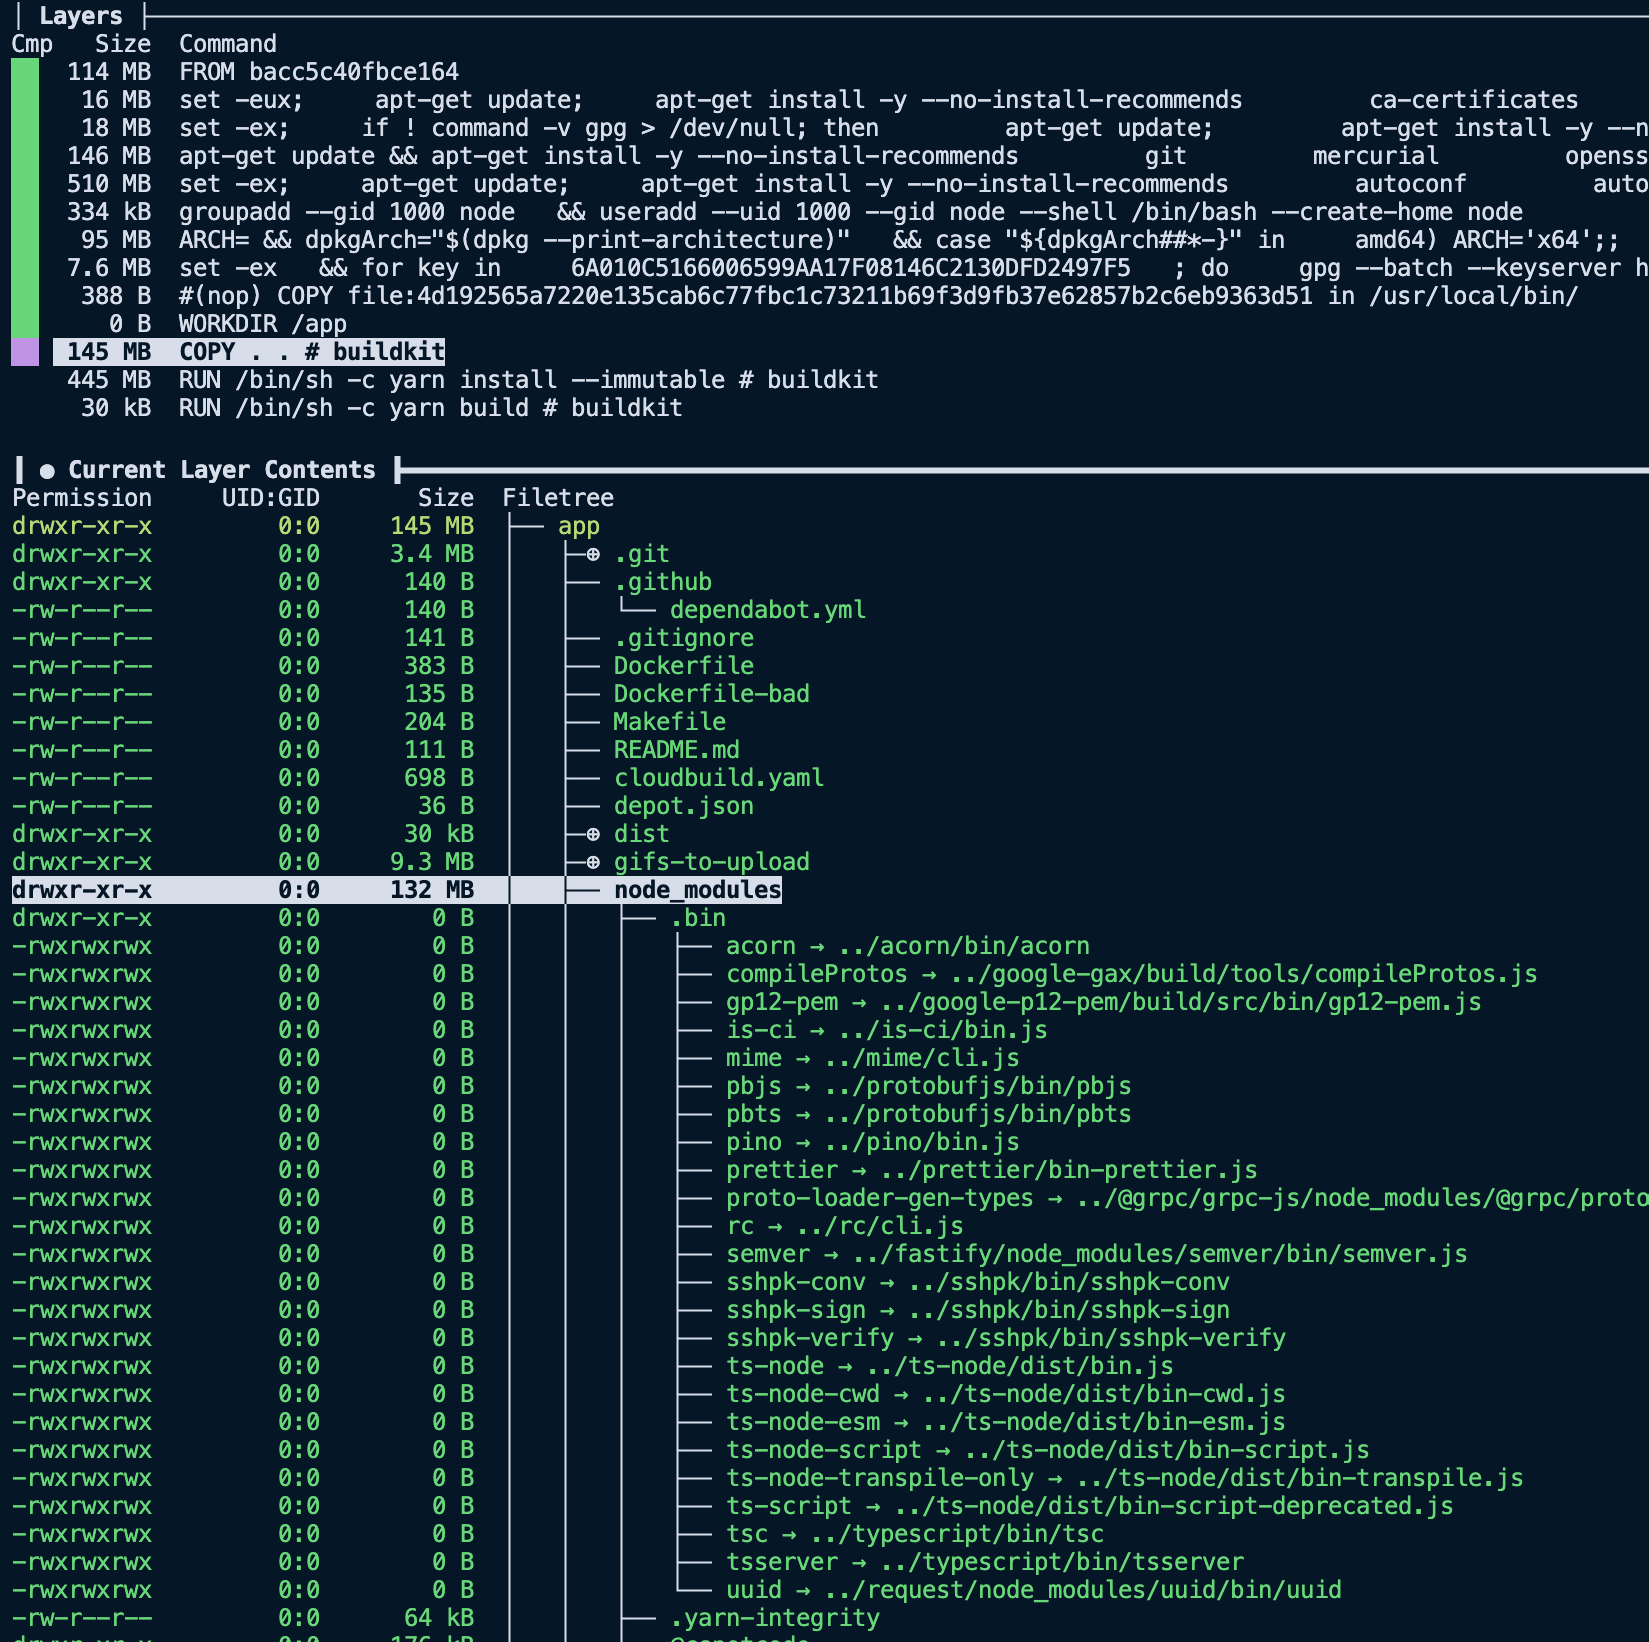
Now things get a little more compelling. Analyzing the layer, we can see it contains our entire project directory, including directories like dist and node_modules that we recreate with future RUN steps. So now that we have spotted the first problem with our image size, we can start implementing solutions to slim it down.
Reducing image size
Now that we have insights into what is in our image via dive, we can reduce the final Docker image size using a few different techniques.
- Add a
.dockerignorefile to our project to exclude unnecessary files or directories - Clear the apt cache
- Use
--mount=type=cache - Change our
Dockerfileto use smaller base images. - Use multi-stage builds to exclude unnecessary artifacts from earlier stages in the final image
Add a .dockerignore file
A .dockerignore file instructs Docker to skip files or directories during docker build. Files or directories that match in .dockerignore won't be copied with any ADD or COPY statements. As a result, they never appear in the final built image.
The .dockerignore syntax is similar to a .gitignore file. We can add a .dockerignore file to the root of our project that ignores all the unneeded files for our example image build.
node_modules
Dockerfile*
.git
.github
.gitignore
dist/**
README.mdHere we exclude files that are recreated as part of our Dockerfile, like node_modules are installed via the RUN yarn install --immutable step. We also exclude unnecessary folders like .git and dist, the RUN yarn build output.
With this small change, we can rebuild our image and recheck its size.
docker build -t example-image .
docker inspect example-image -f "{{ .Size }}" | numfmt --to si --format "%1.3f"
653.796MThe size is now 653 MB instead of 693, so we have already shaved off 40 MB from our image size!
Looking at the COPY layer via dive again, we see that we removed the node_modules folder and other file paths from our .dockerignore. Bringing the layer size down from 134 MB to less than 142 KB.
Clearing out unnecessary files
One common mistake made when building container images is failing to clear out the apt cache. While the packages themselves are necessary for our image to build and run, the intermediate tarballs and package lists aren't. Taking a look at dive, we can pretty quickly see the issue:
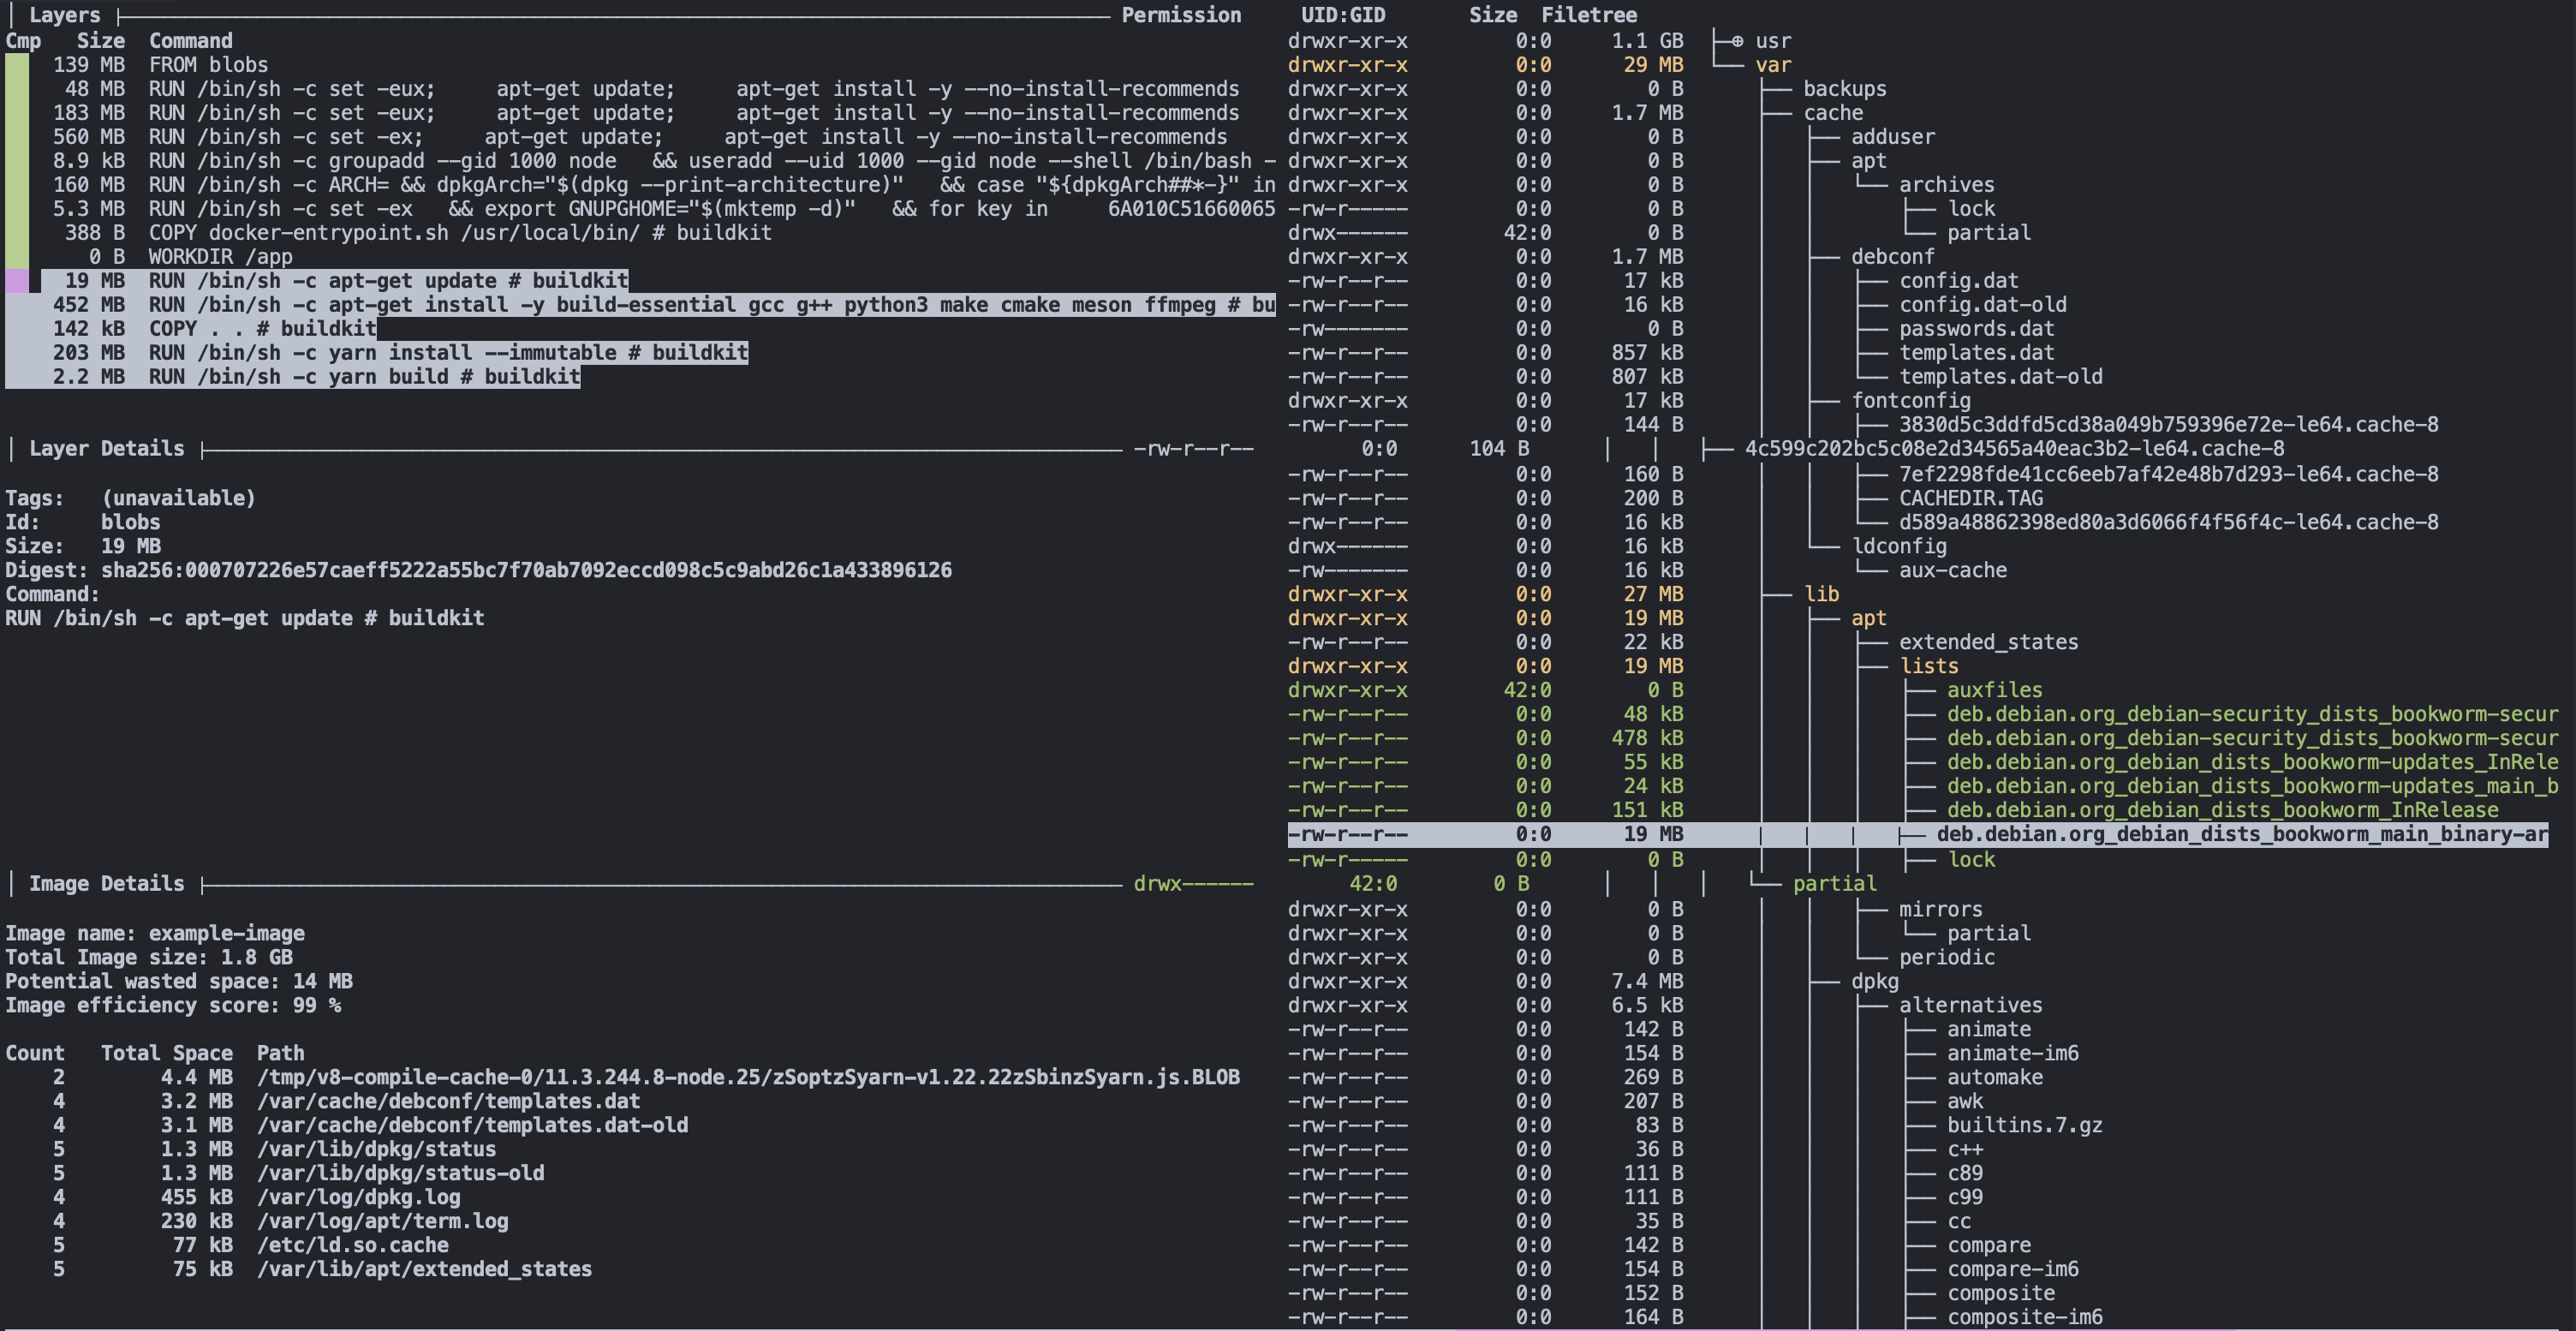
In the layer where we run apt-get update, we're saving around 20 MB into our image! That includes the package list being downloaded, as well as a few other miscellaneous files.
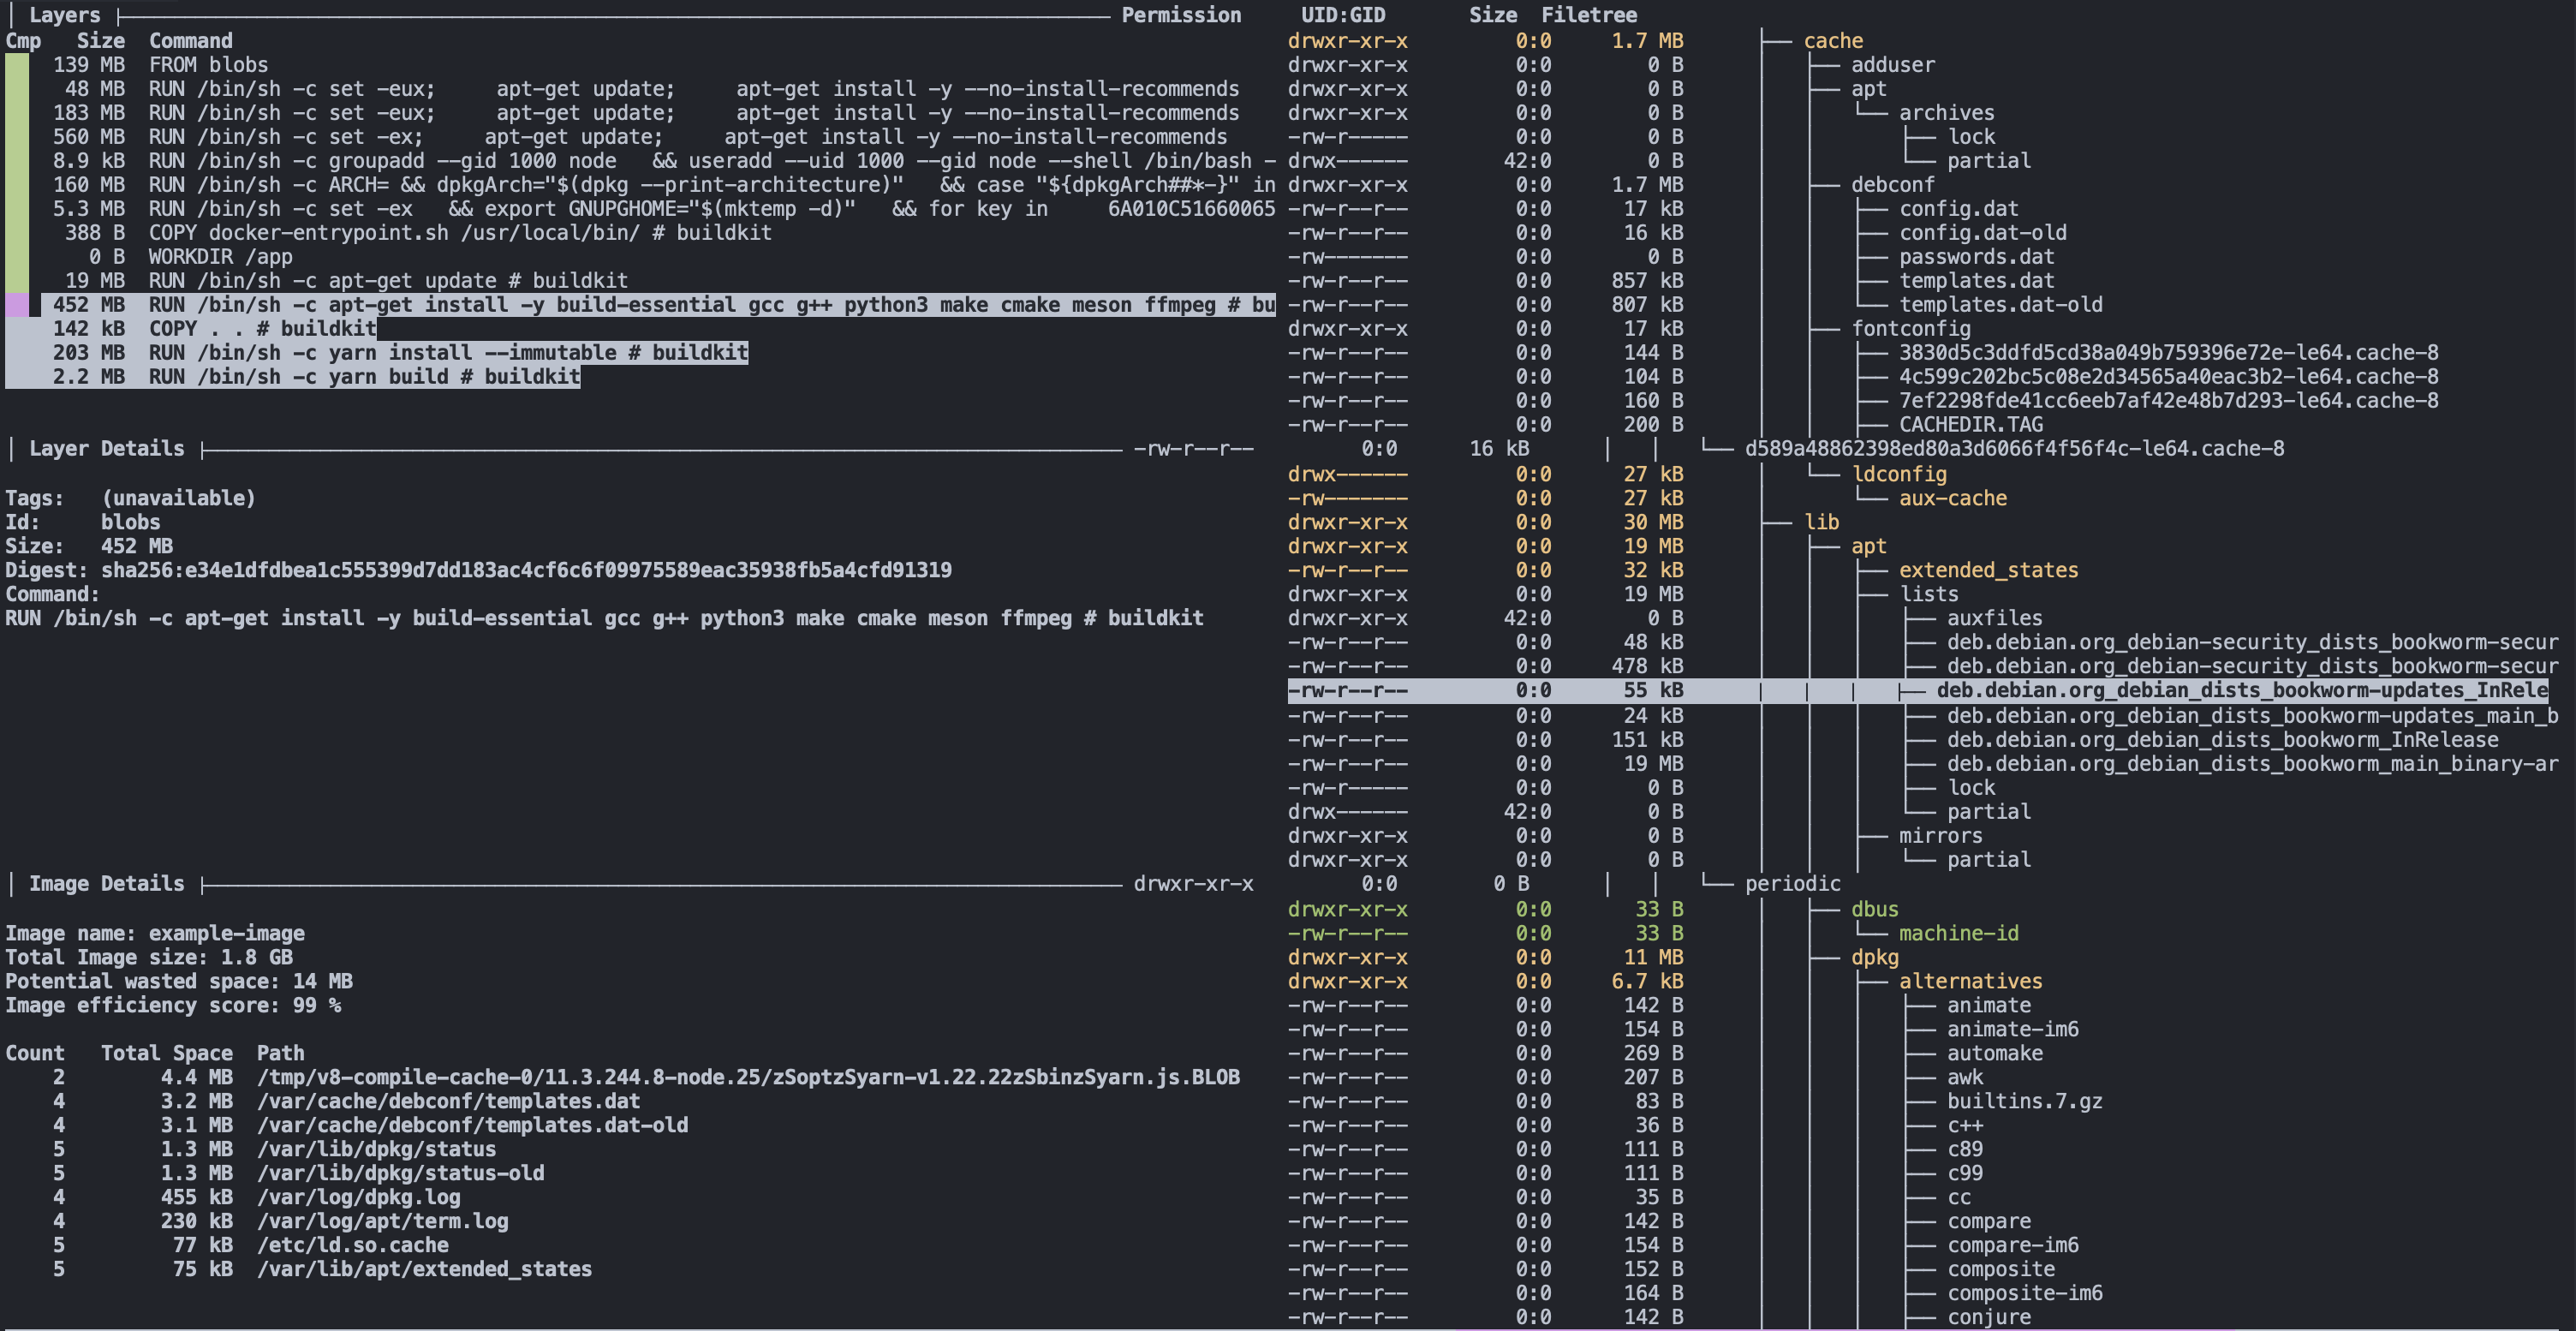
There's ~450 MB being stored in the apt-get install layer, but that's to be expected. We're storing several large binaries and libraries, as well as some files in the apt binary cache.
In this case, the easy solution seems like cleaning the apt cache as well as the package list, right?
FROM node:20
WORKDIR /app
RUN apt-get update
RUN apt-get install -y build-essential gcc g++ python3 make cmake meson ffmpeg
RUN apt-get clean && rm -rf /var/lib/apt/lists/*
COPY . .
RUN yarn install --immutable
RUN yarn build
CMD ["node", "./dist/index.js"]docker build -t example-image .
docker inspect example-image -f "{{ .Size }}" | numfmt --to si --format "%1.3f"
653.798MInterestingly, the image size hasn't changed! The reason for that is we're deleting the cache in a separate step, meaning that the apt-get update and apt-get install layers still have all of the files cached.
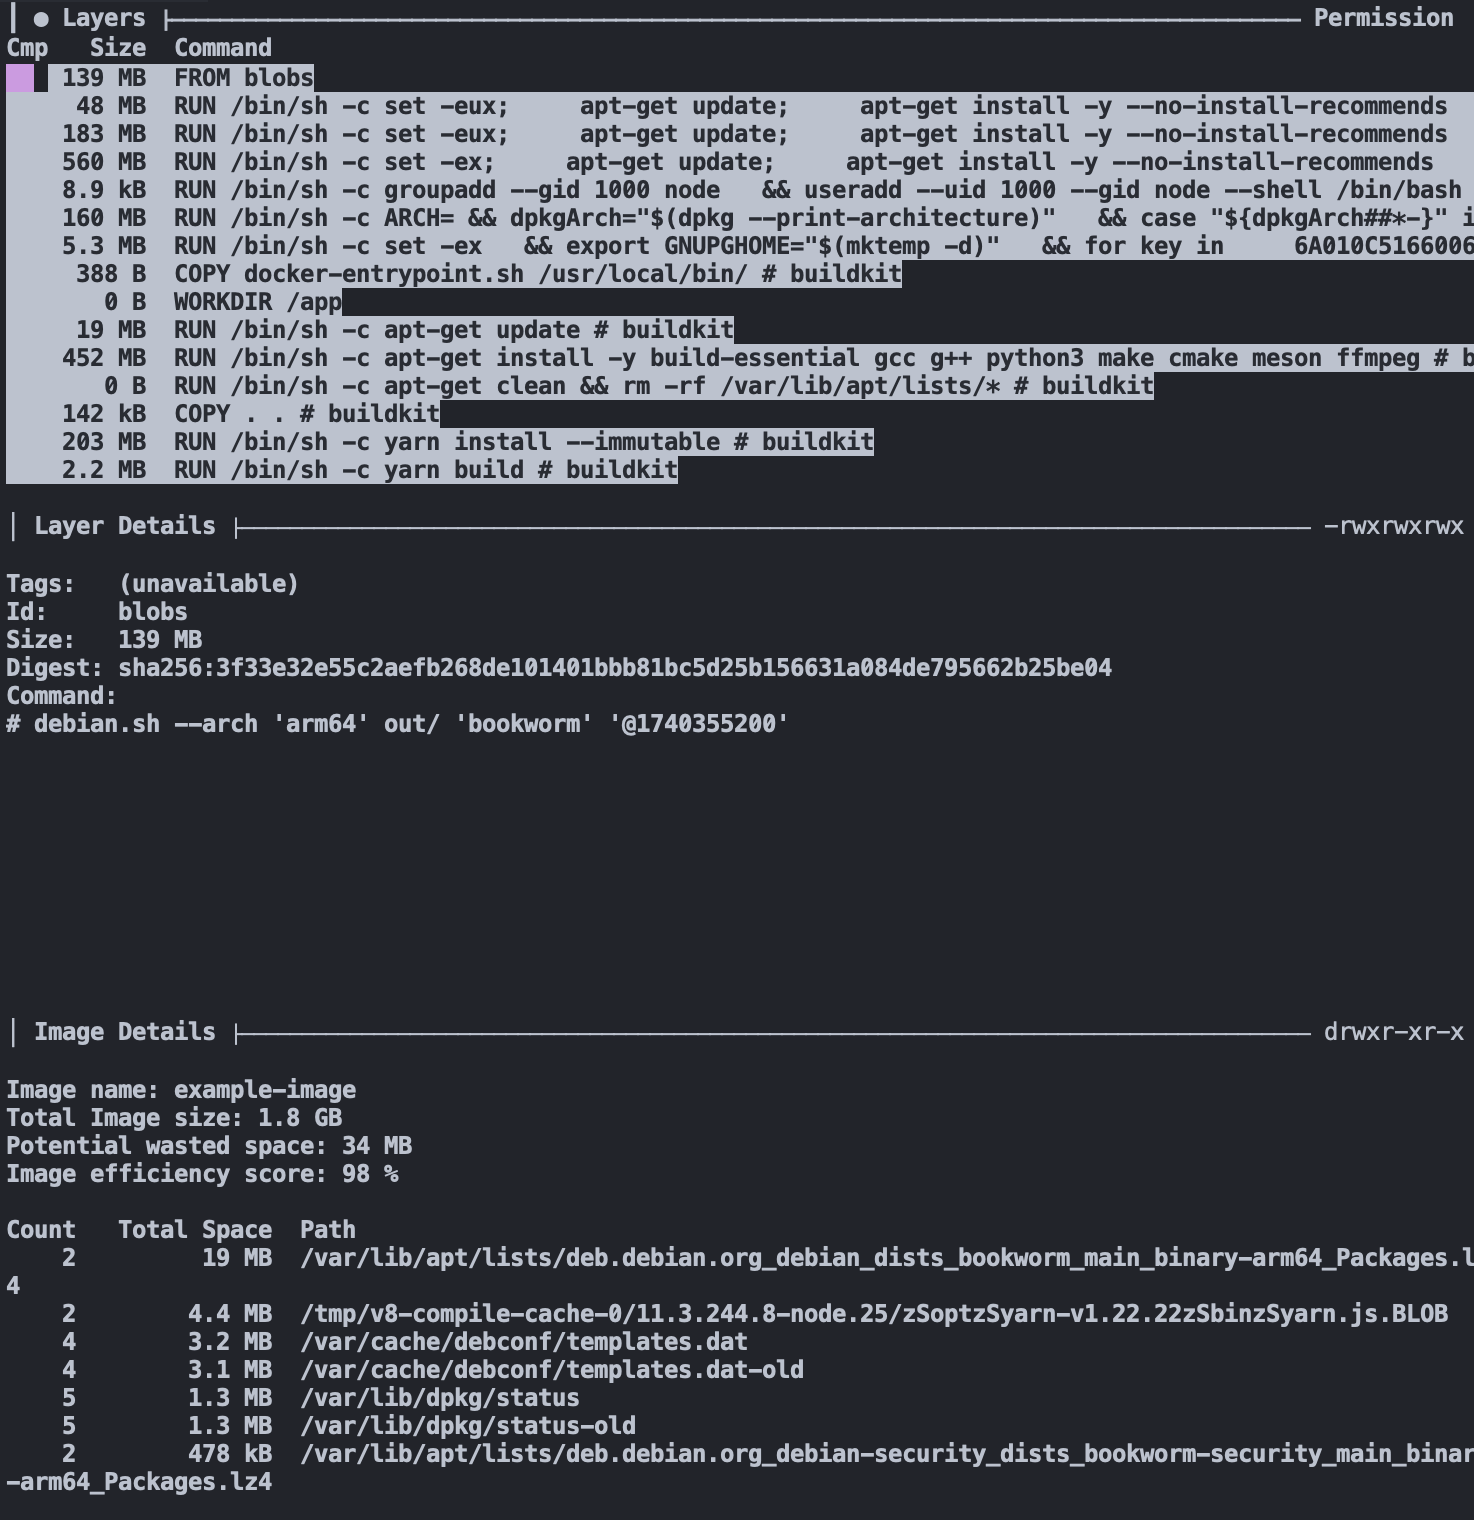
To address this, we need to move the deletion step into the same step as both the update and installation step:
FROM node:20
WORKDIR /app
RUN apt-get update && \
 apt-get install -y build-essential gcc g++ python3 make cmake meson ffmpeg && \
 apt-get clean && \
 rm -rf /var/lib/apt/lists/*
COPY . .
RUN yarn install --immutable
RUN yarn build
CMD ["node", "./dist/index.js"]docker build -t example-image .
docker inspect example-image -f "{{ .Size }}" | numfmt --to si --format "%1.3f"
638.794M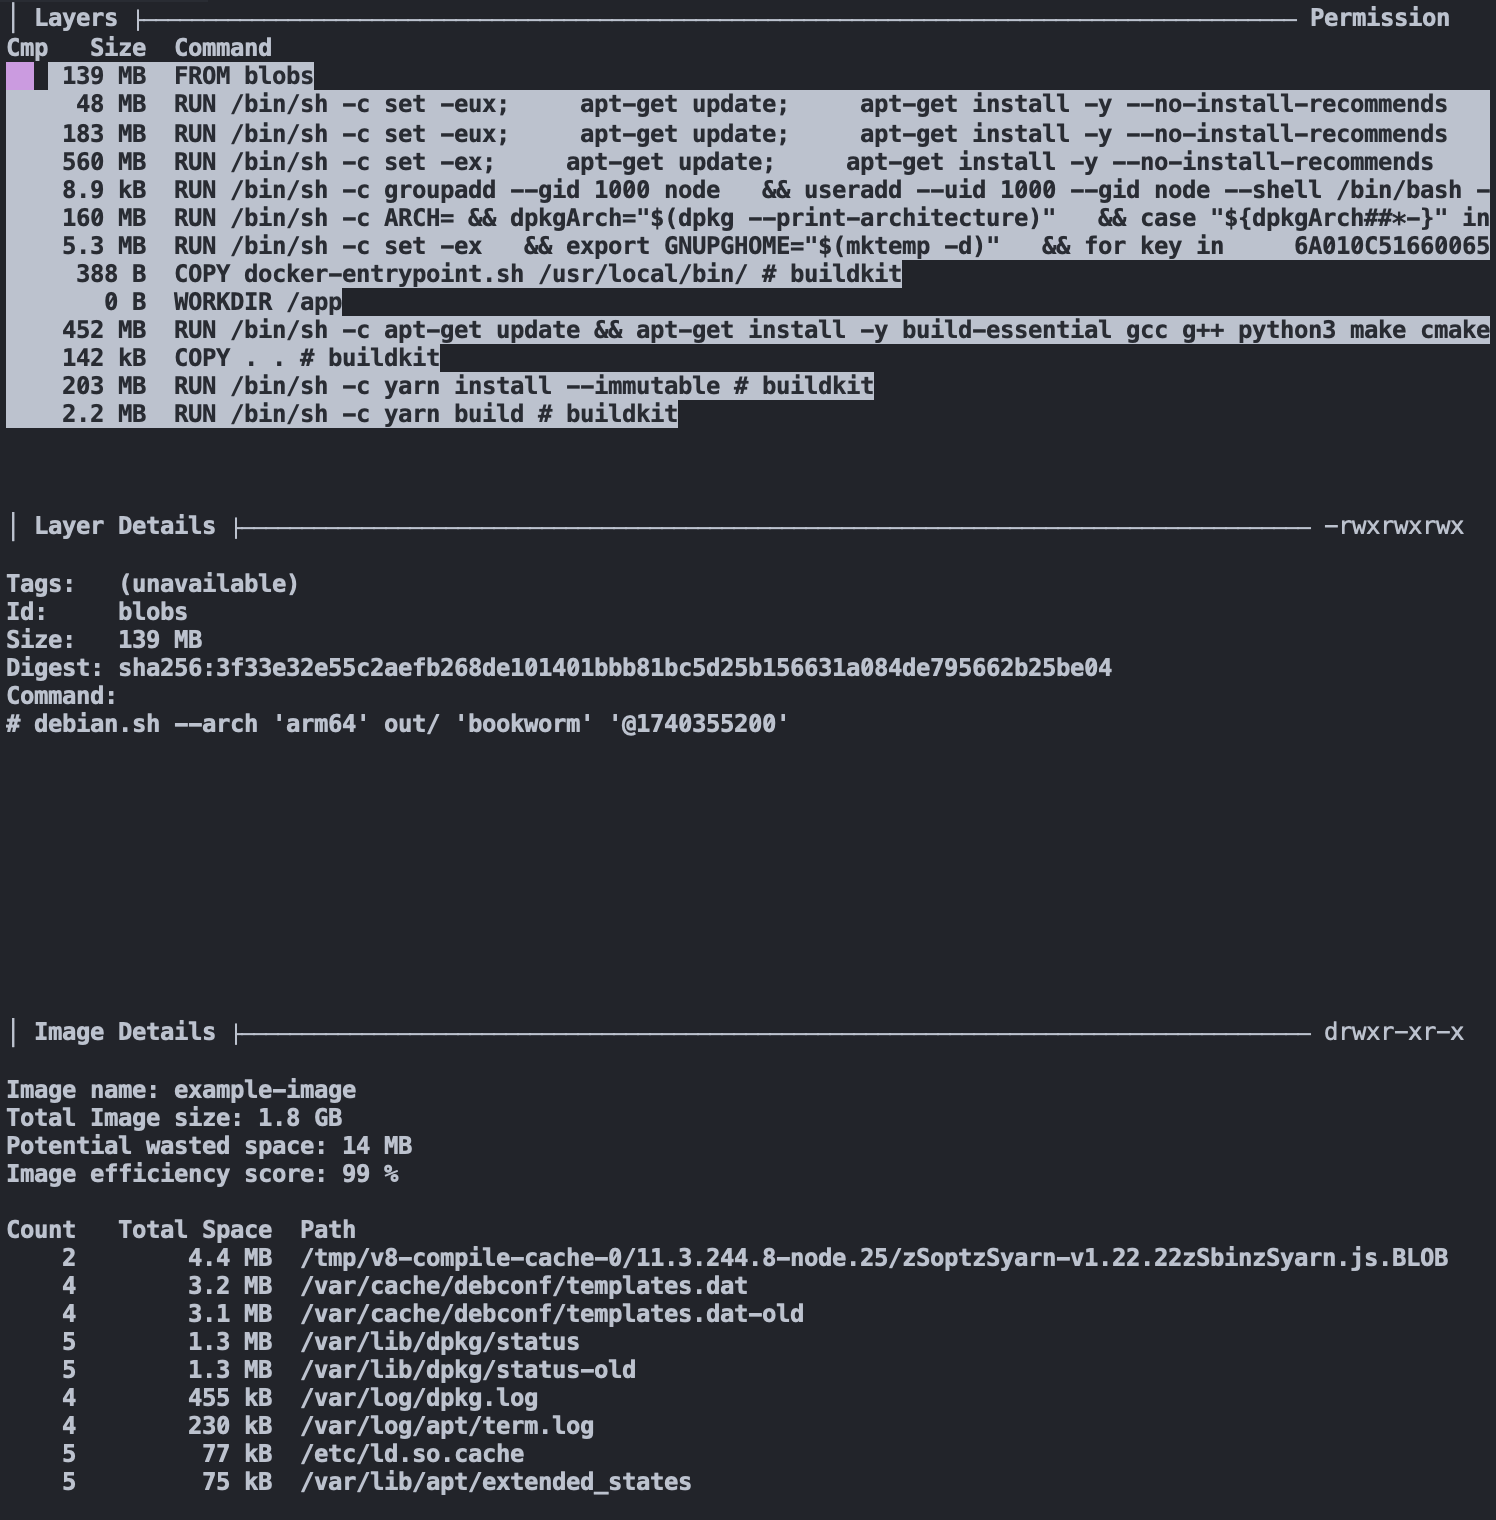
There's another 15 MB gone!
Accelerating builds with Docker cache mounts
By clearing out the apt cache, we can shave some unnecessary storage off our image. However, we don't get to benefit from the nice caching benefits of our package managers and build tools.
There's a great way that we can get the best of both words, however, and thats with the --mount=type=cache option, also known as a BuildKit cache mount. This option allows you to save and load a directory into Buildkit's cache, without saving it into the image. Let's try it with the apt-get commands, as an example:
FROM node:20
WORKDIR /app
RUN --mount=type=cache,target=/var/cache/apt \
    --mount=type=cache,target=/var/lib/apt \
    apt-get update && \
    apt-get install -y build-essential gcc g++ python3 make cmake meson ffmpeg
COPY . .
RUN yarn install --immutable
RUN yarn build
CMD ["node", "./dist/index.js"]docker build -t example-image .
docker inspect example-image -f "{{ .Size }}" | numfmt --to si --format "%1.3f"
638.791MThe image is about the same size, but now any changes that invalidate the layer will still keep the apt cache around, leading to faster image build times. We can do the same for both yarn commands as well:
FROM node:20
WORKDIR /app
RUN --mount=type=cache,target=/var/cache/apt \
    --mount=type=cache,target=/var/lib/apt \
    apt-get update && \
    apt-get install -y build-essential gcc g++ python3 make cmake meson ffmpeg
COPY . .
RUN --mount=type=cache,target=/usr/local/share/.cache/yarn \
    --mount=type=cache,target=/app/node_modules \
    yarn install --immutable
RUN --mount=type=cache,target=/app/node_modules \
    yarn build
CMD ["node", "./dist/index.js"]docker build -t example-image .
docker inspect example-image -f "{{ .Size }}" | numfmt --to si --format "%1.3f"
586.049MThat's another 52 MB off our image size! But we can go even further...
Shave lots of bytes with smaller base images
Slim base images can provide dramatic reductions in image size.
We can start by just using the slim version of the node:20 image, node:20-slim. The latter image contains only the bare essentials needed to run Debian, alongside NodeJS of course. Since we're already installing all of the build and runtime tools we need, however, it's just an easy way for us to cut our image size down even further.
-FROM node:20
+FROM node:20-slim
docker build -t example-image .
docker inspect example-image -f "{{ .Size }}" | numfmt --to si --format "%1.3f"
406.818MAnother 180 MB reduced from our image from a single line change! We could go even further with this by using an alpine base image. These images provide a massive size reduction, but they come with their own and more limited package manager, apk. However, for most use cases, this limitation is manageable and can often be worked around.
For our example, we don't mind the tradeoffs presented for the node:20-alpine base image, so we can plug it into our Dockerfile and run a new build.
-FROM node:20-slim
+FROM node:20-alpine
 WORKDIR /app
-RUN --mount=type=cache,target=/var/cache/apt \
-    --mount=type=cache,target=/var/lib/apt \
-    apt-get update && \
-    apt-get install -y build-essential gcc g++ python3 make cmake meson ffmpeg
+RUN --mount=type=cache,target=/var/cache/apk \
+ apk add --update build-base gcc g++ python3 make cmake meson ffmpegThis required a couple of changes from our previous Dockerfile:
- We changed the mount point of the cache from
/var/cache/aptto/var/cache/apk - We updated the
updateandinstallcommands to the Alpine equivalents
docker build -t example-image .
docker inspect example-image -f "{{ .Size }}" | numfmt --to si --format "%1.3f"
213.280M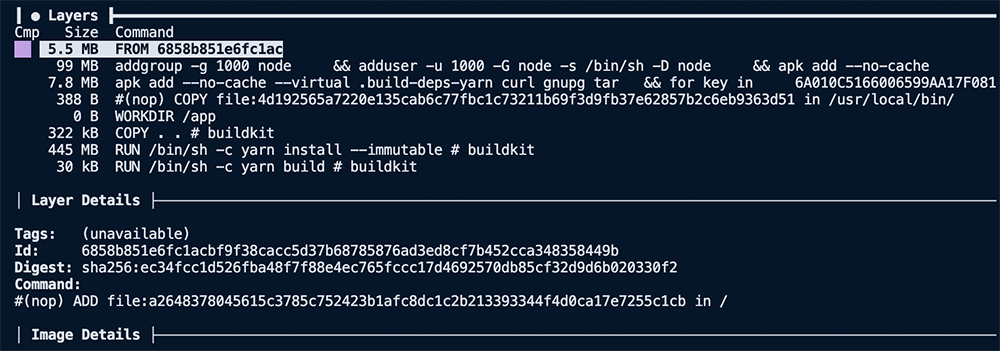
Changing the base image to alpine brings the number of base layers down from nine to five. Reducing the total image size of 693 MB down to 213 MB, over 3x smaller than the original image.
Leverage multi-stage builds
A multi-stage build allows you to specify multiple FROM statements in a single Dockerfile, and each of them represents a new stage in a build. You can also copy files from one stage to another. Files not copied from an earlier stage are discarded in the final image, resulting in a smaller size.
Here is what our example Dockerfile looks like with an optimized multi-stage build.
FROM node:20-alpine AS build
WORKDIR /app

RUN --mount=type=cache,target=/var/cache/apk \
    apk add --update build-base gcc g++ python3 make cmake meson ffmpeg
COPY package.json yarn.lock tsconfig.json ./

RUN --mount=type=cache,target=/usr/local/share/.cache/yarn \
    --mount=type=cache,target=/app/node_modules \
    yarn install --immutable

COPY src/ ./src/
RUN --mount=type=cache,target=/app/node_modules \
    yarn build

FROM node:20-alpine
WORKDIR /app

# Install runtime dependencies only
RUN --mount=type=cache,target=/var/cache/apk \
    apk add --update ffmpeg

COPY --from=build /app/dist /app/dist
CMD ["node", "./dist/index.js"]The first stage copies in the package.json, yarn.lock, and tsconfig.json files so that node_modules can be installed and the application can be built.
The second stage copies the node_modules and dist folders from the first stage, build, into the final image. The items not copied from the first stage get discarded. We no longer have a COPY . . step either; instead, we only copy in the node_modules and the build output of our project, the dist folder.
If we build this example with a multi-stage build, we can bring the total image size down to 94 MB. That's well over a 7x reduction in image size from the original 693 MB.
The benefits of reducing Docker image size
Smaller images build and deploy faster. But speed is one of many benefits of keeping your container images small. The smaller the image is, the less complex it is as well. The less complex an image is the fewer binaries and packages inside it and, by extension, the fewer pathways for vulnerabilities to exist.
Using the three techniques we covered in this post and dive to analyze the contents of our images, we can drastically reduce the size of Docker images so that they build and run faster. But we also make them less complex, more accessible to reason about, and more secure.
Related posts
- Fast Dockerfiles: theory and practice
- The fundamentals of building a Docker image
- How to debug your Docker build context with Depot
- The ultimate guide to Docker build cache
