This article explains how BuildKit works in depth, why it's faster than Docker's previous build engine, and what it looks like under the hood.
BuildKit is Docker's new default build engine as of Docker Engine v23.0.
Despite BuildKit being used by millions of developers, the documentation out there is relatively sparse. This has led to it being seen as a bit of a black box. At Depot, we've been working with (and reverse engineering) BuildKit for years and have developed a deep understanding of it throughout this process. Now we understand the inner workings, we have a better appreciation for it and want to share that knowledge with you.
In this article, we explain how BuildKit works under the hood, covering everything from frontends and backends to LLB (low-level build) and DAGs (directed acyclic graphs). We help to demystify BuildKit and explain why it's such an improvement over Docker's original build engine.
What is BuildKit?
BuildKit is a build engine that takes a configuration file (such as a Dockerfile) and converts it into a built artifact (such as a Docker image). It's faster than Docker's original build engine due to its ability to optimize your build by parallelizing build steps whenever possible and through more advanced layer caching capabilities.
BuildKit speeds up Docker builds with parallelization
A Dockerfile can consist of build stages, each of which can contain one or more steps. BuildKit can determine the dependencies between each stage in the build process. If two stages can be run in parallel, they will be. Stages are a great way to break your Docker image build up into parallelizable steps — for example, you could install your dependencies, build your application at the same time, and then combine the two to form your final image.
To take advantage of parallelization, you must rewrite your Dockerfile to use multi-stage builds. A stage is a section of your Dockerfile that starts with a FROM statement and continues until you reach another FROM statement. Stages can be run in parallel, so by this mechanism, the steps in one stage can run in parallel with the steps in another.
It's worth noting that the steps within a stage run in a linear order, but the order in which stages run may not be linear. To determine the order in which stages will be run, BuildKit detects the name of each stage — which, for a Dockerfile, is the word after the as keyword in a FROM statement.
To determine the stage that another stage depends on, we look at the word after the FROM keyword. In the example below, FROM docker-image as stage1 means that the stage1 stage depends on the Docker image from Docker Hub, and FROM stage1 as stage2 means that the stage2 stage depends on the stage1 stage. It's possible to chain many stages together in this way.
FROM docker-image as stage1
RUN command1

FROM stage1 as stage2
RUN command2

FROM stage2 as stage3
RUN command3It's also possible to have multiple stages depend on one stage:
FROM docker-image as parent
…
FROM parent as child1
…
FROM parent as child2BuildKit is able to evaluate the structure of these FROM statements and work out the dependency tree between the steps in each stage.
Optimize your Dockerfile to take advantage of parallelization
Rewriting your Dockerfile to use multi-stage builds will allow you to take advantage of the speed improvements that BuildKit brings to Docker.
In the example below you can see an unoptimized file with a single stage and an optimized file with two stages: one named build, and another which is unnamed (this is the naming convention for the final stage in a Dockerfile).
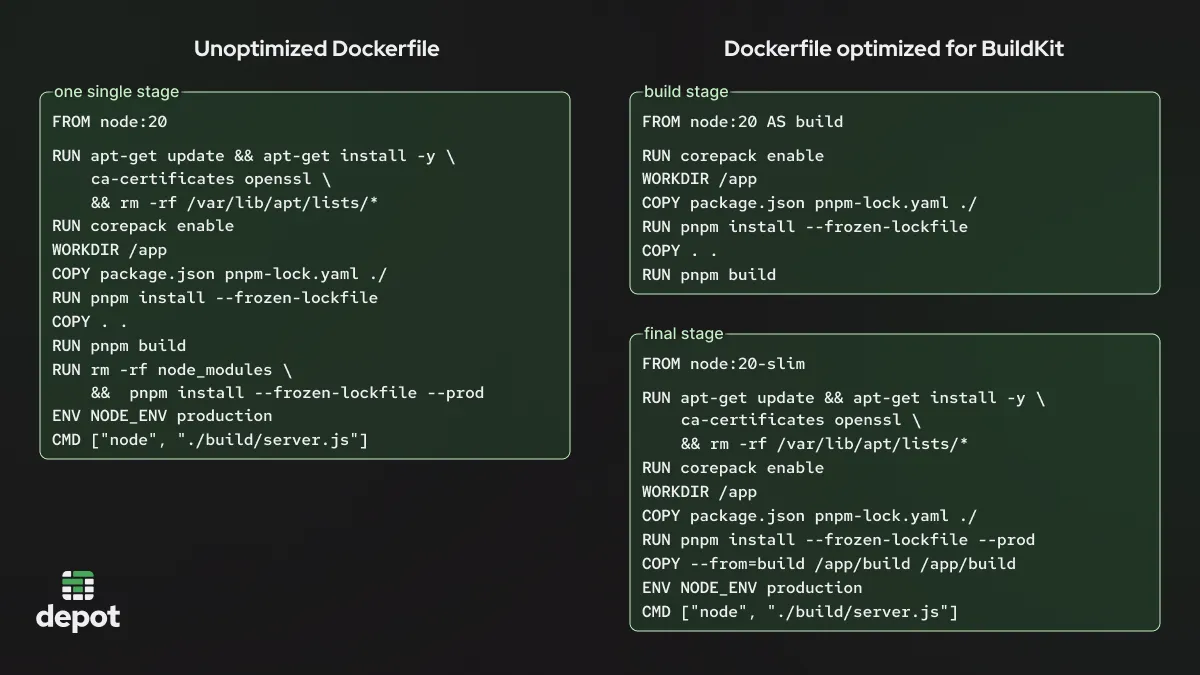
Optimizing this Dockerfile allows steps such as enabling Corepack to run in parallel with copying the package.json file and the pnpm-lock.yaml file into the /app directory.
Once your Dockerfile has been optimized to run in multiple stages, BuildKit can run them in parallel. Below you can see the difference between using BuildKit to run multiple stages in parallel (for building and deploying a Node app) and running all steps sequentially (without multi-stage builds). This Node app deployment example will be used throughout this article, and the Dockerfiles — both optimized for BuildKit (multi-stage) and unoptimized (basic) — are available on our GitHub.
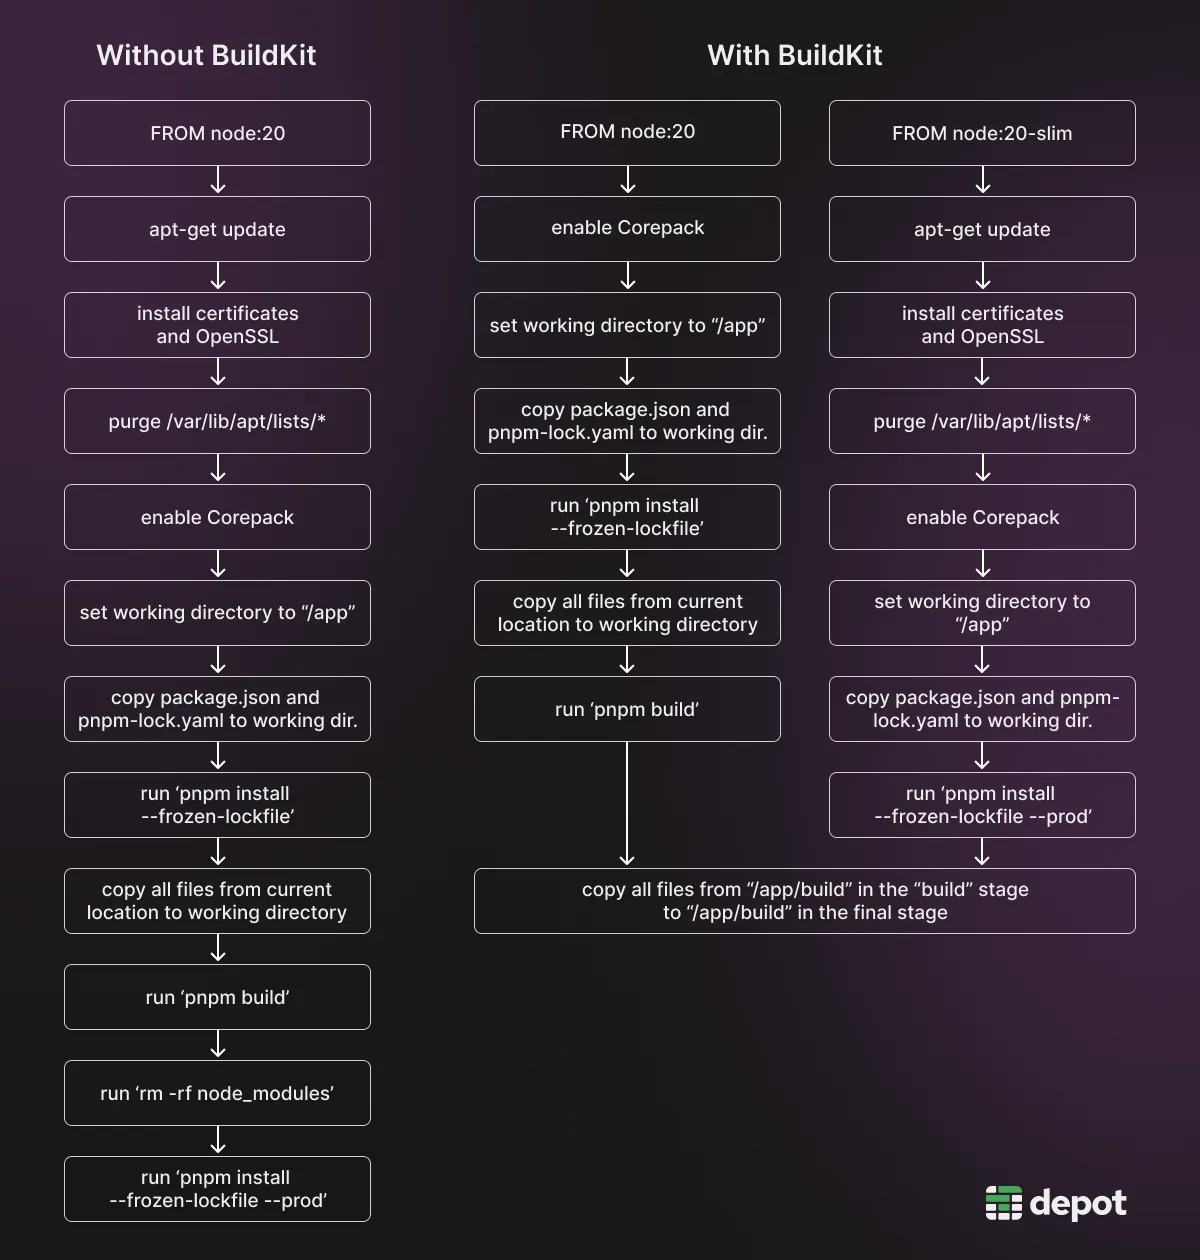
If you use BuildKit to parallelize your stages, your build will complete much faster.
BuildKit speeds up Docker builds with layer caching
BuildKit is also able to improve build performance through clever use of layer caching. With layer caching, each step of your Dockerfile (such as RUN, COPY, and ADD) is cached individually, as a separate reusable layer.
Often, individual layers can be reused, as the results of a build step can be retrieved from the cache rather than rebuilt every time. This eliminates many steps from the build process and often dramatically increases overall build performance.
The hierarchy of layers in BuildKit's layer cache is a tree structure, so if one build step has changed between builds, that build step plus all its child steps in the hierarchy must be rebuilt. With traditional single-stage builds, every single step depends on the previous step, so it can be immensely frustrating if you have a RUN statement that invalidates the cache in an early part of your Dockerfile — because all subsequent statements must be recomputed any time that statement runs. The order of your statements in a Dockerfile has a major impact on optimizing your build to leverage caching.
However, if you've optimized your Dockerfile for BuildKit, used multi-stage builds, and ordered your statements to maximize cache hits, you can reuse previous build results much more frequently.
BuildKit under the hood
"BuildKit builds are based on a binary intermediate format called LLB that is used for defining the dependency graph for processes running part of your build. tl;dr: LLB is to Dockerfile what LLVM IR is to C."
To truly understand how BuildKit works, let's unpack this statement. BuildKit has taken inspiration from compiler designers by creating an intermediate representation between the input and the output to its system. In compiler design, an intermediate representation is a data structure or some human-readable code (such as assembly language) that sits between the source code input and the machine code output. This intermediate representation is later converted into different types of machine code for each different machine the code needs to run on.
BuildKit uses this same principle by inserting an intermediate representation between the Dockerfile input and the final Docker image. BuildKit's intermediate representation is known as a low-level build (LLB), which is a directed acyclic graph (DAG) data structure that sits at the heart of BuildKit's information flow.
The flow of information through BuildKit: frontends, backends and LLB
Continuing with the compiler comparison, BuildKit also uses the concept of frontends and backends.
The frontend is the part of BuildKit that takes the input (usually a Dockerfile) and converts it to LLB. BuildKit has frontends for a variety of different inputs including Nix, HLB, and Bass, all of which take different inputs but build Docker images, and CargoWharf, which is used to build something else entirely (a Rust project). This shows the versatility BuildKit has to build many different types of artifacts, even though the most common use currently is building Docker images from Dockerfiles.
The backend takes the LLB as an input and converts it into a build artifact (such as a Docker image) for the machine architecture that you've specified. It builds the artifact by using a container runtime — either runc or containerd (which uses runc under the hood anyway).
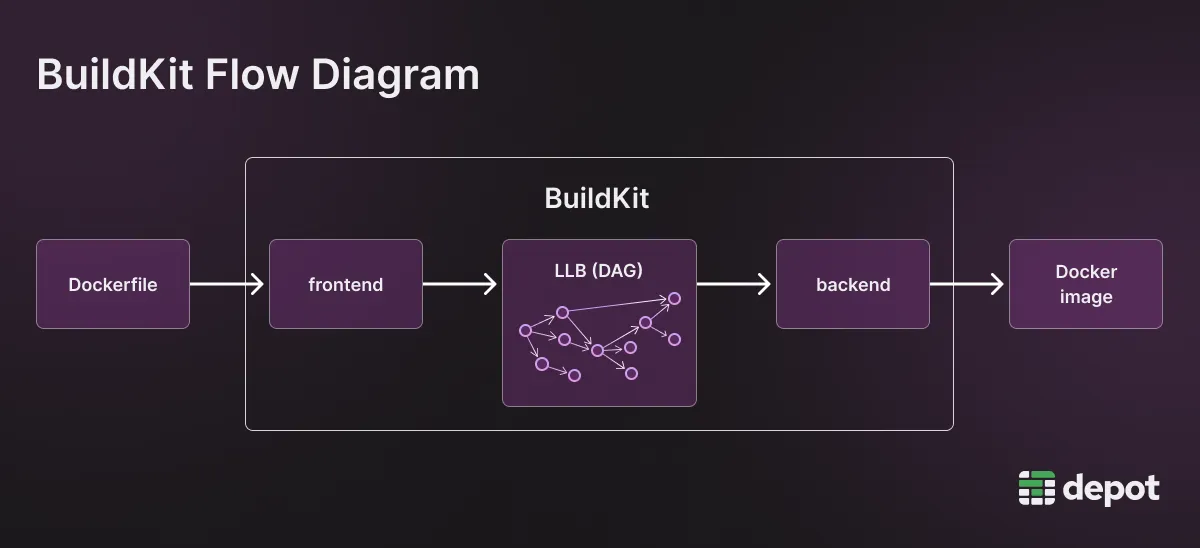
BuildKit's frontend acts as an interface between the input (Dockerfile) and the LLB. The backend is the interface between the LLB and the output (Docker image).
BuildKit's LLB
We've referred to the LLB a few times so far — but what exactly is it?
It's a directed acyclic graph (DAG) data structure, which is a special type of graph data structure. In a DAG, each event is represented as a node with arrows that flow in a particular direction, hence the word “directed.” Arrows start at a parent node and end on a child node. Child nodes are only allowed to execute after all parent nodes have finished executing.
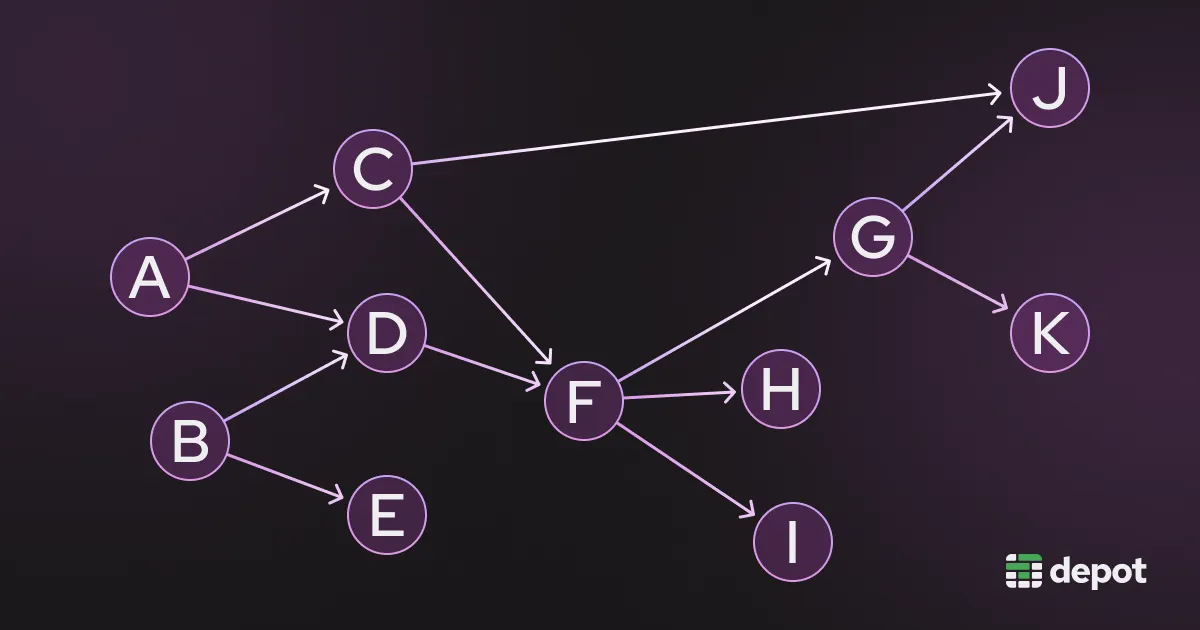
There can be no loops in a DAG, hence the word “acyclic.” This is necessary for modeling build steps, as if a build process allowed loops, the process would never complete because two steps would require each other to finish before each one starts!

BuildKit's LLB DAG is used to represent which build steps depend on each other and the order in which everything needs to happen. This ensures that certain steps don't occur before other steps are completed (like installing a package before downloading it).
In the case of Docker builds, BuildKit uses its Docker frontend to create the LLB from the Dockerfile. For example, this Dockerfile for building and deploying a Node app would create the following LLB DAG:
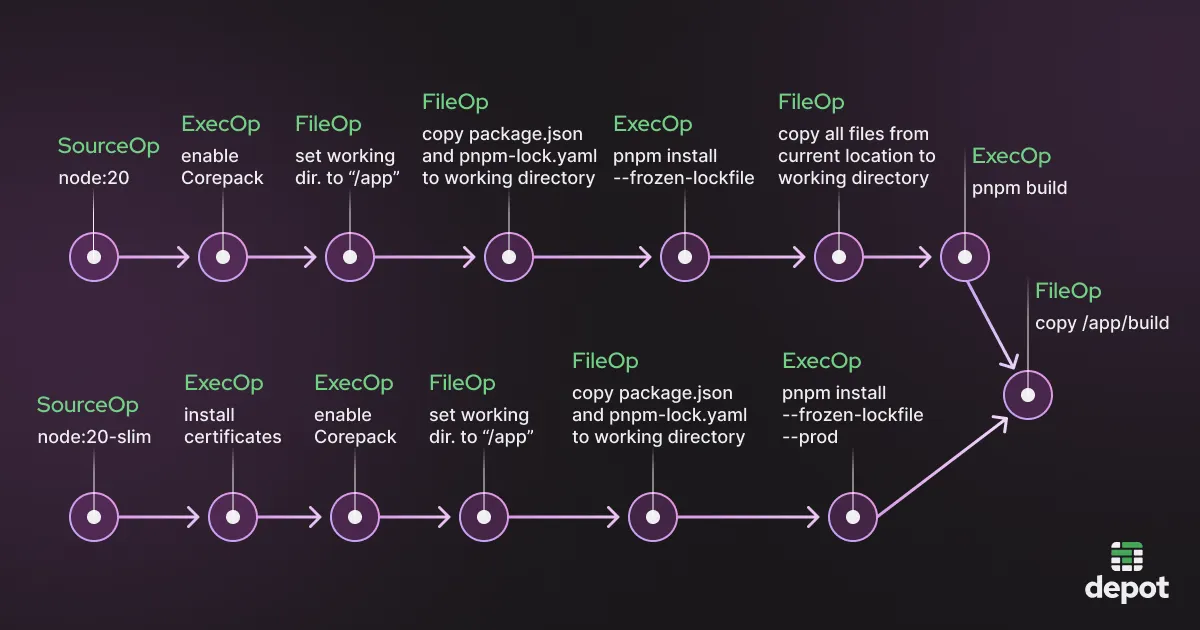
In this LLB DAG, each node represents an operation that can happen. Each LLB operation can take one or more filesystems as its input and output one or more filesystems.
To help you understand more about the LLB operations that your Dockerfile would translate to, we built a free tool that converts any given Dockerfile into LLB through a real-time editor. Our Dockerfile Explorer is easy to use — simply paste your Dockerfile into the box on the left and then view the LLB operations on the right.
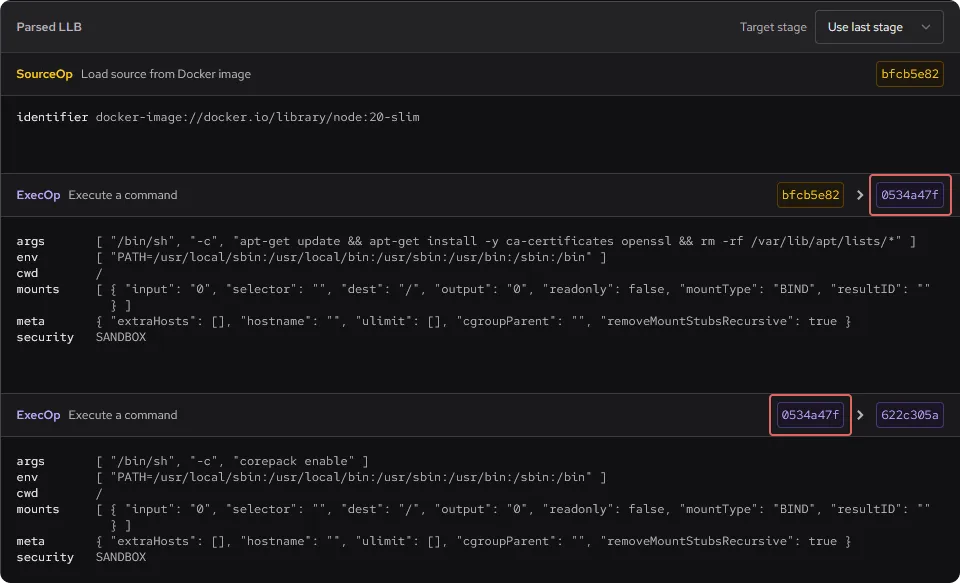
Our Node Dockerfile creates a number of LLB operations, the first three of which can be viewed below. Each operation has a type such as SourceOp or ExecOp, a unique identifier in the form of a hash value, and some extra data like the environment and the commands to be run. The hash values indicate the dependencies between the operations. For example, the first ExecOp operation has a hash value of 0534a47f, and the second ExecOp operation takes as its input an operation with a hash of the same value (0534a47f). This shows that these two operations are directly linked on the LLB DAG.
The different BuildKit LLB operations explained
SourceOp
This loads source files or images from a source location, such as DockerHub, a Git repository, or your local build context.
All SourceOp operations that originated from a Dockerfile have been generated from Dockerfile FROM statements.
ExecOp
ExecOp always executes a command. It's equivalent to Dockerfile RUN statements.
FileOp
This is for operations that relate to files or directories, including Dockerfile statements such as ADD (add a file or directory), COPY (copy a file or directory), or WORKDIR (set the working directory of your Docker container).
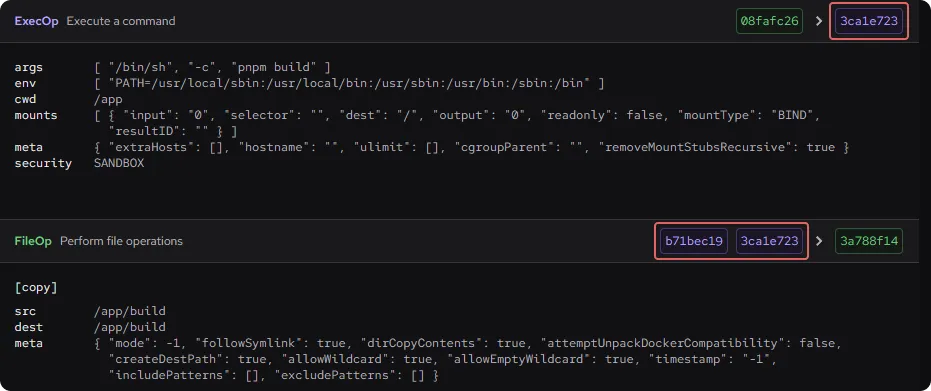
It's possible to use this operation to copy the output of other steps in different stages into a single step. Using our example Dockerfile, the COPY --from statement copies some of the resources from the output of the previous build stage into the final stage.
FROM node:20
…
COPY --from=build /appbuild /app/buildWe can use the Dockerfile Explorer to see how BuildKit deals with this — it takes the output of the final step in each stage and adds them together.

MergeOp
MergeOp allows you to merge multiple inputs into a single flat layer (and is the underlying mechanism behind Docker's COPY --link).
DiffOp
This is a way of calculating the difference between two inputs and producing a single output with the difference represented as a new layer, which you might then want to merge into another layer using MergeOp.
However, this operation is currently not available for the Dockerfile frontend.
BuildOp
This is an experimental operation that implements nested LLB builds (for example, running one LLB build that produces another dynamic LLB).
This operation is also unavailable for the Docker frontend.
BuildKit speeds up your Docker builds using its LLB DAG
Although BuildKit can take multiple frontends, the Dockerfile frontend is by far the most popular. BuildKit uses its Dockerfile frontend to convert statements from your Dockerfile into a DAG of LLB operations — including SourceOp, ExecOp and FileOp — and then it uses that LLB format to build an artifact, like a Docker image, for the specified architectures that were requested.
At Depot, we've taken what was already great about BuildKit and further optimized it to build Docker images up to 40x faster on cloud builders with persistent caching. We've developed our own drop-in replacement CLI, depot build, that can be used to replace your existing docker build wherever you're building images today. Sign up today for our 7-day free trial and try it out for yourself.
FAQ
What is LLB in BuildKit and how does it work?
LLB stands for low-level build, and it's a directed acyclic graph (DAG) data structure that sits at the heart of BuildKit. It's BuildKit's intermediate representation between the Dockerfile input and the final Docker image output. The LLB DAG represents which build steps depend on each other and the order in which everything needs to happen. Each node in the DAG is an operation (like SourceOp, ExecOp, or FileOp) that takes one or more filesystems as input and outputs one or more filesystems.
How does BuildKit parallelize Docker builds?
BuildKit determines the dependencies between each stage in your Dockerfile build process. If two stages can be run in parallel, they will be. Stages are sections of your Dockerfile that start with a FROM statement and continue until another FROM statement. BuildKit evaluates the structure of these FROM statements and works out the dependency tree between the steps in each stage. The steps within a stage run in a linear order, but stages themselves can run in parallel if they don't depend on each other.
Do I need to rewrite my existing Dockerfile to get BuildKit performance improvements?
You'll get some benefits automatically, like better layer caching, but to take full advantage of BuildKit's parallelization, you need to rewrite your Dockerfile to use multi-stage builds. This means breaking your build into multiple stages where independent work can happen simultaneously. For example, you could install dependencies in one stage while building your application in another, then combine them in a final stage. The order of your statements also matters for maximizing cache hits.
Can BuildKit build things other than Docker images from Dockerfiles?
Yes, BuildKit is versatile and can build many different types of artifacts. BuildKit has frontends for different inputs including Nix, HLB, and Bass, which all build Docker images but from different input formats. There's even CargoWharf, which builds Rust projects instead of Docker images. The frontend takes the input and converts it to LLB, then the backend converts the LLB into whatever artifact you're building for the machine architecture you've specified.
Related posts
- How BuildKit Parallelizes Your Builds
- The ultimate guide to Docker build cache
- How Depot speeds up Docker builds
- How to use BuildKit cache mounts in CI providers

