Docker persists build cache, containers, images, and volumes to disk. Over time, these things can take up a lot of space on your system, either locally or in CI. In this post, we'll look at the different Docker artifacts that can take up space on your system, how to clear them individually, and how to use docker system prune to clear Docker cache.
A short refresher on Docker caching
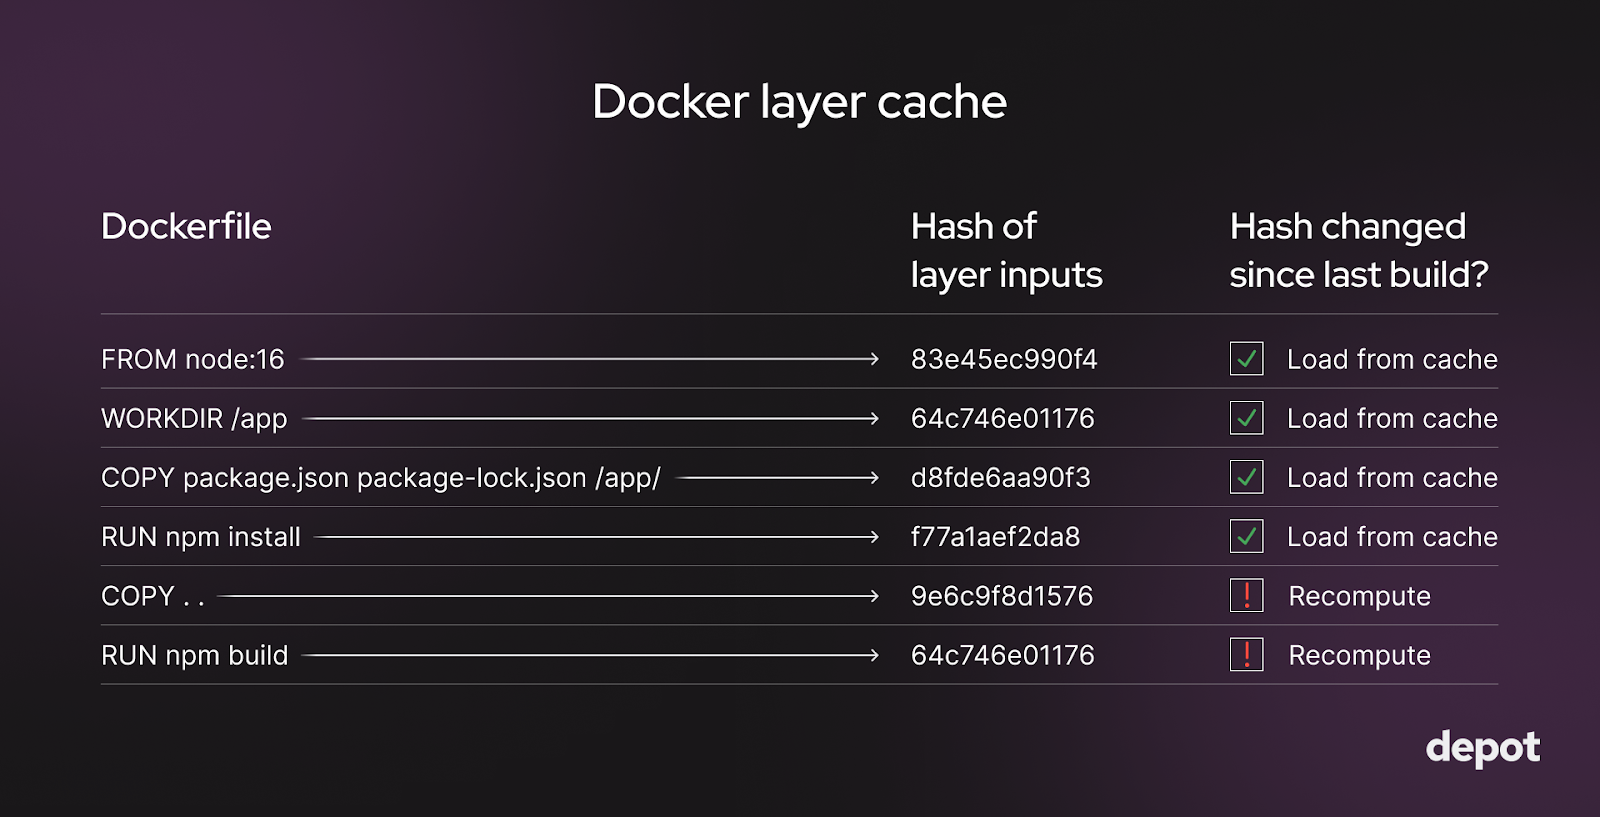
Docker uses layer caching to reuse previously computed build results. Each instruction in a Dockerfile is associated with a layer that contains the changes caused by executing that instruction. If previous layers, as well as any inputs to an instruction, haven't changed, and the instruction has already been run and cached previously, Docker will use the cached layer for it. Otherwise, Docker will rebuild that layer and all layers that follow it.

The Docker layers for which the hash of the inputs (such as source code files on disk or the parent layer) haven't changed get loaded from the cache and reused. For layers where the hash of inputs has changed, the layers get recomputed.
Using a cached layer is much faster than recomputing an instruction from scratch. So, generally, you want as much of your Docker build as possible to come from the cache and to only rebuild layers that have changed since the last build.
One of the main factors that affects how many of the layers in your image need to be rebuilt is the ordering of operations in your Dockerfile.
How much disk space is Docker using?
The first step is knowing the disk usage of Docker. We can use the docker system df command to get a breakdown of how much disk space is being taken up by various artifacts.
docker system df
TYPE            TOTAL     ACTIVE    SIZE      RECLAIMABLE
Images          138       34        36.18GB   34.15GB (94%)
Containers      74        18        834.8kB   834.6kB (99%)
Local Volumes   118       6         15.31GB   15.14GB (98%)
Build Cache 245 0 1.13GB 1.13GBDocker uses 36.18 GB for images, 834.8 kB for containers, 15.31 GB for local volumes, and 1.13 GB for the Docker build cache. This comes to about 50 GB of space in total, and a large chunk of it is reclaimable.
What space can we claim back without affecting Docker build performance?
It's generally quite safe to remove unused Docker images and layers — unless you are building in CI. For CI, clearing the layers might affect performance, so it's better not to do it. Instead, jump to our CI-focused section.
Removing containers from the Docker cache
We can use the docker container prune command to clear the disk space used by containers. This command will remove all stopped containers from the system.
We can omit the -f flag here and in subsequent examples to get a confirmation prompt before artifacts are removed.
docker container prune -f
Deleted Containers:
399d7e3679bf9b14a1c7045cc89c056f2efe31d0a32f186c5e9cb6ebbbf42c8e

Total reclaimed space: 834.6kBWhich containers are unused?
We can see the IDs of unused containers by running the docker ps command with filters on the status of the container. A container is unused if it has a status of exited or dead.
docker ps --filter status=exited --filter status=dead -q
11bc2aa92622
355901f38ecb
263e9bde1f24Note: If we want to know the size of the unused container, we can replace the -q flag with -s to get the size and other metadata about the container.
Removing all containers
If we want to remove all containers from the system, we can stop any running containers and then use the same prune command. Do this by feeding the output of docker ps -q into the docker stop or docker kill command if you want to kill the container forcibly.
docker stop $(docker ps -q)
docker container pruneAnother option is the docker rm command, which can be used with docker ps -a -q to remove all containers.
docker rm $(docker ps -a -q)Note: The docker rm command forces the removal of a running container via a SIGKILL signal. This is the same as the docker kill command. The docker ps -a -q command will list all containers on the system, including running containers, and feed that into the docker rm command.
Removing images
Docker images can take up a significant amount of disk space. We accumulate new images when base images change or build new ones via docker build, for example. We can use the docker image prune command to remove unused images from the system.
By default, it only removes dangling images, which are not associated with any container and don't have tags.
docker image prune -f
Deleted Images:
deleted: sha256:6f096c9fa1568f7566d4acaf57d20383851bcc433853df793f404375c8d975d6
...

Total reclaimed space: 2.751GBWe reclaimed over 2.7 GB of space by removing dangling images. But, if we recall from the output of our docker system df command, we have 34.15 GB of reclaimable images.
Where is the rest of that space coming from? These are images on our system that are tagged or associated with a container. We can run the docker image prune- a command to force the removal of these images as well, assuming they're unused images.
docker image prune -a -f
Deleted Images:
untagged: k8s.gcr.io/etcd:3.4.13-0
untagged: k8s.gcr.io/etcd@sha256:4ad90a11b55313b182afc186b9876c8e891531b8db4c9bf1541953021618d0e2
deleted: sha256:0369cf4303ffdb467dc219990960a9baa8512a54b0ad9283eaf55bd6c0adb934
deleted: sha256:f3cecccfe2bea1cbd18db5eae847c3a9c8253663bf30a41288f541dc1470b41e

Total reclaimed space: 22.66GBIn this way, we remove all unused images not associated with a container, not just the dangling ones.
Removing volumes
Volumes are never cleaned up automatically in Docker because they could contain valuable data. But, if we know that we no longer need the data in a volume, we can remove it with the docker volume prune command. This removes all anonymous volumes not used by any containers.
docker volume prune -f
Total reclaimed space: 0BInterestingly, we see that we didn't reclaim any space. This is because we have volumes that are associated with containers. We can see these volumes by running the docker volume ls command.
DRIVER    VOLUME NAME
local     0a44f085adc881ac9bb9cdcd659c28910b11fdf4c07aa4c38d0cca21c76d4ac4
local     0d3ee99b36edfada7834044f2caa063ac8eaf82b0dda8935ae9d8be2bffe404c
...We get an output that shows the driver and the volume name. The command docker volume prune only removes anonymous volumes. These volumes are not named and don't have a specific source from outside the container. We can use the docker volume rm -a command to remove all volumes.
docker volume prune -a -f
Deleted Volumes:
c0c240b680d70fffef420b8699eeee3f0a49eec4cc55706036f38135ae121be0
2ce324adb91e2e6286d655b7cdaaaba4b6b363770d01ec88672e26c3e2704d9e

Total reclaimed space: 15.31GBRemoving build cache
To remove the Docker build cache, we can run the docker buildx prune command to clear the build cache of the default builder.
docker buildx prune -f
ID                                        RECLAIMABLE   SIZE        LAST ACCESSED
pw11qgl0xs4zwy533i2x61pef*                true          54B         12 days ago
y37tt0kfwn1px9fnjqwxk7dnk                 true          0B          12 days ago
sq3f8r0qrqh4rniemd396s5gq*                true          154.1kB     12 days ago

Total: 5.806GBIf we want to remove the build cache for a specific builder, we can use the --builder flag to specify the builder name.
docker buildx prune --builder builder-name -fRemoving networks
While Docker networks don't take up disk space on our machine, they do create network bridges, iptables, and routing table entries. So, similarly to the other artifacts, we can remove unused networks with the docker network prune command to clean these up.
docker network prune -f
Deleted Networks:
test-network-1Removing everything with docker system prune
The equivalent of a docker clean all is better known as Docker prune. We can remove all unused artifacts Docker has produced by running docker system prune. This will remove all unused containers, images, networks, and build cache.
docker system prune -f
Deleted Images:
deleted: sha256:93477d5bde9ef0d3d7d6d2054dc58cbce1c1ca159a7b33a7b9d23cd1fe7436a3

Deleted build cache objects:
6mm1daa19k1gdijlde3l2bidb
vq294gub98yx8mjgwila989k1
xd2x5q3s6c6dh5y9ruazo4dlm

Total reclaimed space: 419.6MBBy default, Docker prune will not remove volumes and only removes dangling Docker images. We can use the --volumes flag to remove volumes as well. We can also add the -a flag again to remove all images not associated with a container.
docker system prune --volumes -afManaging Docker build cache in CI
Docker image builds in a CI environment are slightly different. You can, of course, use the above commands to clean up artifacts and manipulate the Docker cache. However, your builds might not be fully taking advantage of the Docker build cache for the following reasons:
-
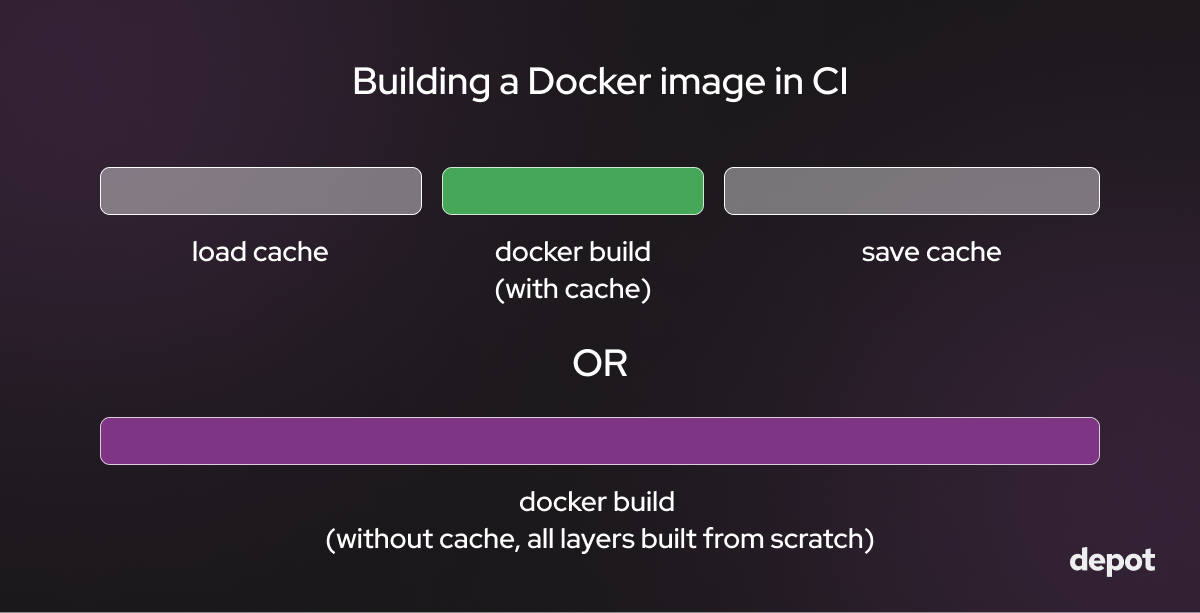
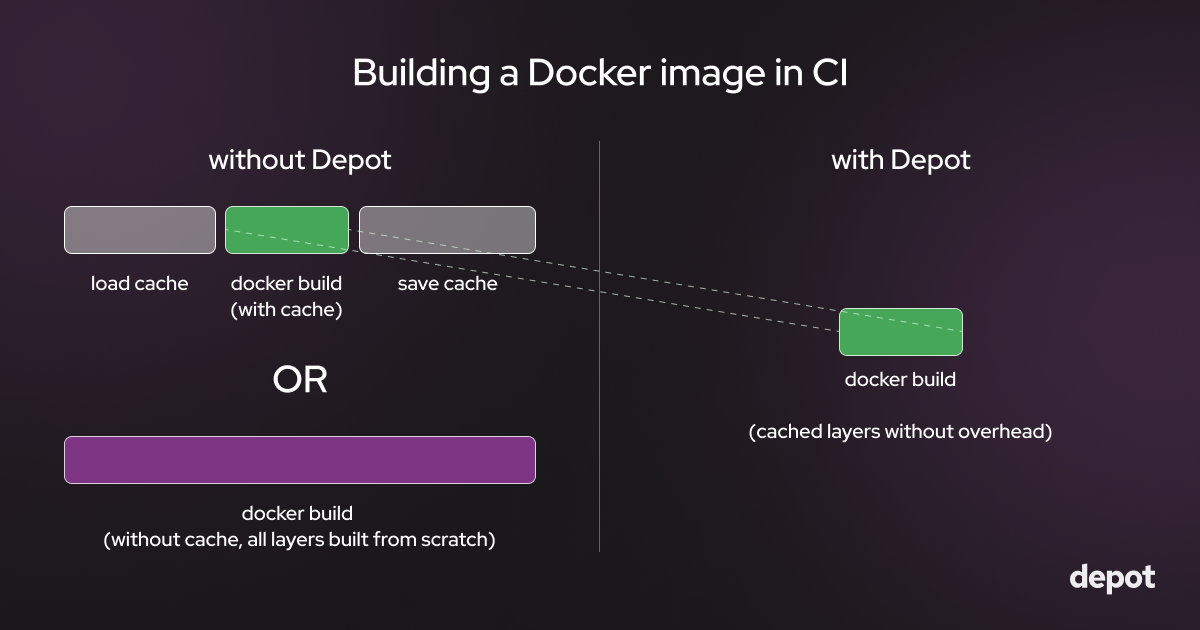
In a CI environment with ephemeral runners, such as GitHub Actions or GitLab CI, build cache isn't persisted across builds without saving/loading it over the network to somewhere off of the ephemeral runner. Saving and loading the cache is therefore slow because the network transfer speed is slow.
-
By default, all CI runners are ephemeral unless you run your own. If you choose to run your own, you can launch runners with persistentn volumes, but you have to maintain those runners going forward.
-
If you do have disk space in your non self-hosted runner, it's usually capped at 10 to 15 GB. Thus, if you're building large images with large layers, you will likely exhaust it. That disk space is also ephemeral and will be wiped after each build.
Even if you are building very small images and only keep essential layers in the Docker cache on each CI runner, your builds will likely not use the cache and thus be quite slow, as computing each layer on every build can take a while.

Then how can you optimize the use of the Docker cache in CI systems?
Use Depot to speed up Docker builds in CI
Depot automatically persists the cache across builds on a real NVMe SSds. This makes Docker builds that use Depot up to twenty times faster than building Docker images on CI without it. With Depot, your Docker build cache is automatically persisted across builds to a real storage device, so no more saving & loading layer cache over slow CI networks.

Adding Depot to your build only takes a few minutes — the depot CLI is a drop-in replacement for docker build and accepts all of the same parameters & flags. We have integrations with all of the main providers documented in our CI integrations docs.
FAQ
What does docker system df show me?
The docker system df command gives you a breakdown of disk usage across different Docker artifacts. You'll see how much space is consumed by images, containers, local volumes, and build cache, along with how much of that space is reclaimable. For example, you might see that you have 36 GB of images with 34 GB (94%) being reclaimable because those images aren't associated with any running containers.
What's the difference between docker image prune and docker image prune -a?
By default, docker image prune only removes dangling images, those without tags and not associated with any
container. If you add the -a flag, it removes all unused images, including tagged ones that aren't associated with a
container. The difference can be significant: you might reclaim 2.7 GB with the default command, but 22 GB with the
-a flag.
Will clearing Docker cache slow down my CI builds?
Yes, if you're running builds in CI with ephemeral runners. The layer cache is what makes subsequent builds fast; without it, Docker has to recompute every layer from scratch on each build. In CI environments like GitHub Actions or GitLab CI, you're already dealing with cache persistence challenges because runners don't keep state between builds. Clearing the cache just makes this worse unless you have a solution like Depot that persists cache to real storage between builds.
Does docker volume prune remove all my volumes?
No, docker volume prune only removes anonymous volumes that aren't used by any containers. If you have named volumes or volumes associated with containers, they won't be touched. To remove all volumes, you need to use docker volume prune -a, which will delete both anonymous and named volumes that aren't currently in use.
Related posts
- The ultimate guide to Docker build cache
- Tidy up with docker system prune
- Build Docker images faster using build cache
- How to use cache mounts to speed up Docker builds

