One of the greatest benefits of OCI (Docker) containers, is how they can abstract away the complexities of the underlying systems our software runs on, by encapsulating applications and their dependencies. They allow us developers to focus on writing and shipping code, without worrying excessively about the architecture or state of the machine it might run on. But what is going on inside that container? Let's open up a container and figure out how Docker layers work.
What is a Docker image?
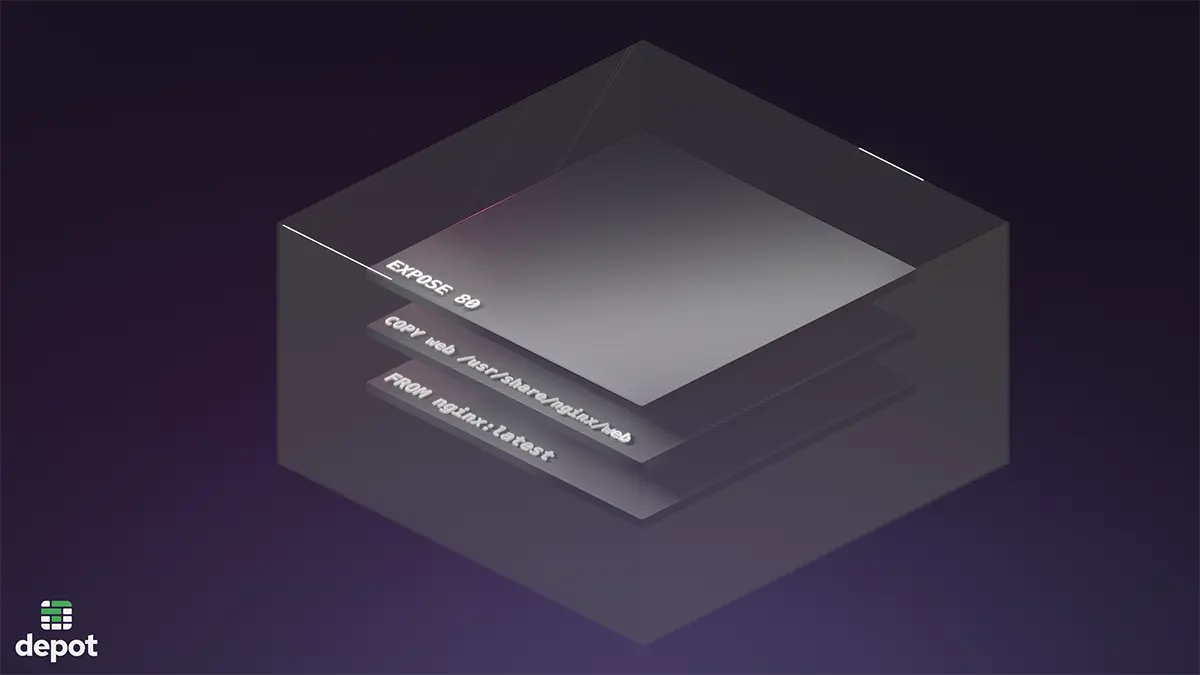
Let's recap starting at the top and break down what a Docker image is. A Docker image is made up of some metadata and a stack of read-only filesystem layers. These stacked layers represent the state of the filesystem at different points in the image's build.
Docker uses these layers to create a container filesystem when you run a container from an image. The layers are stacked on top of each other, and the filesystem changes in each layer are applied on top of the previous layer. This allows for efficient use of disk space, as layers shared between images are only stored once on disk.
You may have built an image before using the FROM directive in a Dockerfile. This directive tells Docker to start building your image from a base image. This base image is the first layer in your image's stack, and each command in your Dockerfile adds a new layer on top of the previous one.
Your container runtime uses a storage driver compatible with your machine to manage the layers of all of your local images.
The docker inspect command
The Docker inspect command gives us a detailed look at any Docker object, typically in JSON format. We can use this to inspect an image and better understand what Docker knows about it. Let's look at a popular image, node:lts
docker inspect node:lts | jq[
{
"Id": "sha256:7ffc9d92dc5d2df7dfe185517c38a47b8a0205b45aeed6dd93b3c875929b63c9",
"RepoTags": ["node:lts"],
"RepoDigests": ["node@sha256:786005cf39792f7046bcd66491056c26d2dbcc669c072d1a1e4ef4fcdddd26eb"],
"Parent": "",
"Comment": "buildkit.dockerfile.v0",
"Created": "2024-07-09T05:33:43Z",
"DockerVersion": "",
"Author": "",
"Config": {
"Hostname": "",
"Domainname": "",
"User": "",
"AttachStdin": false,
"AttachStdout": false,
"AttachStderr": false,
"Tty": false,
"OpenStdin": false,
"StdinOnce": false,
"Env": [
"PATH=/usr/local/sbin:/usr/local/bin:/usr/sbin:/usr/bin:/sbin:/bin",
"NODE_VERSION=20.15.1",
"YARN_VERSION=1.22.22"
],
"Cmd": ["node"],
"ArgsEscaped": true,
"Image": "",
"Volumes": null,
"WorkingDir": "",
"Entrypoint": ["docker-entrypoint.sh"],
"OnBuild": null,
"Labels": null
},
"Architecture": "arm64",
"Os": "linux",
"Size": 1094104203,
"GraphDriver": {
"Data": {
"LowerDir": "/var/lib/docker/overlay2/53f4a1cb375f9a65b31a763f71c663de37193ff63bd336c04006d14f839cb7a9/diff:/var/lib/docker/overlay2/c802c8614273704ab237df66ceccad42ebae1366fbbf93caa0f2925511703037/diff:/var/lib/docker/overlay2/ef663250ab1cf81ec90dac1ad8a63ceea5800a002bc5d9c6af503d15c1c4fe95/diff:/var/lib/docker/overlay2/3a309cca6bc539f6a0702b0c94610e850f52f12d55032ab50e791d8a47fc1819/diff:/var/lib/docker/overlay2/26aadc283a0beaba67d00e95b6e8273c66f6971aa31310113940aaf6fc871b42/diff:/var/lib/docker/overlay2/67d4497530ebe70aa7daea09db6bfddee80a9237fe57fb795c5ae5bdf222acb5/diff:/var/lib/docker/overlay2/a2f4ade2e53eb096bec7651a1705322528bf34c19a2d2bd5bb305df1a1444d09/diff",
"MergedDir": "/var/lib/docker/overlay2/c1f28249d0f3ede73c059409cf74c5e1d77c0ac2cbc3c320ddb5927a9679a961/merged",
"UpperDir": "/var/lib/docker/overlay2/c1f28249d0f3ede73c059409cf74c5e1d77c0ac2cbc3c320ddb5927a9679a961/diff",
"WorkDir": "/var/lib/docker/overlay2/c1f28249d0f3ede73c059409cf74c5e1d77c0ac2cbc3c320ddb5927a9679a961/work"
},
"Name": "overlay2"
},
"RootFS": {
"Type": "layers",
"Layers": [
"sha256:d1660adccd2b42ad0160cba9a291ef75a87223577240a585a7f1cb90676ec3b8",
"sha256:61dff208cd2faf1c739a9dfcf13239180964fd58683006f622e6e03ef8d98573",
"sha256:daa3e00c13a2b863c956bdc235752db6e1f1ca79273efca52e0f48824dc91293",
"sha256:b7db168206662496530f438a03e165fc2a438f3b2148257f491654e28a4e3998",
"sha256:b1e40c6b9bd885d8671095d4b450907f0027e86bba0e523511f8137e1ea708fd",
"sha256:2e6a631d5a8cc18f087a170028c0e12df3be0431fb8e578bac78f07881653436",
"sha256:556605c3055f0384b71a36833c5f9328233c14f5dc9657f3a73f1b9975a7a01d",
"sha256:3d5709452625038d1eee4c2b19a0c78b14481712671ea7fceec35983a4dd6097"
]
},
"Metadata": {
"LastTagTime": "0001-01-01T00:00:00Z"
}
}
]After pulling the image and running docker inspect, this is what we get. Let's look at some key elements of the output.
RepoTags: The name and tag(s) of the image.Parent: The ID of the parent image. This is used in multi-stage builds.Cmd: The default command to run when a container is started; this is the same as theCMDdirective in the Dockerfile used to build the image.Architecture: The CPU architecture of the image. I am currently on an M series Mac where I pulled this image, which isarm64.GraphDriver: The storage driver used to manage the image's layers.RootFS: The filesystem layers that make up the image.
The Storage Driver
The storage driver is a key element in how the container orchestrator (containerd, podman, etc.) manages the layers of the images on your machine. You'll notice in the output that the GraphDriver section shows the overlay2 driver. This is the default storage driver for Docker on most systems and implements the OverlayFS filesystem to perform most of the magic we associate with Docker image layers.
OverlayFS is a union filesystem, it allows multiple filesystems to be mounted and layered on top of each other. Each layer exists as a subdirectory in the /var/lib/Docker/overlay2 directory on your machine. When a container is started, the storage driver mounts the layers in the correct order to create the container's filesystem.
This hierarchical filesystem allows for the efficient use of disk space, as layers shared between images are only stored once on disk. This is why you may see the same layer ID in the output of docker inspect for multiple images.
If you are on Linux, you can view the layers stored in /var/lib/Docker/overlay2 on your machine. If you are on a Mac like myself, you may need to access a VM to view the layers.
Using colima, I can run the colima ssh command to access the VM where colima is running.
colima ssh
sudo -sIn the RootfFS.Layers section of the docker inspect output, you can see the SHA256 hashes of the layers that make up the image. These hashes correspond to the directories in the /var/lib/Docker/overlay2 directory on your machine.
If we wanted to manually inspect them, we could do so by navigating to the directory and listing the contents.
cd /var/lib/docker/overlay2/53f4a1cb375f9a65b31a763f71c663de37193ff63bd336c04006d14f839cb7a9

ls
committed diff link lower workNotice each of these layers contains a diff directory. This is where the filesystem changes for that layer are stored. The lower directory contains the layers below it in the stack, and the upper directory contains the writable layer for the container.
Visualize Docker layers with dive
Let's install a CLI tool called dive to help us more easily navigate the layers of an image. Dive is an interactive terminal UI for exploring docker images. We'll use Dive to show us the layers of the node:lts image and navigate through the filesystem changes.
brew install diveIf you are using colima, you may need to set the DOCKER_HOST environment variable.
docker context ls
default *   Current DOCKER_HOST based configuration   unix:///Users/<user>/.colima/default/docker.sock

export DOCKER_HOST=unix:///Users/<user>/.colima/default/docker.sockNow, we can run Dive on the node:lts image.
dive node:lts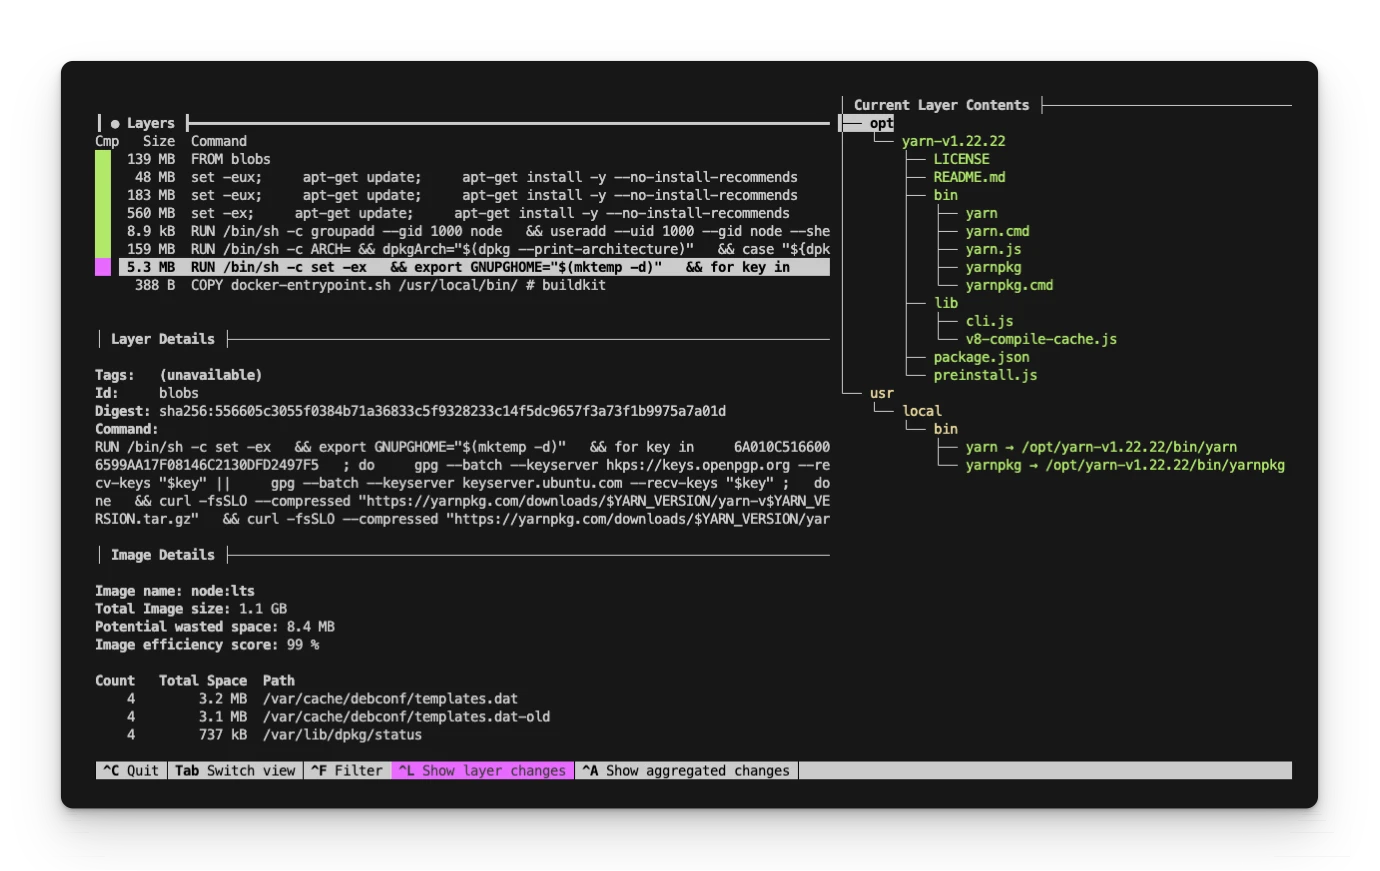
In short, we are given two panels. On the left, we can navigate each of the image's layers. On the right, we have a file-tree view of the filesystem at that layer. You can enable and disable different filters for easier navigation.
The Docker layer cache
The Overlay filesystem and compartmentalized layers allow Docker to "cache" layers independently during the build process and only rebuild the layers that have changed. Also, because the layers are read-only, Docker can share them between multiple images on the same machine.
When building an image from a Dockerfile, each command in the Dockerfile creates a new layer. If parts of the Dockerfile remain unchanged between builds, Docker can reuse the existing layers in the cache rather than rebuilding them. However, even if the Dockerfile stays the same, changes in the files or directories referenced (e.g., via a COPY command) can invalidate the cache for subsequent layers.
Each layer’s cache key includes the cache of all preceding layers. If any layer in the build changes, all the following layers must be rebuilt. This is why it is crucial to consider the order and staging of your commands to maximize the benefits of Docker’s layer caching.
When you’re ready to start writing your own Dockerfiles, check out our guide on building Docker images.
So what are Docker layers?
To answer the question of "What are Docker layers?", we've broken down and inspected the inner workings of a Docker image, and what did we learn?
A Docker layer is a directory on the host machine's disk that contains the "diff" of the filesystem changes made in that layer. These layers are stacked on top of each other to build up a complete filesystem for a container using a union filesystem like OverlayFS. The layers are read-only, and managed by the storage driver. The storage driver mounts the layers in the correct order to create the container's filesystem. Each layer is referred to by a hash, and shared between images to save disk space.
Want to go even deeper? Try building a Docker layer from scratch.
Faster Docker Layer Caching With Depot
Depot moves your build process to centralized build machines on AWS, with native Intel and Arm CPU support, for zero emulation builds. Centralizing your builds means persisting cache automatically, even when using ephemeral CI environments. You, your coworkers, and your CI environment, all benefit from up to 40x faster builds with Depot.
If you want to learn more about how Depot can help you optimize your Docker image builds, sign up for our free trial.
