# Depot Documentation
## Authentication
---
title: Authentication
ogTitle: Authentication for Depot remote caching
description: Learn how to authenticate with Depot remote caching
---
Depot Cache supports authenticating with user tokens and organization tokens. Additionally, [Depot-managed GitHub Actions runners](/docs/github-actions/overview) are pre-configured with single-use job tokens.
## Token types
- **User tokens** are used to authenticate as a specific user and can be generated from your [user settings](/settings) page.
- **Organization tokens** are used to authenticate as an organization. These tokens can be generated from your organization's settings page.
- **Depot GitHub Actions runners** are pre-configured with single-use job tokens. If you are using the automatic Depot Cache integration with Depot runners, you do not need to manually configure authentication.
## Configuring build tools
For specific details on how to configure your build tools to authenticate with Depot Cache, refer to the following guides:
- [Bazel](/docs/cache/reference/bazel)
- [Go](/docs/cache/reference/gocache)
- [Gradle](/docs/cache/reference/gradle)
- [Pants](/docs/cache/reference/pants)
- [sccache](/docs/cache/reference/sccache)
- [Turborepo](/docs/cache/reference/turbo)
## Depot Cache
---
title: Depot Cache
ogTitle: Overview of Depot remote caching
description: Learn how to use Depot remote cache for exponentially faster builds for tools like Bazel, Go, Turborepo, sccache, Pants, and Gradle.
---
import {CacheToolLogoGrid} from '~/components/docs/CacheToolLogoGrid'
**Depot Cache** is our remote caching service that speeds up your builds by providing incremental builds and accelerated tests, both locally and inside of your favorite CI provider.
One of the biggest benefits of adopting advanced build tools like Bazel is the ability to build only the parts of your codebase that have changed. Or, in other words, incremental builds. This is done by reusing previously built artifacts that have not changed via a build cache.
## Supported tools
Depot Cache integrates with build tools that support remote caching like Bazel, Go, Turborepo, sccache, Pants, and Gradle. For information about how to configure each tool to use Depot Cache, see the tool documentation:
Don't see a tool that supports remote caching that you use? Let us know in our [Discord
Community](https://discord.gg/MMPqYSgDCg)!
## How does it work?
Supported build tools can be configured to use Depot Cache, so that they store and retrieve build artifacts from Depot's remote cache. That cache can then be used from local development environments, CI/CD systems, or anywhere else you run your builds.
This speeds up your builds and tests by orders of magnitude, especially for large codebases, as those builds and tests become incremental. Instead of always having to rebuild from scratch, only the parts of your codebase that have changed are rebuilt, and only affected tests are re-run.
## Where can I use Depot Cache?
Depot Cache is accessible anywhere you run your builds, in local development or from any CI/CD system. Additionally, all supported tools are pre-configured to use Depot Cache when using [Depot GitHub Actions Runners](/docs/github-actions/overview).
This means that build artifacts are shared between different members of your team and sequential CI/CD jobs, making these builds and tests incremental.
## Pricing
Depot Cache is available on all of our pricing plans. Each plan includes a block of cache storage. Each additional GB over the included amount is billed at **$0.20/GB/month**. See our [pricing page](/pricing) for more details.
## Cache Retention
Depot Cache retains build artifacts for a configurable amount of time. By default, artifacts are retained for 14 days. You can configure this retention period in the Depot Cache settings.
## Bazel
---
title: Bazel
ogTitle: Remote caching for Bazel builds
description: Learn how to use Depot remote caching for Bazel builds
---
[**Bazel**](https://bazel.build/) is a build tool that builds code quickly and reliably. It is used by many large projects, including Google, and is optimized for incremental builds with advanced local and remote caching and parallel execution. Bazel supports many different languages and platforms, and is highly configurable, scaling to codebases of any size.
[**Depot Cache**](/docs/cache/overview) provides a remote cache service that can be used with Bazel, allowing you to incrementally cache and reuse parts of your builds. This cache is accessible from anywhere, both on your local machine and on CI/CD systems.
## Configuring Bazel to use Depot Cache
Depot Cache can be used with Bazel from Depot's managed GitHub Actions runners, from your local machine, or from any CI/CD system.
### From Depot-managed Actions runners
[Depot GitHub Actions runners](/docs/github-actions/overview) are pre-configured to use Depot Cache with Bazel - each runner is launched with a `$HOME/.bazelrc` file that is pre-populated with the connection details for Depot Cache.
If this automatic configuration is incompatible with your specific setup, you can disable automatic configuration in your organization settings page and manually configure Bazel to use Depot Cache as described below.
### From your local machine or any CI/CD system
To manually configure Bazel to use Depot Cache, you will need to set two build flags in your `.bazelrc` file. Configure Bazel to use the Depot Cache service endpoint and set API token as the `authorization` header:
```bash
build --remote_cache=https://cache.depot.dev
build --remote_header=authorization=DEPOT_TOKEN
```
If you are a member of multiple organizations, and you are authenticating with a user token, you must additionally specify which organization to use for cache storage with the `x-depot-org` header:
```bash
build --remote_header=x-depot-org=DEPOT_ORG_ID
```
## Using Depot Cache with Bazel
Once Bazel is configured to use Depot Cache, you can then run your builds as you normally would. Bazel will automatically communicate with Depot Cache to fetch and reuse any stored build artifacts from your previous builds.
## Go Cache
---
title: Go Cache
ogTitle: Remote caching for Go builds and tests
description: Learn how to use Depot remote caching for Go
---
## Configuring Go to use Depot Cache
Depot Cache can be used with Go from Depot's managed GitHub Actions runners, from your local machine, or from any CI/CD system.
### From Depot-managed Actions runners
[Depot GitHub Actions runners](/docs/github-actions/overview) are pre-configured to use Depot Cache with Go - each runner is launched with the `GOCACHEPROG` environment variable pre-populated with the connection details for Depot Cache.
If this automatic configuration is incompatible with your specific setup, you can disable automatic configuration in your organization settings page and manually configure `GOCACHEPROG` to use Depot Cache as described below.
### From your local machine or any CI/CD system
To manually configure Go to use Depot Cache, set the `GOCACHEPROG` in your environment:
```shell
export GOCACHEPROG="depot gocache"
```
The `depot` CLI will need to have [authorization](/docs/cli/authentication) to write to the cache.
If you are a member of multiple organizations, and you are authenticating with a user token, you must instead specify which organization should be used for cache storage as follows:
```shell
export GOCACHEPROG='depot gocache --organization ORG_ID'
```
To clean the cache, you can use the typical `go clean` workflow:
```shell
go clean -cache
```
To set verbose output, add the --verbose option:
```shell
export GOCACHEPROG='depot gocache --verbose'
```
## Using Depot Cache with Go
Once Go is configured to use Depot Cache, you can then run your builds as you normally would. Go will automatically communicate with `GOCACHEPROG` to fetch from Depot Cache and reuse any stored build artifacts from your previous builds.
## Gradle
---
title: Gradle
ogTitle: Remote caching for Gradle builds
description: Learn how to use Depot remote caching for Gradle builds
---
[**Gradle**](https://gradle.org/) is the build tool of choice for Java, Android, and Kotlin. It is used in many large projects, including Android itself, and is optimized for incremental builds, advanced local and remote caching, and parallel execution. Gradle supports many different languages and platforms, and is highly configurable, scaling to codebases of any size.
[**Depot Cache**](/docs/cache/overview) provides a remote cache service that can be used with Gradle, allowing you to incrementally cache and reuse parts of your builds. This cache is accessible from anywhere, both on your local machine and on CI/CD systems.
## Configuring Gradle to use Depot Cache
Depot Cache can be used with Gradle from Depot's managed GitHub Actions runners, from your local machine, or from any CI/CD system.
### From Depot-managed Actions runners
[Depot GitHub Actions runners](/docs/github-actions/overview) are pre-configured to use Depot Cache with Gradle - each runner is launched with an `init.gradle` file that is pre-populated with the connection details for Depot Cache. You will need to verify that caching is enabled in your `gradle.properties` file.
```properties
org.gradle.caching=true
```
If this automatic configuration is incompatible with your specific setup, you can disable automatic configuration in your organization settings page and manually configure Gradle to use Depot Cache as described below.
### From your local machine or any CI/CD system
To manually configure Gradle to use Depot Cache, you will need to configure remote caching in your `settings.gradle` file. Configure Gradle to use the Depot Cache service endpoints and set your API token as the `password` credential:
`settings.gradle`:
```groovy
buildCache {
remote(HttpBuildCache) {
url = 'https://cache.depot.dev'
enabled = true
push = true
credentials {
username = ''
password = 'DEPOT_TOKEN'
}
}
}
```
If you are a member of multiple organizations, and you are authenticating with a user token, you must additionally specify which organization ID to use for cache storage in the username:
```groovy
buildCache {
remote(HttpBuildCache) {
url = 'https://cache.depot.dev'
enabled = true
push = true
credentials {
username = 'DEPOT_ORG_ID'
password = 'DEPOT_TOKEN'
}
}
}
```
## Using Depot Cache with Gradle
Once Gradle is configured to use Depot Cache, you can then run your builds as you normally would. Gradle will automatically communicate with Depot Cache to fetch and reuse any stored build artifacts from your previous builds.
## Maven
---
title: Maven
ogTitle: Remote caching for Maven builds
description: Learn how to use Depot remote caching for Maven builds
---
[**Maven**](https://maven.apache.org/) is a build automation and project management tool primarily used for Java projects that helps developers manage dependencies, build processes, and documentation in a centralized way. It follows a convention-over-configuration approach by providing a standard project structure and build lifecycle, allowing teams to quickly begin development without extensive configuration.
[**Depot Cache**](/docs/cache/overview) provides a remote cache service that can be used with Maven, allowing you to incrementally cache and reuse parts of your builds. This cache is accessible from anywhere, both on your local machine and on CI/CD systems.
## Configuring Maven to use Depot Cache
Depot Cache can be used with Maven from Depot's managed GitHub Actions runners, your local machine, or any CI/CD system.
### From Depot-managed Actions runners
[Depot GitHub Actions runners](/docs/github-actions/overview) are pre-configured to use Depot Cache with Maven - each runner is launched with a `settings.xml` file that is pre-populated with the connection details for Depot Cache. You must verify that remote caching is enabled via the [Maven Build Cache extension](https://maven.apache.org/extensions/maven-build-cache-extension/index.html) in `.mvn/maven-build-cache-config.xml`:
```xml
true
SHA-256
true
https://cache.depot.dev
```
It is important to note that the `id` of your remote cache must be set to `depot-cache` for the Depot Cache service to work correctly in Depot GitHub Actions Runners. The cache will not be used if you use a different ID.
You should also verify that you have registered the Build Cache extension in your `pom.xml` file:
```xml
org.apache.maven.extensions
maven-build-cache-extension
1.0.1
```
If this automatic configuration is incompatible with your specific setup, you can disable automatic configuration in your organization settings page and manually configure Maven to use Depot Cache, as described below.
### From your local machine or any CI/CD system
To manually configure Maven to use Depot Cache, you will need to configure remote caching in your `~/.m2/settings.xml` file. Configure Maven to use the Depot Cache service endpoints and set your API token where there is the `DEPOT_TOKEN` below:
`settings.xml`:
```xml
depot-cache
Authorization
Bearer DEPOT_TOKEN
```
**Note: Maven support currently only supports Depot Organization API tokens, not user tokens.**
## Using Depot Cache with Maven
Once Maven is configured to use Depot Cache, you can run your builds as usual. Maven will automatically communicate with Depot Cache to fetch and reuse any stored build artifacts from your previous builds.
## moonrepo
---
title: moonrepo
ogTitle: Remote caching for moonrepo builds
description: Learn how to use Depot remote caching for moonrepo builds
---
[**moonrepo**](https://moonrepo.dev/) is a repository management, organization, orchestration, and notification tool for the web ecosystem, written in Rust. Many of the concepts within moon are heavily inspired from Bazel and other popular build systems.
[**Depot Cache**](/docs/cache/overview) provides a remote cache service that can be used with moonrepo, allowing you to incrementally cache and reuse parts of your builds. This cache is accessible from anywhere, both on your local machine and on CI/CD systems.
## Configuring moonrepo to use Depot Cache
Depot Cache can be used with moonrepo from Depot's managed GitHub Actions runners, from your local machine, or from any CI/CD system.
To configure `moon` to use Depot Cache, you will need to set a `DEPOT_TOKEN` environment variable with an organization or user token and add the following to your `.moon/workspace.yml` file:
```yaml
unstable_remote:
host: 'grpcs://cache.depot.dev'
auth:
token: 'DEPOT_TOKEN'
```
If you are using a user token and are a member of more than one organization, you will additionally need to set an `X-Depot-Org` header to your Depot organization ID in `.moon/workspace.yml`:
```yaml
unstable_remote:
host: 'grpcs://cache.depot.dev'
auth:
token: 'DEPOT_TOKEN'
headers:
'X-Depot-Org': ''
```
See [moonrepo's remote cache documentation](https://moonrepo.dev/docs/guides/remote-cache#cloud-hosted-depot) for more details.
## Using Depot Cache with moonrepo
Once moonrepo is configured to use Depot Cache, you can then run your builds as you normally would. moonrepo will automatically communicate with Depot Cache to fetch and reuse any stored build artifacts from your previous builds.
## Pants
---
title: Pants
ogTitle: Remote caching for Pants builds
description: Learn how to use Depot remote caching for Pants builds
---
[**Pants**](https://www.pantsbuild.org/) is an ergonomic build tool for codebases of all sizes and supports Python, Go, Java, Scala, Kotlin, Shell, and Docker. It is used in many large projects, including Coinbase, IBM, and Slack, and is optimized for fine-grained incremental builds with advanced local and remote cachin. Pants is highly configurable and can scale to codebases of any size.
[**Depot Cache**](/docs/cache/overview) provides a remote cache service that can be used with Pants, allowing you to incrementally cache and reuse parts of your builds. This cache is accessible from anywhere, both on your local machine and on CI/CD systems.
## Configuring Pants to use Depot Cache
Depot Cache can be used with Pants from Depot's managed GitHub Actions runners, from your local machine, or from any CI/CD system.
### From Depot-managed Actions runners
[Depot GitHub Actions runners](/docs/github-actions/overview) are pre-configured to use Depot Cache with Pants - each runner is launched with a `pants.toml` file that is pre-configured with the connection details for Depot Cache.
If this automatic configuration is incompatible with your specific setup, you can disable automatic configuration in your organization settings page and manually configure Pants to use Depot Cache as described below.
### From your local machine or any CI/CD system
To manually configure Pants to use Depot Cache, you will need to enable remote caching in your `pants.toml`. Configure Pants to use the Depot Cache service endpoints and set your API token in the `Authorization` header:
`pants.toml`:
```toml
[GLOBAL]
# Enable remote caching
remote_cache_read = true
remote_cache_write = true
# Point remote caching to Depot Cache
remote_store_headers = { "Authorization" = "DEPOT_TOKEN" }
remote_store_address = "grpcs://cache.depot.dev"
```
If you are a member of multiple organizations, and you are authenticating with a user token, you must additionally specify which organization to use for cache storage using the `x-depot-org` header:
```toml
remote_store_headers = { "x-depot-org" = "DEPOT_ORG_ID" }
```
## Using Depot Cache with Pants
Once Pants is configured to use Depot Cache, you can then run your builds as you normally would. Pants will automatically communicate with Depot Cache to fetch and reuse any stored build artifacts from your previous builds.
## sccache
---
title: sccache
ogTitle: Remote caching for sccache builds
description: Learn how to use Depot remote caching for sccache builds
---
[**sccache**](https://github.com/mozilla/sccache) is a ccache-like compiler caching tool that was created by Mozilla. It is a compiler wrapper that avoids compilation when possible and stores cached results locally or in remote storage. It supports caching the compilation of several languages including C, C++, and Rust. sccache is used in many large projects, including Firefox, and is optimized for incremental builds and advanced local and remote caching.
[**Depot Cache**](/docs/cache/overview) provides a remote cache service that can be used with sccache, allowing you to incrementally cache and reuse parts of your builds. This cache is accessible from anywhere, both on your local machine and on CI/CD systems.
## Configuring sccache to use Depot Cache
Depot Cache can be used with sccache from Depot's managed GitHub Actions runners, from your local machine, or from any CI/CD system.
### From Depot-managed Actions runners
[Depot GitHub Actions runners](/docs/github-actions/overview) are pre-configured to use Depot Cache with sccache - each runner is launched with a `SCCACHE_WEBDAV_ENDPOINT` environment variable and is pre-configured with the connection details for Depot Cache.
If this automatic configuration is incompatible with your specific setup, you can disable automatic configuration in your organization settings page and manually configure sccache to use Depot Cache as described below.
### From your local machine or any CI/CD system
To manually configure sccache to use Depot Cache, you will need to set two environment variables in your environment, representing the Depot Cache service endpoint and your API token:
```shell
export SCCACHE_WEBDAV_ENDPOINT=https://cache.depot.dev
export SCCACHE_WEBDAV_TOKEN=DEPOT_TOKEN
```
If you are a member of multiple organizations, and you are authenticating with a user token, you must instead specify a password along with which organization should be used for cache storage as follows:
```shell
export SCCACHE_WEBDAV_ENDPOINT=https://cache.depot.dev
export SCCACHE_WEBDAV_USERNAME=DEPOT_ORG_ID
export SCCACHE_WEBDAV_PASSWORD=DEPOT_TOKEN
```
## Using Depot Cache with sccache
Once sccache is configured to use Depot Cache, you can then run your builds as you normally would. sccache will automatically communicate with Depot Cache to fetch and reuse any stored build artifacts from your previous builds.
## Turborepo
---
title: Turborepo
ogTitle: Remote caching for Turborepo builds
description: Learn how to use Depot remote caching for Turborepo builds
---
[**Turborepo**](https://turbo.build/) is a high-performance build system for JavaScript and TypeScript codebases, and is designed around scaling build performance for large monorepos. It is used by large projects at Netflix, AWS, and Disney, and supports incremental builds backed by local and remote cache options.
[**Depot Cache**](/docs/cache/overview) provides a remote cache service that can be used with Turborepo, allowing you to incrementally cache and reuse parts of your builds. This cache is accessible from anywhere, both on your local machine and on CI/CD systems.
## Configuring Turborepo to use Depot Cache
Depot Cache can be used with Turborepo from Depot's managed GitHub Actions runners, from your local machine, or from any CI/CD system.
### From Depot-managed Actions runners
[Depot GitHub Actions runners](/docs/github-actions/overview) are pre-configured to use Depot Cache with Turborepo - each runner is launched with a `TURBO_API` environment variable and is pre-configured with the connection details for Depot Cache.
If this automatic configuration is incompatible with your specific setup, you can disable automatic configuration in your organization settings page and manually configure Turborepo to use Depot Cache as described below.
### From your local machine or any CI/CD system
To manually configure Turborepo to use Depot Cache, you will need to set three environment variables in your environment. These represent the Depot Cache service endpoint, your API token, and your Depot organization id:
```shell
export TURBO_API=https://cache.depot.dev
export TURBO_TOKEN=DEPOT_TOKEN
export TURBO_TEAM=DEPOT_ORG_ID
```
## Using Depot Cache with Turborepo
Once Turborepo is configured to use Depot Cache, you can then run your builds as you normally would. Turborepo will automatically communicate with Depot Cache to fetch and reuse any stored build artifacts from your previous builds.
## Authentication
---
title: Authentication
ogTitle: Options for authenticating builds with the Depot CLI
description: We provide three different methods you can use to authenticate your container image builds.
---
We provide three different options you can use to authenticate your build to our remote Docker builders via the `depot` CLI.
## User access tokens
You can generate an access token tied to your Depot account that can be used for builds in any project in any organization you have access. When you run `depot login` we authenticate your account and generate a new user access token that all builds from your machine use by default. It is recommended to only use these for local development and not in CI environments.
To generate a user access token, you can go through the following steps:
1. Open your [Account Settings](/settings)
2. Enter a description for your token under API Tokens
3. Click Create token
## Project tokens
Unlike user access tokens, project tokens are tied to a specific project in your organization and not a user account. These are ideal for building images with Depot from your existing CI provider. They are not tied to a single user account and are restricted to a single project in a single organization.
To generate a project token, you can go through the following steps:
1. Open your Project Details page by clicking on a project from your projects list
2. Click the Settings button next to your project ID
3. Enter a token description and click create token
## OIDC trust relationships
If you use GitHub Actions, CircleCI, or Buildkite as your CI provider, we can directly integrate with [GitHub Actions OIDC](https://docs.github.com/en/actions/deployment/security-hardening-your-deployments/about-security-hardening-with-openid-connect), [CircleCI OIDC](https://circleci.com/docs/openid-connect-tokens/), [Buildkite OIDC](https://buildkite.com/docs/agent/v3/cli-oidc), or [Mint](https://www.rwx.com/mint) via trust relationships. This token exchange is a great way to plug Depot into your existing Actions workflows, CircleCI jobs, or Buildkite pipelines, as it requires no static secrets, and credentials are short-lived.
You configure a trust relationship in Depot that allows your GitHub Actions workflows, CircleCI jobs, or Buildkite pipelines to access your project via a token exchange. The CI job requests an access token from Depot, and we check the request details to see if they match a configured trust relationship for your project. If everything matches, we generate a temporary access token and return it to the job. This temporary access token is only valid for the duration of the job that requested it.
### Adding a trust relationship for GitHub Actions
To add a trust relationship for GitHub Actions, you can go through the following steps:
1. Open your Project Details page by clicking on a project from your projects list
2. Click the Settings button next to your project ID
3. Click the Add trust relationship button
4. Select GitHub as the provider
5. Enter a GitHub User or Organization for the trust relationship
6. Enter the name of the GitHub repository that will build images via Depot (Note: this is the repository name, not the full URL and it must match the repository name exactly)
7. Click Add trust relationship
8. Ensure your workflow has permission to use this OIDC trust relationship by setting the permission `id-token: write`.
### Adding a trust relationship for CircleCI
To add a trust relationship for CircleCI, you can go through the following steps:
1. Open your Project Details page by clicking on a project from your projects list
2. Click the Settings button next to your project ID
3. Click the Add trust relationship button
4. Select CircleCI as the provider
5. Enter your CircleCI organization UUID (this is found in your CircleCI organization settings)
6. Enter your CircleCI project UUID (this is found in your CircleCI project settings)
7. Click Add trust relationship
**Note:** CircleCI requires entering your organization and project UUID, _not_ the friendly name of your organization or project.
### Adding a trust relationship for Buildkite
To add a trust relationship for Buildkite, you can go through the following steps:
1. Open your Project Details page by clicking on a project from your projects list
2. Click the Settings button next to your project ID
3. Click the Add trust relationship button
4. Select Buildkite as the provider
5. Enter the organization slug (i.e., `buildkite.com/`)
6. Enter the pipeline organization slug (i.e., `buildkite.com//`)
7. Click Add trust relationship
### Adding a trust relationship for Mint
To add a trust relationship for Mint, you can go through the following steps:
1. Open your Project Details page by clicking on a project from your projects list
2. Click the Settings button next to your project ID
3. Click the Add trust relationship button
4. Select Mint as the provider
5. Enter your Mint Vault subject you configured [here](https://www.rwx.com/docs/mint/oidc-depot#configure-depot-in-mint)
6. Click Add trust relationship
## Depot CLI Installation
---
title: Depot CLI Installation
ogTitle: Install the Depot CLI
description: Install our Depot CLI, a drop-in replacement for docker build.
---
How to install the `depot` CLI on all platforms, with links to CI configuration guides.
## Mac
For Mac, you can install the CLI with Homebrew:
```shell
brew install depot/tap/depot
```
Or download the latest version from [GitHub releases](https://github.com/depot/cli/releases).
## Linux
Either install with [our installation script](https://depot.dev/install-cli.sh):
```shell
# Install the latest version
curl -L https://depot.dev/install-cli.sh | sh
# Install a specific version
curl -L https://depot.dev/install-cli.sh | sh -s x.y.z
```
Or download the latest version from [GitHub releases](https://github.com/depot/cli/releases).
## CLI Reference
---
title: CLI Reference
ogTitle: Depot CLI Reference
description: A reference for the `depot` CLI, including all config, commands, flags, and options.
---
Below is a reference to the `depot` CLI, including all config, commands, flags, and options. To submit an issue or features please see our CLI repo over on [GitHub](https://github.com/depot/cli).
## Specifying a Depot project
Some commands need to know which [project](/docs/core-concepts#projects) to route the build to.
For interactive terminals calling [`build`](#depot-build) or [`bake`](#depot-bake), if don't specify a project, you will be prompted to choose a project when using an interactive prompt and given the option to save that project for future use in a `depot.json` file.
Alternatively, you can specify the Depot project for any command using any of the following methods:
1. Use the `--project` flag with the ID of the project you want to use
2. Set the `DEPOT_PROJECT_ID` environment variable to the ID of the project you want to use
## Authentication
The Depot CLI supports different authentication mechanisms based on where you're running your build, you can read more about them in our [authentication docs](/docs/cli/authentication).
### Local builds with the CLI
For the CLI running locally, you can use the `depot login` command to authenticate with your Depot account, and the `depot logout` command to log out. This will generate a [user token](/docs/cli/authentication#user-access-tokens) and store it on your local machine. We recommended only using this option when running builds locally.
### Build with the CLI in a CI environment
When using the CLI in a CI environment like GitHub Actions, we recommended configuring your workflows to leverage our [OIDC trust relationships](/docs/cli/authentication#oidc-trust-relationships). These prevent the need to store user tokens in your CI environment and allow you to authenticate with Depot using your CI provider's identity.
For CI providers that don't support OIDC, we recommended configuring your CI environment to use a [project token](/docs/cli/authentication#project-tokens).
### The `--token` flag
A variety of Depot CLI calls accept a `--token` flag, which allows you to specify a **user or project token** to use for the command. If no token is specified, the CLI will attempt to use the token stored on your local machine or look for an environment variable called `DEPOT_TOKEN`.
## Commands
### `depot bake`
The `bake` command allows you to define all of your build targets in a central file, either HCL, JSON, or Compose. You can then pass that file to the `bake` command and Depot will build all of the target images with all of their options (i.e. platforms, tags, build arguments, etc.).
By default, `depot bake` will leave the built image in the remote builder cache. If you would like to download the image to your local Docker daemon (for instance, to `docker run` the result), you can use the `--load` flag. In some cases it is more efficient to load from the registry, so this may result in the build getting saved to the Depot Registry.
Alternatively, to push the image to a remote registry directly from the builder instance, you can use the `--push` flag.
**Example**
An example `docker-bake.hcl` file:
```hcl
group "default" {
targets = ["original", "db"]
}
target "original" {
dockerfile = "Dockerfile"
platforms = ["linux/amd64", "linux/arm64"]
tags = ["example/app:test"]
}
target "db" {
dockerfile = "Dockerfile.db"
platforms = ["linux/amd64", "linux/arm64"]
tags = ["example/db:test"]
}
```
To build all of the images we just need to call `bake`:
```shell
depot bake -f docker-bake.hcl
```
If you want to build different targets in the bake file with different Depot projects, you can specify the `project_id` in the `target` block:
```hcl
group "default" {
targets = ["original", "db"]
}
target "original" {
dockerfile = "Dockerfile"
platforms = ["linux/amd64", "linux/arm64"]
tags = ["example/app:test"]
project_id = "project-id-1"
}
target "db" {
dockerfile = "Dockerfile.db"
platforms = ["linux/amd64", "linux/arm64"]
tags = ["example/db:test"]
project_id = "project-id-2"
}
```
If you want to build a specific target in the bake file, you can specify it in the `bake` command:
```shell
depot bake -f docker-bake.hcl original
```
You can also save all of the targets built in a bake or compose file to the [Depot Registry](/docs/registry/overview) for later use with the `--save` flag:
```shell
depot bake -f docker-bake.hcl --save
```
#### Docker Compose support
Depot supports using bake to build [Docker Compose](/blog/depot-with-docker-compose) files.
To use `depot bake` with a Docker Compose file, you can specify the file with the `-f` flag:
```shell
depot bake -f docker-compose.yml
```
Compose files have special extensions prefixed with `x-` to give additional information to the build process.
In this example, the `x-bake` extension is used to specify the tags for each service and the `x-depot` extension is used to specify different project IDs for each.
```yaml
services:
mydb:
build:
dockerfile: ./Dockerfile.db
x-bake:
tags:
- ghcr.io/myorg/mydb:latest
- ghcr.io/myorg/mydb:v1.0.0
x-depot:
project-id: 1234567890
myapp:
build:
dockerfile: ./Dockerfile.app
x-bake:
tags:
- ghcr.io/myorg/myapp:latest
- ghcr.io/myorg/myapp:v1.0.0
x-depot:
project-id: 9876543210
```
#### Flags for `bake`
This command accepts all the command line flags as Docker's `docker buildx bake` command.
{/* */}
| Name | Description |
| ---- | ----------- |
| `build-platform` | Run builds on this platform ("dynamic", "linux/amd64", "linux/arm64") (default "dynamic") |
| `file` | Build definition file |
| `help` | Show the help doc for `bake` |
| `lint` | Lint Dockerfiles of targets before the build |
| `lint-fail-on` | Set the lint severity that fails the build ("info", "warn", "error", "none") (default "error") |
| `load` | Shorthand for "--set=\*.output=type=docker" |
| `metadata-file` | Write build result metadata to the file |
| `no-cache` | Do not use cache when building the image |
| `print` | Print the options without building |
| `progress` | Set type of progress output ("auto", "plain", "tty"). Use plain to show container output (default "auto") |
| `project` | Depot project ID |
| `provenance` | Shorthand for "--set=\*.attest=type=provenance" |
| `pull` | Always attempt to pull all referenced images |
| `push` | Shorthand for "--set=\*.output=type=registry" |
| `save` | Saves the build to the Depot Registry
| `save-tag` | Saves the tag prepended to each target to the Depot Registry |
| `sbom` | Shorthand for "--set=\*.attest=type=sbom" |
| `sbom-dir` | Directory to store SBOM attestations |
| `set` | Override target value (e.g., "targetpattern.key=value") |
| `token` | Depot token ([authentication docs](/docs/cli/authentication)) |
{/* */}
### `depot build`
Runs a Docker build using Depot's remote builder infrastructure.
By default, `depot build` will leave the built image in the remote builder cache. If you would like to download the image to your local Docker daemon (for instance, to `docker run` the result), you can use the `--load` flag. In some cases it is more efficient to load from the registry, so this may result in the build getting saved to the Depot Registry.
Alternatively, to push the image to a remote registry directly from the builder instance, you can use the `--push` flag.
**Example**
```shell
# Build remotely
depot build -t repo/image:tag .
```
```shell
# Build remotely, download the container locally
depot build -t repo/image:tag . --load
```
```shell
# Lint your dockerfile
depot build -t repo/image:tag . --lint
```
```shell
# Build remotely, push to a registry
depot build -t repo/image:tag . --push
```
#### Flags for `build`
This command accepts all the command line flags as Docker's `docker buildx build` command.
{/* */}
| Name | Description |
| ---- | ----------- |
| `add-host` | Add a custom host-to-IP mapping (format: "host:ip") |
| `allow` | Allow extra privileged entitlement (e.g., "network.host", "security.insecure") |
| `attest` | Attestation parameters (format: "type=sbom,generator=image") |
| `build-arg` | Set build-time variables |
| `build-context` | Additional build contexts (e.g., name=path) |
| `build-platform` | Run builds on this platform ("dynamic", "linux/amd64", "linux/arm64") (default "dynamic") |
| `cache-from` | External cache sources (e.g., "user/app:cache", "type=local,src=path/to/dir") |
| `cache-to` | Cache export destinations (e.g., "user/app:cache", "type=local,dest=path/to/dir") |
| `cgroup-parent` | Optional parent cgroup for the container |
| `file` | Name of the Dockerfile (default: "PATH/Dockerfile") |
| `help` | Show help doc for `build` |
| `iidfile` | Write the image ID to the file |
| `label` | Set metadata for an image |
| `lint` | Lint Dockerfile before the build |
| `lint-fail-on` | Set the lint severity that fails the build ("info", "warn", "error", "none") (default "error") |
| `load` | Shorthand for "--output=type=docker" |
| `metadata-file` | Write build result metadata to the file |
| `network` | Set the networking mode for the "RUN" instructions during build (default "default") |
| `no-cache` | Do not use cache when building the image |
| `no-cache-filter` | Do not cache specified stages |
| `output` | Output destination (format: "type=local,dest=path") |
| `platform` | Set target platform for build |
| `progress` | Set type of progress output ("auto", "plain", "tty"). Use plain to show container output (default "auto") |
| `project` | Depot project ID |
| `provenance` | Shortand for "--attest=type=provenance" |
| `pull` | Always attempt to pull all referenced images |
| `push` | Shorthand for "--output=type=registry" |
| `quiet` | Suppress the build output and print image ID on success |
| `save` | Saves the build to the Depot Registry |
| `save-tag` | Saves the tag provided to the Depot Registry |
| `sbom` | Shorthand for "--attest=type=sbom" |
| `sbom-dir` | Directory to store SBOM attestations |
| `secret` | Secret to expose to the build (format: "id=mysecret[,src=/local/secret]") |
| `shm-size` | Size of "/dev/shm" |
| `ssh` | SSH agent socket or keys to expose to the build |
| `tag` | Name and optionally a tag (format: "name:tag") |
| `target` | Set the target build stage to build |
| `token` | Depot token |
| `ulimit` | Ulimit options (default []) |
{/* */}
### `depot cache`
Interact with the cache associated with a Depot project. The `cache` command consists of subcommands for each operation.
#### `depot cache reset`
Reset the cache of the Depot project to force a new empty cache volume to be created.
**Example**
Reset the cache of the current project ID in the root `depot.json`
```shell
depot cache reset .
```
Reset the cache of a specific project ID
```shell
depot cache reset --project 12345678910
```
### `depot gocache`
Configure Go tools to use Depot Cache. The Go tools will use the remote cache service to store and retrieve build artifacts.
_Note: This requires Go 1.24 or later._
Set the environment variable `GOCACHEPROG` to `depot gocache` to configure Go to use Depot Cache.
```shell
export GOCACHEPROG='depot gocache'
```
Next, run your Go build commands as usual.
```shell
go build ./...
```
To set verbose output, add the --verbose option:
```shell
export GOCACHEPROG='depot gocache --verbose'
```
To clean the cache, you can use the typical `go clean` workflow:
```shell
go clean -cache
```
If you are in multiple Depot organizations and want to specify the organization, you can use the `--organization` flag.
```shell
export GOCACHEPROG='depot gocache --organization ORG_ID'
```
### `depot configure-docker`
Configure Docker to use Depot's remote builder infrastructure. This command installs Depot as a Docker CLI plugin (i.e., `docker depot ...`), sets the Depot plugin as the default Docker builder (i.e., `docker build`), and activates a buildx driver (i.e. `docker buildx buildx ...`).
```shell
depot configure-docker
```
If you want to uninstall the plugin, you can specify the `--uninstall` flag.
```shell
depot configure-docker --uninstall
```
### `depot list`
Interact with Depot builds.
### `depot list builds`
Display the latest Depot builds for a project. By default the command runs an interactive listing of depot builds showing status and build duration.
To exit type `q` or `ctrl+c`
**Example**
List builds for the project in the current directory.
```shell
depot list builds
```
**Example**
List builds for a specific project ID
```shell
depot list builds --project 12345678910
```
**Example**
The list command can output build information to stdout with the `--output` option. It supports `json` and `csv`.
Output builds in JSON for the project in the current directory.
```shell
depot list builds --output json
```
### `depot init`
Initialize an existing Depot project in the current directory. The CLI will display an interactive list of your Depot projects for you to choose from, then write a `depot.json` file in the current directory with the contents `{"id": "PROJECT_ID"}`.
**Example**
```shell
depot init
```
### `depot login`
Authenticates with your Depot account, automatically creating and storing a user token on your local machine.
**Examples**
```shell
# Login and select organization interactively
$ depot login
# Login and specify organization ID
$ depot login --org-id 1234567890
# Clear existing token before logging in
$ depot login --clear
```
### `depot logout`
Logout out of your Depot account, removing your user token from your local machine.
**Example**
```shell
depot logout
```
### `depot projects create`
Create a new project in your Depot organization.
```shell
depot projects create "your-project-name"
```
Projects will be created with the default region `us-east-1` and cache storage policy of 50 GB per architecture. You can specify a different region and cache storage policy using the `--region` and `--cache-storage-policy` flags.
```shell
depot projects create --region eu-central-1 --cache-storage-policy 100 "your-project-name"
```
If you are in more than one organization, you can specify the ID of the organization you want the project to be created in using the `--organization` flag.
```shell
depot projects create ---organization 12345678910 "your-project-name"
```
#### Flags for `create`
Additional flags that can be used with this command.
{/* */}
| Name | Description |
| ---- | ----------- |
| `platform` | Pulls image for specific platform ("linux/amd64", "linux/arm64") |
| `organization` | Depot organization ID |
| `region` | Build data will be stored in the chosen region (default "us-east-1") |
| `cache-storage-policy` | Build cache to keep per architecture in GB (default 50) |
| `token` | Depot token |
{/* */}
### `depot projects list`
Display an interactive listing of current Depot projects. Selecting a specific project will display the latest builds.
To return from the latest builds to projects, press `ESC`.
To exit type `q` or `ctrl+c`
**Example**
```shell
depot list projects
```
### `depot pull`
Pull an image from the Depot Registry by build ID in a project.
**Example**
```shell
depot pull --project
```
You can also specify the tag to assign to the image using the `-t` flag.
**Example**
```shell
depot pull --project -t :
```
There is also the option to pull an image for a specific platform.
```shell
depot pull --project --platform linux/arm64
```
#### Flags for `pull`
Additional flags that can be used with this command.
{/* */}
| Name | Description |
| ---- | ----------- |
| `platform` | Pulls image for specific platform ("linux/amd64", "linux/arm64") |
| `progress` | Set type of progress output ("auto", "plain", "tty", "quiet") (default "auto") |
| `project` | Depot project ID |
| `tag` | Optional tags to apply to the image |
| `token` | Depot token |
{/* */}
### `depot pull-token`
Generate a short-lived token to pull an image from the Depot Registry.
**Example**
```shell
depot pull-token --project
```
You can also specify a build ID to generate a token for a specific build.
**Example**
```shell
depot pull-token --project
```
#### Flags for `pull-token`
Additional flags that can be used with this command.
{/* */}
| Name | Description |
| ---- | ----------- |
| `project` | Depot project ID |
| `token` | Depot token |
{/* */}
### `depot push`
Push an image from the Depot Registry to another registry. It uses registry credentials stored in Docker when pushing to registries. If you have not already authenticated with your registry, you should do so with `docker login` before running `depot push`.
Alternatively, you can specify the environment variables `DEPOT_PUSH_REGISTRY_USERNAME` and `DEPOT_PUSH_REGISTRY_PASSWORD`
for the registry credentials. This allows you to skip the `docker login` step.
**Example**
```shell
depot push --project
```
You can also specify the tag to assign to the image that is being pushed by using the `-t` flag.
**Example**
```shell
depot push --project -t :
```
#### Flags for `push`
Additional flags that can be used with this command.
{/* */}
| Name | Description |
| ---- | ----------- |
| `progress` | Set type of progress output ("auto", "plain", "tty", "quiet") (default "auto") |
| `project` | Depot project ID |
| `tag` | Optional tags to apply to the image |
| `token` | Depot token |
{/* */}
### `depot org`
Manage organizations you have access to in Depot. The `org` command group provides tools to list, switch, and show your current organization context.
#### `depot org list`
List organizations that you can access. By default, this command opens an interactive table. You can also output the list in `json` or `csv` format for scripting.
**Usage**
```shell
depot org list
```
#### `depot org switch`
Set the current organization in your global Depot settings. This affects which organization is used by default for commands that support organization context.
**Usage**
```shell
depot org switch [org-id]
```
If you do not provide an `org-id`, you will be prompted to select one interactively.
**Examples**
```shell
# Switch to a specific organization by ID
$ depot org switch 1234567890
# Select organization interactively
$ depot org switch
```
#### `depot org show`
Show the current organization set in your global Depot settings.
**Usage**
```shell
depot org show
```
**Example**
```shell
$ depot org show
1234567890
```
## Docker Arm images
---
title: Docker Arm images
ogTitle: Building native Docker Arm images with Depot
description: Build native Docker Arm images or multi-platform Docker images without emulation.
---
## Docker Arm images with Depot
Building Docker images for Arm via `docker build` from a host architecture running an Intel chip is forced to use QEMU emulation to build Docker Arm images. It's also only possible to build multi-platform Docker images using emulation or running your own BuildKit builders.
Depot removes emulation altogether.
Depot is a remote Docker container build service that orchestrates optimized BuildKit builders on native CPUs for Intel (x86) and Arm (arm64).
When a Docker image build is routed to Depot either via [`depot build`](/docs/cli/reference#depot-build) or [`docker build`](/docs/container-builds/how-to-guides/docker-build#how-to-use-depot-with-docker), we launch optimized builders for each architecture requested with a persistent layer cache attached to them. Each image builder, by default, has 16 CPUs and 32GB of memory. If you're on a startup or business plan, you can configure your builders to be larger, with up to 64 CPUs and 128 GB of memory. Each builder also has a fast NVMe SSD with at least 50GB for layer caching.
## How to build Docker images for Arm CPUs like Apple Silicon or AWS Graviton
With `depot build` or `docker build` configured to use Depot, it automatically detects the architecture you're building for and routes the build to the appropriate builder.
So, if you're building a Docker image from a macOS device running Apple Silicon (M1, M2, M3, M4), there is nothing extra you need to do. We will detect the architecture and route the build to an Arm builder.
```shell
depot build .
```
If you're building a Docker image from an Intel machine, like a CI provider, you can specify `--platform linux/arm64` to build a Docker Arm image.
```shell
docker build --platform linux/arm64 .
```
We have integration guides for most of the CI providers:
- [Bitbucket Pipelines](/docs/container-builds/reference/bitbucket-pipelines)
- [Buildkite](/docs/container-builds/reference/buildkite)
- [CircleCI](/docs/container-builds/reference/circleci)
- [GitHub Actions](/docs/container-builds/reference/github-actions)
- [GitLab CI](/docs/container-builds/reference/gitlab-ci)
- [Google Cloud Build](/docs/container-builds/reference/google-cloud-build)
- [Jenkins](/docs/container-builds/reference/jenkins)
- [Travis CI](/docs/container-builds/reference/travis-ci)
## How to build multi-platform Docker images
With Depot, we can launch multiple builders in parallel to build multi-platform Docker images concurrently. To build a multi-platform Docker image for both Intel & Arm, we can specify `--platform linux/amd64,linux/arm64` to `depot build` or `docker build`.
```shell
depot build --platform linux/amd64,linux/arm64 .
```
### Loading a multi-platform Docker image via `--load`
If you want to load a multi-platform Docker image into your local Docker daemon, you will hit an error when using `docker buildx build --load`:
```shell
docker exporter does not currently support exporting manifest lists
```
This is because the default behavior of load does not support loading multi-platform Docker images. To get around this, you can use [`depot build --load`](/docs/cli/reference#depot-build) instead where we have made load faster & more intelligent.
```shell
depot build --platform linux/amd64,linux/arm64 --load .
```
## Build autoscaling
---
title: Build autoscaling
description: How to enable and configure container build autoscaling to parallelize builds across multiple builders
---
import {ImageWithCaption} from '~/components/Image'
Container build autoscaling allows you to automatically scale out your builds to multiple BuildKit builders based on the number of concurrent builds you want to process on a single builder. This feature is available on all Depot plans and can significantly speed up your container builds when you have multiple concurrent builds or resource-intensive builds.
## How build autoscaling works
By default, all builds for a project are routed to a single BuildKit host per architecture you're building. Each BuildKit builder can process multiple jobs concurrently on the same host, which enables deduplication of work across builds that share similar steps and layers.
With build autoscaling enabled, Depot will automatically spin up additional BuildKit builders when the concurrent build limit is reached. Here's how the process works:
1. You run `depot build`, which informs our control plane that you'd like to run a container build
2. The control plane checks your autoscaling configuration to determine the maximum concurrent builds per builder
3. If the current builder is at capacity, the provisioning system spins up additional BuildKit builders
4. Each additional builder operates on a clone of the main builder's layer cache
5. The `depot build` command connects directly to an available builder to run the build
## When to use build autoscaling
Build autoscaling is particularly useful in these scenarios:
- **High concurrent build volume**: When you have many builds running simultaneously that consume all resources of a single builder
- **Resource-intensive builds**: When individual builds require significant CPU, memory, or I/O resources
- **Time-sensitive builds**: When you need to reduce build queue times during peak periods
- **CI/CD pipelines with parallel jobs**: When your pipeline triggers multiple builds at once
### When NOT to use build autoscaling
Consider these tradeoffs before enabling autoscaling:
- **Cache efficiency**: Additional builders operate on cache clones that are not written back to the main cache, reducing cache hit rates
- **Deduplication loss**: Builds on different builders cannot share work, even if they have similar layers
- **Small, infrequent builds**: If your builds are small and run infrequently, the overhead may not be worth it
**Recommendation**: Before enabling autoscaling, first try sizing up your container builder. You can select larger builder sizes on our [pricing page](/pricing), which allows you to run larger builds on a single builder without needing to scale out.
## How to enable build autoscaling
To enable container build autoscaling:
1. Navigate to your Depot project settings
2. Go to the **Settings** tab
3. Find the **Build autoscaling** section
4. Toggle **Enable horizontal autoscaling**
5. Set the **Maximum concurrent builds per builder** (default is 1)
6. Click **Save changes**
The concurrent builds setting determines how many builds can run on a single builder before triggering a scale-out event. For example:
- Setting it to `1` means each build gets its own dedicated builder
- Setting it to `3` means up to 3 builds can share a builder before a new one is launched
## Cache behavior with autoscaling
Understanding cache behavior is crucial when using autoscaling:
### Cache cloning
When additional builders are launched due to autoscaling:
1. They receive a **read-only clone** of the main builder's layer cache
2. New layers built on scaled builders are stored locally but **not persisted** back to the main cache
3. When the scaled builder terminates, its local cache changes are lost
### Cache implications
This means:
- Builds on scaled builders can read from the main cache
- They cannot contribute new layers back to the main cache
- Subsequent builds may need to rebuild layers that were already built on scaled builders
- Cache efficiency may decrease with heavy autoscaling usage
## Billing and costs
Build autoscaling is available on **all Depot plans** at no additional cost:
- **No extra charges**: Autoscaling itself doesn't incur additional fees
- **Standard compute rates**: You pay the same per-minute rate for scaled builders as regular builders
- **No cache storage charges**: Cache clones are temporary and don't count toward your storage quota
- **Pay for what you use**: Scaled builders are terminated when not in use
## Best practices
1. **Monitor your builds**: Use Depot's build insights to understand your build patterns before enabling autoscaling
2. **Start conservative**: Begin with a higher concurrent build limit and decrease if needed
3. **Size up first**: Consider using larger builder sizes before enabling autoscaling
4. **Review cache hit rates**: Monitor if autoscaling significantly impacts your cache efficiency
5. **Adjust during peak times**: You can dynamically adjust settings based on your build patterns
## Example configuration
Here's an example of when autoscaling might be beneficial:
**Scenario**: Your team has resource-intensive builds that compile large applications with heavy dependencies. Each build requires significant CPU and memory resources, and you frequently have multiple builds running concurrently due to:
- Multiple developers pushing code simultaneously
- CI pipelines that build multiple variants of your application (different environments, architectures, or configurations)
- Monorepo setups where changes trigger builds for multiple services
**Without autoscaling**:
- Multiple resource-intensive builds compete for CPU and memory on a single builder
- Builds experience CPU throttling and memory pressure
- Build times increase dramatically when multiple builds run concurrently
- Builds may fail due to out-of-memory errors when too many run simultaneously
**With autoscaling** (max 1 concurrent build per builder):
- Each resource-intensive build gets its own dedicated builder with full access to 16 CPUs and 32GB RAM
- No resource contention between builds
- Consistent, predictable build times regardless of concurrent load
- Builds can fully utilize available compute resources without interference
**Example build characteristics that benefit from this configuration**:
- Large Docker images with many layers (>50 layers)
- Compilation of languages like Rust, C++, or Go with extensive dependencies
- Machine learning model training or data processing during build
- Multi-stage builds with resource-intensive compilation steps
- Builds that require significant disk I/O for dependency installation
Result: Each build runs with dedicated resources, preventing resource contention and ensuring optimal performance even during peak usage.
## Troubleshooting
If you're experiencing issues with autoscaling:
1. **Builds still queueing**: Verify autoscaling is enabled and check your concurrent build limit
2. **Increased cache misses**: This is expected behavior with cache clones - consider if the speed benefit outweighs cache efficiency
3. **Costs increasing**: Monitor your usage in the Depot dashboard and adjust concurrent limits if needed
For additional help, reach out on [Discord](https://depot.dev/discord) or contact support.
## Continuous Integration
---
title: Continuous Integration
ogTitle: How to use Depot in your existing CI provider
description: Make your container image builds faster in your existing CI by replacing docker build with depot build.
---
## Why use Depot with your CI provider?
Depot provides a remote Docker build service that makes the image build process faster and more intelligent.
By routing the image build step of your CI to Depot, you can complete the image build up to 40x faster than you could in your generic CI provider. Saving you build minutes in your existing CI provider and, more importantly, saving you developer time waiting for the build to finish.
The `depot build` command is a drop-in replacement for `docker build` and `docker buildx build`. Alternatively, you can [configure your local Docker CLI to use Depot as the default builder](/docs/container-builds/how-to-guides/docker-build). Depot launches remote builders for both native Intel & Arm CPUs with, by default, 16 CPUs, 32 GB of memory, and a 50 GB persistent NVMe cache SSD. On a startup or business plan, in your project settings, you can configure your builders to be larger, with up to 64 CPUs and 128 GB of memory.
Running `depot` in a continuous integration environment is a great way to get fast and consistent builds with any CI provider. See below for documentation on integrating Depot with your CI provider.
## Providers
- [AWS CodeBuild](/docs/container-builds/reference/aws-codebuild)
- [Bitbucket Pipelines](/docs/container-builds/reference/bitbucket-pipelines)
- [Buildkite](/docs/container-builds/reference/buildkite)
- [CircleCI](/docs/container-builds/reference/circleci)
- [GitHub Actions](/docs/container-builds/reference/github-actions)
- [GitLab CI](/docs/container-builds/reference/gitlab-ci)
- [Google Cloud Build](/docs/container-builds/reference/google-cloud-build)
- [Jenkins](/docs/container-builds/reference/jenkins)
- [Travis CI](/docs/container-builds/reference/travis-ci)
## Dev Containers
---
title: Dev Containers
ogTitle: How to use Depot with Dev Containers
description: Leverage Depot to build your Dev Containers on demand with our configure-docker command.
---
## Why use Depot with Dev Containers?
[Dev Containers](https://code.visualstudio.com/docs/devcontainers/containers) are becoming a popular way to leverage a container as a fully featured development environment directly integrated with Visual Studio Code. You can open any folder inside a container and use the full power of VS Code inside.
With Depot, you can build your Dev Containers on demand with instant shared caching across your entire team.
## How to use Depot with Dev Containers
First, you will need to make sure you have [installed the `depot` CLI](/docs/container-builds/quickstart#installing-the-cli) and [configured a project](/docs/container-builds/quickstart#creating-a-project).
### Connect to your Depot project from the `depot` CLI
Once the CLI is installed, you can configure your environment:
1. Run `depot login` to login to your Depot account
2. Change into the root of your project directory
3. Run `depot init` to link your project to your repository; this will create a `depot.json` directory in the current directory
**Note: You can also connect `depot` to your project by passing the `DEPOT_PROJECT_ID` environment variable**
### Configure Docker to use Depot
Dev Containers uses the `docker buildx build` command internally to build the container image. You can configure Depot as a plugin for the Docker CLI and Buildx with the following command:
```bash
depot configure-docker
```
The `configure-docker` command is a one-time operation that routes any `docker build` or `docker buildx build` commands to Depot builders.
### Build your Dev Container
There are multiple options for building your Dev Container:
1. You can open an existing folder in VS Code in a container, [see these docs](https://code.visualstudio.com/docs/devcontainers/containers#_quick-start-open-an-existing-folder-in-a-container)
2. You can open a Git repo or Pull Request in an isolated container, [see these docs](https://code.visualstudio.com/docs/devcontainers/containers#_quick-start-open-a-git-repository-or-github-pr-in-an-isolated-container-volume)
3. You can also build your Dev container directly using the [`devcontainer` CLI](https://code.visualstudio.com/docs/devcontainers/devcontainer-cli#_prebuilding):
```bash
devcontainer build --workspace-folder .
[4 ms] @devcontainers/cli 0.50.0. Node.js v20.3.1. darwin 22.5.0 arm64.
[1878 ms] Start: Run: docker buildx build --load --build-arg BUILDKIT_INLINE_CACHE=1 -f /var/folders/w9/8yw9qm955bqcdwphh62w6fvr0000gn/T/devcontainercli/container-features/0.50.0-1690365763237/Dockerfile-with-features -t vsc-example-241be831c2682292f834c48f737ab308a1e901188127c5444a37dd0c0a339c90 --target dev_containers_target_stage --build-arg _DEV_CONTAINERS_BASE_IMAGE=dev_container_auto_added_stage_label /Users/user1/projects/proj/example
[+] Building 3.5s (19/19) FINISHED
=> [depot] build: https://depot.dev/orgs/orgid/projects/projectid/builds/9hh2rh7zkq 0.0s
=> [depot] launching arm64 builder 0.5s
=> [depot] connecting to arm64 builder 0.4s
=> [internal] load .dockerignore 0.4s
=> => transferring context: 116B 0.3s
=> [internal] load build definition from Dockerfile-with-features 0.3s
=> => transferring dockerfile: 601B 0.3s
=> [internal] load metadata for docker.io/library/node:16-alpine 0.4s
=> [build 1/5] FROM docker.io/library/node:16-alpine@sha256:6c381d5dc2a11dcdb693f0301e8587e43f440c90cdb8933eaaaabb905d44cdb9 0.0s
....
```
You should see something similar to the above in your VS Code or `devcontainer` build logs. You can see that the `docker buildx build` command is called, and then you see log lines for `[depot] ...` that confirm your Docker image build is routed to Depot builders.
## Docker Bake
---
title: Docker Bake
ogTitle: How to build multiple Docker images in parallel with Depot bake
description: Learn how to use depot bake to build multiple container images concurrently from HCL, JSON, or Docker Compose files
---
Building multiple Docker images that share common dependencies? Need to build all your services at once? `depot bake` lets you build multiple images in parallel from a single file, dramatically speeding up your builds while taking advantage of shared work between images.
## Why use bake?
Traditional approaches to building multiple images often involve sequential builds using tools like `make` or shell scripts. This means waiting for each image to complete before starting the next one, and rebuilding shared dependencies multiple times.
With `depot bake`, you can:
- Build all images in parallel on dedicated BuildKit builders
- Automatically deduplicate shared work across images
- Define all your builds in a single HCL, JSON, or Docker Compose file
- Get native Intel and Arm builds without emulation
- Leverage persistent caching across all your builds
## How to use depot bake
### Basic usage
By default, `depot bake` looks for these files in your project root:
- `compose.yaml`, `compose.yml`, `docker-compose.yml`, `docker-compose.yaml`
- `docker-bake.json`, `docker-bake.override.json`
- `docker-bake.hcl`, `docker-bake.override.hcl`
Run bake with no arguments to build the default group or all services:
```shell
depot bake
```
### Specifying a bake file
Use the `-f` flag to specify a custom bake file:
```shell
depot bake -f my-bake-file.hcl
```
### Building specific targets
Build only specific targets instead of all:
```shell
depot bake app db
```
## HCL bake file format
HCL is the recommended format for bake files as it provides the most features and flexibility.
### Basic example
```hcl
group "default" {
targets = ["app", "db", "cron"]
}
target "app" {
dockerfile = "Dockerfile.app"
platforms = ["linux/amd64", "linux/arm64"]
tags = ["myrepo/app:latest"]
}
target "db" {
dockerfile = "Dockerfile.db"
platforms = ["linux/amd64", "linux/arm64"]
tags = ["myrepo/db:latest"]
}
target "cron" {
dockerfile = "Dockerfile.cron"
platforms = ["linux/amd64", "linux/arm64"]
tags = ["myrepo/cron:latest"]
}
```
You can think of each `target` as a Docker build command, where you specify the Dockerfile, platforms, and tags for the image. These targets can be grouped together in a `group` to build them all at once.
Our optimized instances of BuildKit will build these images in parallel, automatically deduplicating work across targets.
### Using variables
Make your bake files more flexible with variables:
```hcl
variable "TAG" {
default = "latest"
}
variable "REGISTRY" {
default = "myrepo"
}
target "app" {
dockerfile = "Dockerfile.app"
platforms = ["linux/amd64", "linux/arm64"]
tags = ["${REGISTRY}/app:${TAG}"]
}
```
Override variables from the command line:
```shell
TAG=v1.0.0 REGISTRY=mycompany depot bake
```
### Sharing base images
Use `contexts` to specify dependencies between targets in a bake file. A common use of this is to highlight that targets share a base image, so you can deduplicate work by only building that base image once:
```hcl
target "base" {
dockerfile = "Dockerfile.base"
platforms = ["linux/amd64", "linux/arm64"]
}
target "app" {
contexts = {
base = "target:base"
}
dockerfile = "Dockerfile.app"
platforms = ["linux/amd64", "linux/arm64"]
tags = ["myrepo/app:latest"]
}
target "worker" {
contexts = {
base = "target:base"
}
dockerfile = "Dockerfile.worker"
platforms = ["linux/amd64", "linux/arm64"]
tags = ["myrepo/worker:latest"]
}
```
In your Dockerfiles, reference the base context:
```dockerfile
# Dockerfile.app
FROM base
# ... rest of your app Dockerfile
```
### Matrix builds
You can use the matrix key to parameterize a single target to build images for different inputs. This can be helpful if you have a lot of similarities between targets in your bake file.
```hcl
target "service" {
name = "service-${item}"
matrix = {
item = ["frontend", "backend", "api"]
}
dockerfile = "Dockerfile.${item}"
platforms = ["linux/amd64", "linux/arm64"]
tags = ["myrepo/${item}:latest"]
}
```
**Note: The name property is required when using the matrix property to create the unique image build for each value in the matrix.**
## Docker Compose bake format
You can use your existing Docker Compose files as a bake file. There are limitations compared to HCL, like not supporting `inherits` or variable blocks. But it's a great way to build all of your services in parallel without needing to rewrite your existing Compose files.
```yaml
services:
app:
build:
dockerfile: Dockerfile.app
platforms:
- linux/amd64
- linux/arm64
image: myrepo/app:latest
db:
build:
dockerfile: Dockerfile.db
platforms:
- linux/amd64
- linux/arm64
image: myrepo/db:latest
worker:
build:
dockerfile: Dockerfile.worker
platforms:
- linux/amd64
- linux/arm64
image: myrepo/worker:latest
```
Build all services defined in the Docker Compose file with:
```shell
depot bake -f docker-compose.yml
```
## Advanced features
### Using multiple Depot projects in a bake file
In some cases you may want to shard your container builds out across different Depot projects so you can have the full BuildKit host dedicated to the build. For compose, you can specify different Depot projects per service.
```yaml
services:
frontend:
build:
dockerfile: ./Dockerfile.frontend
x-depot:
project-id: project-id-1
backend:
build:
dockerfile: ./Dockerfile.backend
x-depot:
project-id: project-id-2
```
You can also specify the project ID in HCL for each `target`:
```hcl
target "app" {
dockerfile = "Dockerfile.app"
platforms = ["linux/amd64", "linux/arm64"]
tags = ["myrepo/app:latest"]
project_id = "project-id-1"
}
target "db" {
dockerfile = "Dockerfile.db"
platforms = ["linux/amd64", "linux/arm64"]
tags = ["myrepo/db:latest"]
project_id = "project-id-2"
}
target "worker" {
dockerfile = "Dockerfile.worker"
platforms = ["linux/amd64", "linux/arm64"]
tags = ["myrepo/worker:latest"]
project_id = "project-id-3"
}
```
### Loading images locally
Load specific targets to your local Docker daemon by including the target name after the load flag:
```shell
depot bake --load app
```
This only loads the specified target, not all targets in the bake file.
### Using the Depot Registry with bake
You can save built images to the [Depot Registry](/docs/registry/overview) for later use:
```shell
depot bake --save --metadata-file=build.json
```
If you want to specify a specific tag for the images being stored in the registry, you can do so by using the `--save-tag` flag:
```shell
depot bake --save --save-tag myrepo/app:v1.0.0
```
You can pull specific targets out of the Depot Registry later using the [`depot pull`](/docs/cli/reference#depot-pull) command:
```shell
depot pull --project --target app,db
```
Or push to your registry after tests pass:
```shell
depot push --project --target app \
--tag myregistry/app:v1.0.0
```
### Passing build arguments (i.e. `--build-arg`) to a target
You can pass build arguments to your targets in the bake file using the `args` block. This is useful for passing environment variables or other configuration options to your Docker builds.
```hcl
target "app" {
args = {
NODE_VERSION = "18"
ENV = "production"
}
}
```
## GitHub Actions integration
You can use the [`depot/bake-action`](https://github.com/depot/bake-action) in your GitHub Actions workflows to leverage `depot bake` for building your bake files with our [Docker build service](/products/container-builds):
```yaml
name: Build images
on: push
jobs:
bake:
runs-on: ubuntu-latest
permissions:
id-token: write
contents: read
steps:
- uses: actions/checkout@v4
- uses: depot/setup-action@v1
- uses: depot/bake-action@v1
with:
file: docker-bake.hcl
push: true
```
## Tips and best practices
1. **Use groups** to organize related targets and build them together
2. **Leverage inheritance** with `inherits` to reduce duplication
3. **Use contexts** for shared base images to maximize deduplication
4. **Set platforms explicitly** to ensure consistent multi-platform builds
5. **Use variables** for configuration that changes between environments
6. **Use multiple Depot projects** to shard builds across different BuildKit hosts for resource intensive builds
7. **Save to ephemeral registry** in CI to build once and push after tests
## Next steps
- Learn more about [BuildKit parallelization](/blog/buildkit-in-depth)
- Explore the [full bake syntax reference](/blog/buildx-bake-deep-dive)
- Check out how to get faster container builds with [`depot/bake-action`](/docs/container-builds/reference/github-actions)
## Docker
---
title: Docker
ogTitle: How to use Depot with your existing Docker commands
description: Use Depot with your existing Docker commands like docker build, docker buildx build, and docker compose build, with our depot configure-docker command.
---
## Running builds with Depot
To run builds with Depot via `docker`, you still need to connect the build to an active Depot project via the `depot init` and `depot.json` files or via the `DEPOT_PROJECT_ID` environment variable.
## How to use Depot with Docker
Depot can directly integrate with your existing Docker workflows via a one-time configuration command from our `depot` CLI. See [our instructions for installing our CLI](/docs/cli/installation) if you still need to do so.
With the CLI installed, you can run `configure-docker` to configure your Docker CLI to use Depot as the default handler for `docker build` and `docker buildx build`:
```shell
depot configure-docker
```
Underneath the hood, the `configure-docker` command installs Depot as a Docker CLI plugin and sets the plugin as the default Docker builder (i.e., `docker build`). In addition, the command also installs a Depot `buildx` driver and sets that driver as the default driver for `docker buildx build`.
### `docker build`
Once your `docker` environment is configured to use Depot, you can run your builds as usual.
```shell
docker build --platform linux/amd64,linux/arm64 .
```
If you have correctly configured your Depot project via `depot init` or `DEPOT_PROJECT_ID`, your build will automatically be sent to Depot for execution. You can confirm this by looking for log lines in the output that are prefixed with `[depot]`.
### `docker buildx build`
Similarly, once your environment is configured to use Depot, you can run your `docker buildx build` commands as usual.
```shell
docker buildx build --platform linux/amd64,linux/arm64 .
```
Again, you can confirm that builds are going to your Depot project by looking for log lines that are prefixed with `[depot]` or by checking out the [builds for your project](/orgs).
## Using Depot with Docker Compose
You can efficiently build Compose service images in parallel with Depot, with either `depot bake --load -f ./docker-compose.yml` or `docker compose build`. See [the Docker Compose integration guide](/docs/container-builds/how-to-guides/docker-compose) for more information.
## Docker Compose
---
title: Docker Compose
ogTitle: How to use Depot with Docker Compose
description: Use Depot with Docker Compose, to accelerate the builds of all Compose services.
---
Depot can be used with Docker Compose to efficiently build images for all the services in your `docker-compose.yml` file using Depot's accelerated container build infrastructure.
There are two ways to use Depot with Docker Compose:
1. Using `depot bake --load` with a `docker-compose.yml` file to build all images in parallel and load them back into your local Docker daemon.
2. Using `docker compose build` with `depot configure-docker` to use Depot as a Docker Buildx driver inside Docker Compose.
## Building images with `depot bake --load`
The `depot bake` command is a powerful and efficient way to build multiple container images in parallel with a single command. The command implements the features of [docker buildx bake](https://docs.docker.com/build/bake/), but optimized to work with Depot infrastructure.
With `depot bake` you can provide a `docker-compose.yml` file, and Depot will build all service images specified in the compose file in parallel. Additionally by specifying the `--load` flag, those images will be efficiently pulled back into your local Docker daemon:
```yaml
# docker-compose.yml
services:
app:
build:
context: .
dockerfile: Dockerfile
backend:
build:
context: ./backend
dockerfile: Dockerfile
```
```shell
# Will build both the app and backend images in parallel
$ depot bake -f ./docker-compose.yml --load
```
Once the images are loaded into your local Docker daemon, they are ready to be used by Docker Compose. For instance, you could run `docker compose up` and Compose would use the images just built by Depot.
**This is the preferred way to build images with Depot for Docker Compose.** The `depot bake` command is optimized to work with Depot infrastructure and is able to efficiently load images back into your local Docker daemon. However if you need to use `docker compose build` specifically and cannot call `depot bake`, see below for information on how to integrate Depot as a Docker Buildx driver.
See the [bake deep dive](https://depot.dev/blog/buildx-bake-deep-dive) for more information about `depot bake`.
### Using multiple Depot projects with `depot bake`
As a more advanced use-case, it's possible to use different Depot projects to build the different services in a Compose file. To specify different projects, you can use the `x-depot.project-id` extension value in the Compose service build configuration:
```yaml
# docker-compose.yml
services:
app:
build:
context: .
dockerfile: Dockerfile
x-depot:
project-id: abc123456
backend:
build:
context: ./backend
dockerfile: Dockerfile
x-depot:
project-id: xyz123456
```
With the above configuration, the `app` service will be built in the `abc123456` Depot project and the `backend` service will be built in the `xyz123456` Depot project when running `depot bake`.
## Building images with `docker compose build`
If you are unable to use `depot bake --load` and need to use `docker compose build` directly, you can still use Depot to accelerate your builds. Docker Compose can use Docker Buildx to build the requested images in the `docker-compose.yml` file, and Depot can be installed as a Buildx driver serve those build requests.
To do so, first run `depot configure-docker`. This configures Depot as the default handler for `docker build` and `docker buildx build`:
```shell
$ depot configure-docker
```
Once configured, you can use `docker compose build` as usual. The `build` command will use the Depot Buildx driver to build the images specified in the `docker-compose.yml` file:
```shell
$ docker compose build
```
See the [Docker integration guide](/docs/container-builds/how-to-guides/docker-build) for more information about `depot configure-docker`.
### Caveats
When using `docker compose build` with Depot, there are a few things to be aware of:
1. Buildx requires that the entire image be converted into a tarball and downloaded from the remote build server to the local Docker daemon before it can be used. This is less efficient than using `depot bake --load`, which is able to efficiently pull only the missing layers of an image back into the local Docker daemon.
2. Buildx will create a new Depot build request for each service image, so the Depot console will not display the `docker compose build` as a single unified request.
3. It's not possible to use multiple different Depot projects for different Compose services with `docker compose build`.
However, `depot configure-docker` does directly integrate with any tools that use Docker Buildx, so if you are unable to use `depot bake --load` or otherwise need full Buildx compatibility with other tools, this is a good option.
## Building and testing `docker compose` on GitHub Actions
With the `depot/bake-action` action and the `--save` flag, we can build all of the services in a Compose file in parallel and save them to the Depot Registry. Then, with the `depot/pull-action`, we can pull all of the images back into the local Docker daemon for testing in subsequent jobs.
```yaml
name: Depot example compose
on: push
permissions:
contents: read
id-token: write
packages: write
jobs:
build-services:
runs-on: ubuntu-22.04
outputs:
build-id: ${{ steps.bake.outputs.build-id }}
steps:
- uses: actions/checkout@v4
- uses: depot/setup-action@v1
- name: Build, cache, and save all compose images to the Depot Registry.
uses: depot/bake-action@v1
id: bake
with:
files: docker-compose.yml
save: true
test:
runs-on: depot-ubuntu-22.04
needs: [build-services]
steps:
- uses: actions/checkout@v4
- uses: depot/setup-action@v1
- name: Pull all compose service images locally from the Depot Registry.
uses: depot/pull-action@v1
with:
build-id: ${{ needs.build-services.outputs.build-id }}
- name: Run compose up (images should not rebuild)
run: |
docker compose up -d
- name: If successful, push the srv1 compose service target image to ghcr.io from Depot Registry
run: |
echo ${{ secrets.GITHUB_TOKEN }} | docker login ghcr.io -u $ --password-stdin
depot push --target srv1 -t ghcr.io/depot/srv1:latest ${{ steps.build.outputs.build-id }}
```
## Local Development
---
title: Local Development
ogTitle: How to use Depot for faster local development and shared caching
description: Accelerate local development by building Docker images with Depot builders that come with a shared persistent cache that your entire engineering team can use.
---
## Why use Depot for local development?
Using Depot's remote builders for local development allows you to get faster Docker image builds with the entire Docker layer cache instantly available across builds. The cache is shared across your entire team who has access to a given Depot project, allowing you to reuse build results and cache across your entire team for faster local development. Additionally, routing the image build to remote builders frees your local machine's CPU and memory resources.
### Cache sharing with local builds
There is nothing additional you need to configure to share your build cache across your team for local builds. If your team members can access the Depot project, they will automatically share the same build cache. So, if you build an image locally, your team members can reuse the layers you built in their own builds.
## How to use Depot for local development
To leverage Depot locally, [install the `depot` CLI tool](/docs/cli/installation) and [configure your Depot project](/docs/container-builds/quickstart#creating-a-project), if you haven't already.
With those two things complete, you can then login to Depot via the CLI:
```bash
depot login
```
Once you're logged in, you can configure Depot inside of your git repository by running the `init` command:
```bash
depot init
```
The `init` command writes a `depot.json` file to the root of your repository with the Depot project ID that you selected. Alternatively, you can skip the `init` command if you'd like and use the `--project` flag on the `build` command to specify the project ID.
You can run a build with Depot locally by running the [`build` command](/docs/cli/reference#depot-build):
```bash
depot build -t my-image:latest .
```
By default, Depot won't return you the built image locally. Instead, the built image and the layers produced will remain in the build cache. However, if you'd like to download the image locally, for instance, so you can `docker run` it, you can specify the `--load` flag:
```bash
depot build -t my-image:latest --load .
```
### Using `docker build`
You can also run a build with Depot locally via the `docker build` or `docker buildx build` commands. To do so, you'll need to run `depot configure-docker` to configure your Docker CLI to use Depot as the default builder:
```bash
depot configure-docker
docker build -t my-image:latest .
```
For a full guide on using Depot via your existing `docker build` of `docker compose` commands, see our [Docker integration guide](/docs/container-builds/how-to-guides/docker-build#docker-compose-build).
## Best practice Dockerfiles
---
title: Best practice Dockerfiles
ogTitle: Best practice Dockerfiles
description: A set of best practice Dockerfiles for building Docker images
---
We've assembled some best practice Dockerfiles for building Docker images for several different languages:
## Guides
- [Dockerfile for Node.js using `pnpm`](/docs/container-builds/how-to-guides/optimal-dockerfiles/node-pnpm-dockerfile)
- [Dockerfile for Python using `uv`](/docs/container-builds/how-to-guides/optimal-dockerfiles/python-uv-dockerfile)
- [Dockerfile for Python using `poetry`](/docs/container-builds/how-to-guides/optimal-dockerfiles/python-poetry-dockerfile)
- [Dockerfile for Rust](/docs/container-builds/how-to-guides/optimal-dockerfiles/rust-dockerfile)
## Best practice Dockerfile for Node.js with pnpm
---
title: Best practice Dockerfile for Node.js with pnpm
ogTitle: Best practice Dockerfile for Node.js with pnpm
description: A sample best practice pnpm Dockerfile for Node.js from us at Depot
---
Below is an example `Dockerfile` that we use and recommend at Depot when we are building Docker images for Node applications that use `pnpm` as their package manager.
```dockerfile
FROM node:20 AS base
FROM base AS deps
RUN corepack enable
WORKDIR /app
COPY pnpm-lock.yaml ./
RUN --mount=type=cache,id=pnpm,target=/root/.local/share/pnpm/store pnpm fetch --frozen-lockfile
COPY package.json ./
RUN --mount=type=cache,id=pnpm,target=/root/.local/share/pnpm/store pnpm install --frozen-lockfile --prod
FROM base AS build
RUN corepack enable
WORKDIR /app
COPY pnpm-lock.yaml ./
RUN --mount=type=cache,id=pnpm,target=/root/.local/share/pnpm/store pnpm fetch --frozen-lockfile
COPY package.json ./
RUN --mount=type=cache,id=pnpm,target=/root/.local/share/pnpm/store pnpm install --frozen-lockfile
COPY . .
RUN pnpm build
FROM base
WORKDIR /app
COPY --from=deps /app/node_modules /app/node_modules
COPY --from=build /app/dist /app/dist
ENV NODE_ENV production
CMD ["node", "./dist/index.js"]
```
## Explanation of the Dockerfile
There are several things in this example Dockerfile that are worth calling out. Most notably, we use a multi-stage build to separate the installation of dependencies from the actual build of the application. This allows us to take advantage of Docker's layer caching to speed up our builds.
#### Stage 1: `FROM node:20 AS base`
```dockerfile
FROM node:20 AS base
```
Here we use the `node:20` base image and set the stage name to be reused in stages that follow. If we had common dependencies that we wanted to be accessible in any stages using this `base` stage, we could install them here.
#### Stage 2: `FROM base AS deps`
```dockerfile
FROM base AS deps
RUN corepack enable
WORKDIR /app
COPY pnpm-lock.yaml ./
RUN --mount=type=cache,id=pnpm,target=/root/.local/share/pnpm/store pnpm fetch --frozen-lockfile
COPY package.json ./
RUN --mount=type=cache,id=pnpm,target=/root/.local/share/pnpm/store pnpm install --frozen-lockfile --prod
```
Next up is installing our dependencies via `pnpm`.
First, we enable [`corepack`](https://nodejs.org/api/corepack.html) in the Node `base` image. Corepack allows us to use `pnpm` right out of the box without having to install it ourselves. It's a nice convenience but watch out that you have the expected `pnpm` version.
We then create our working directory, `app`, and copy in just our `package.json` and `pnpm-lock.yaml` files. Note that we do not copy in our entire codebase. We only care about installing our production dependencies at this stage. This is a best practice that allows us to take advantage of Docker's layer caching.
Finally, we get to installing our packages via `pnpm`. This is broken into two `RUN` statements that are making use of [BuildKit cache mounts](/blog/how-to-use-buildkit-cache-mounts-in-ci).
1. `pnpm fetch --frozen-lockfile` is a [pnpm feature](https://pnpm.io/cli/fetch) that is designed to improve building a Docker image. It fetches packages from the `pnpm-lock.yaml` file and stores them in the `pnpm` virtual store. Ignoring the `package.json` manifest. It's a nice optimization that avoids having to reinstall all packages in the `package.json` when a change occurs there that isn't related to the actual dependencies.
2. `pnpm install --frozen-lockfile --prod` is the actual installation of our dependencies. We use the `--frozen-lockfile` flag to ensure that we are installing the exact same versions of our dependencies that are in our `package.json`. We also use the `--prod` flag to ensure that we are not installing any `devDependencies`.
This is a best practice that allows us to take advantage of Docker's layer caching.
We use the `--frozen-lockfile` flag to ensure that we are installing the exact same versions of our dependencies that we have installed locally. We also use the `--prod` flag to ensure that we are only installing our production dependencies. This is a best practice that allows us to take advantage of Docker's layer caching.
#### Stage 3: `FROM base AS build`
```dockerfile
FROM base AS build
RUN corepack enable
WORKDIR /app
COPY pnpm-lock.yaml ./
RUN --mount=type=cache,id=pnpm,target=/root/.local/share/pnpm/store pnpm fetch --frozen-lockfile
COPY package.json ./
RUN --mount=type=cache,id=pnpm,target=/root/.local/share/pnpm/store pnpm install --frozen-lockfile
COPY . .
RUN pnpm build
```
It's time to build our application. We start by enabling `corepack` again so that we have `pnpm` in this stage. We then configure our working directory to be `app` and copy in the `package.json` and `pnpm-lock.yaml` files as we saw in the `deps` stage.
We then run `pnpm fetch --frozen-lockfile` and `pnpm install --frozen-lockfile` again. However, we omit the `--prod` flag as we want to install _all dependencies_ as we may need some dev ones to build our final application. If that wasn't the case, we could copy in our dependencies from our earlier `deps` stage.
Once our dependencies have been installed into this stage, we then copy in our source code via the `COPY` statement. We then run our build command, `pnpm build`.
#### Stage 4: `FROM base`
```dockerfile
FROM base
WORKDIR /app
COPY --from=deps /app/node_modules /app/node_modules
COPY --from=build /app/dist /app/dist
ENV NODE_ENV production
CMD ["node", "./dist/index.js"]
```
Our final stage is copying all of the files from our earlier stages into our final image. We start by setting our working directory to `app`, then have several `COPY` statements:
1. We copy in our `node_modules` from our `deps` stage
2. We then copy in the `dist` directory from our `build` stage containing the outputs from our `pnpm build`
Finally, we set our `NODE_ENV` to production for any dependencies that have an optimized production mode. We then set our `CMD` to run our application.
## Best practice Dockerfiles for Node.js
---
title: Best practice Dockerfiles for Node.js
ogTitle: Best practice Dockerfiles for Node.js
description: A set of best practice Dockerfiles for building Docker images for Node
---
We've assembled some best practice Dockerfiles for building Docker images for Node.js using different package managers. These Dockerfiles are what we recommend when building Docker images for Node applications, but they are not the only way to do it, so your mileage may vary.
## Guides
- [Dockerfile for Node.js using `pnpm`](/docs/container-builds/how-to-guides/optimal-dockerfiles/node-pnpm-dockerfile)
## Best practice Dockerfile for Python with poetry
---
title: Best practice Dockerfile for Python with poetry
ogTitle: Best practice Dockerfile for Python with poetry
description: A sample best practice poetry Dockerfile for Python from Depot
---
Below is an example `Dockerfile` that we use and recommend at Depot when we are building Docker images for Python applications that use `poetry`as their package manager.
```dockerfile
FROM python:3.12-slim as base
ENV POETRY_VERSION=1.6.1 \
PYTHONUNBUFFERED=1 \
PYTHONDONTWRITEBYTECODE=1 \
PIP_NO_CACHE_DIR=off \
PIP_DISABLE_PIP_VERSION_CHECK=on \
PIP_DEFAULT_TIMEOUT=100 \
POETRY_HOME="/opt/poetry" \
POETRY_VIRTUALENVS_IN_PROJECT=true \
POETRY_NO_INTERACTION=1 \
PYSETUP_PATH="/opt/pysetup" \
VENV_PATH="/opt/pysetup/.venv"
ENV PATH="$POETRY_HOME/bin:$VENV_PATH/bin:$PATH"
FROM base as builder
RUN --mount=type=cache,target=/root/.cache \
pip install "poetry==$POETRY_VERSION"
WORKDIR $PYSETUP_PATH
COPY ./poetry.lock ./pyproject.toml ./
RUN --mount=type=cache,target=$POETRY_HOME/pypoetry/cache \
poetry install --no-dev
FROM base as production
ENV FASTAPI_ENV=production
COPY --from=builder $VENV_PATH $VENV_PATH
COPY ./app /app
WORKDIR /app
EXPOSE 8000
CMD ["uvicorn", "main:app", "--host", "0.0.0.0", "--port", "8000"]
```
## Explanation of the Dockerfile
[Poetry](https://github.com/python-poetry/poetry) is a popular Python package manager that helps manage dependencies on your local machine using virtual environments to isolate dependency versions between projects. In a Docker environment, we don't need to use virtual environments, and we can instead use a more straightforward approach to installing and managing dependencies. Assuming your project is currently using Poetry and has a `pyproject.toml` file, you can use the following Dockerfile to build your project with multi-stage builds to produce an efficient build and optimized final image.
### Stage 1: `FROM python:3.12-slim-bookworm AS base`
Using a common base image for all stages ensures compatibility between the build and deployment stages and allows us to take advantage of Docker's layer caching to produce fewer layers in the build. An `-alpine` image can also be used for an even smaller final image, but some projects may require additional dependencies to be installed.
```dockerfile
ENV POETRY_VERSION=1.6.1 \
PYTHONUNBUFFERED=1 \
PYTHONDONTWRITEBYTECODE=1 \
PIP_NO_CACHE_DIR=off \
PIP_DISABLE_PIP_VERSION_CHECK=on \
PIP_DEFAULT_TIMEOUT=100 \
POETRY_HOME="/opt/poetry" \
POETRY_VIRTUALENVS_IN_PROJECT=true \
POETRY_NO_INTERACTION=1 \
PYSETUP_PATH="/opt/pysetup" \
VENV_PATH="/opt/pysetup/.venv"
ENV PATH="$POETRY_HOME/bin:$VENV_PATH/bin:$PATH"
```
- `POETRY_VERSION=1.6.1` specifies the version of Poetry to install.
- `PYTHONUNBUFFERED=1` tells Python to not buffer the output. This is useful for ensuring logs are output in real-time, so a crash doesn't obscure the logs that would otherwise be in a buffer.
- `POETRY_HOME` specifies a deterministic location for Poetry to install itself.
- `PYSETUP_PATH` specifies a deterministic location for Poetry to install the project's dependencies.
- `VENV_PATH` specifies a deterministic location for the virtual environment to be created.
```dockerfile
ENV PATH="$POETRY_HOME/bin:$VENV_PATH/bin:$PATH"
```
After setting the environment variables, we add the Poetry and virtual environment paths to the `PATH` environment variable so that we can run Poetry and the project's dependencies without specifying the full path.
### Stage 2: `FROM base AS builder`
The builder stage efficiently installs Poetry and the project's production dependencies with caching enabled. A similar stage can be used for development dependencies if needed by changing the `--no-dev` flag in the `poetry install` command.
```dockerfile
RUN --mount=type=cache,target=/root/.cache \
pip install "poetry==$POETRY_VERSION"
WORKDIR $PYSETUP_PATH
COPY ./poetry.lock ./pyproject.toml ./
RUN --mount=type=cache,target=$POETRY_HOME/pypoetry/cache \
poetry install --no-dev
```
We use `pip` to install `poetry` so we can cache the installation. Then, we copy over only the `poetry.lock` and `pyproject.toml` files to the `$PYSETUP_PATH` directory and run `poetry install` to install the project's dependencies. By using the `--no-dev` flag, we ensure that only production dependencies are installed.
### Stage 3: `FROM base AS production`
In the production stage, we copy the virtual environment from the builder stage and the project source code into the final image. We then set the working directory to the project source code and expose the port the application listens on. Finally, we define the command to run the application.
```dockerfile
ENV FASTAPI_ENV=production
COPY --from=builder $VENV_PATH $VENV_PATH
COPY ./app /app
WORKDIR /app
EXPOSE 8000
CMD ["uvicorn", "main:app", "--host", "0.0.0.0", "--port", "8000"]
```
Using this Dockerfile pattern, we are able to avoid installing poetry in the final image. In fact, as we are only copying in the previously installed production dependencies and source code, the final stage is extremely fast, even in the event the project source changes.
Your project may require additional tweaks to this Dockerfile, but if you are a poetry user, this is a great starting point for efficiently building your project with Docker. Consider adding an additional development stage for development dependencies and adding more stages for linting, testing, or other tasks as needed.
## Best practice Dockerfile for Python with uv
---
title: Best practice Dockerfile for Python with uv
ogTitle: Best practice Dockerfile for Python with uv
description: A sample best practice uv Dockerfile for Python from Depot
---
Below is an example `Dockerfile` that we use and recommend at Depot when we are building Docker images for Python applications that use `uv` as their package manager.
```dockerfile
FROM python:3.12-slim-bookworm AS base
FROM base AS builder
COPY --from=ghcr.io/astral-sh/uv:0.4.9 /uv /bin/uv
ENV UV_COMPILE_BYTECODE=1 UV_LINK_MODE=copy
WORKDIR /app
COPY uv.lock pyproject.toml /app/
RUN --mount=type=cache,target=/root/.cache/uv \
uv sync --frozen --no-install-project --no-dev
COPY . /app
RUN --mount=type=cache,target=/root/.cache/uv \
uv sync --frozen --no-dev
FROM base
COPY --from=builder /app /app
ENV PATH="/app/.venv/bin:$PATH"
EXPOSE 8000
CMD ["uvicorn", "uv_docker_example:app", "--host", "0.0.0.0", "--port", "8000"]
```
## Explanation of the Dockerfile
Using a multi-stage build, we can separate our build from our deployment, taking full advantage of Docker's layer caching to speed up our builds and produce a smaller final image.
### Stage 1: `FROM python:3.12-slim-bookworm AS base`
```dockerfile
FROM python:3.12-slim-bookworm AS base
```
For optimal caching, we use the same base image for all of our stages. This ensures compatibility between the build and deployment stages and allows us to take advantage of Docker's layer caching to produce fewer layers in the build. An `-alpine` image can also be used for an even smaller final image, but some projects may require additional dependencies to be installed.
### Stage 2: `FROM base AS builder`
```dockerfile
COPY --from=ghcr.io/astral-sh/uv:0.4.9 /uv /bin/uv
ENV UV_COMPILE_BYTECODE=1 UV_LINK_MODE=copy
```
In the builder we copy in the `uv` binary from the official UV image at a specific version tag.
`UV_COMPILE_BYTECODE=1` tells `uv` to compile Python files to `.pyc` bytecode files. This takes a little longer to install (part of the build process), but often speeds up the application's startup time in the container.
`UV_LINK_MODE=copy` tells `uv` to copy the Python files into the container from the cache mount, resolving any issues from symlinks.
```dockerfile
WORKDIR /app
COPY uv.lock pyproject.toml /app/
RUN --mount=type=cache,target=/root/.cache/uv \
uv sync --frozen --no-install-project --no-dev
```
After setting the working directory, we copy in only the `uv.lock` and `pyproject.toml` files to the `/app` directory and run `uv sync` to install the dependencies. This allows us to take advantage of Docker's layer caching to cache the dependencies, which change less often, before copying in the rest of the application code.
```dockerfile
COPY . /app
RUN --mount=type=cache,target=/root/.cache/uv \
uv sync --frozen --no-dev
```
After the dependencies are installed and the layer is cached, we copy in the rest of the application code and run `uv sync` again, without the `--no-install-project` flag, to install the application. If the application source code changes, this layer will be invalidated, but the dependencies will not need to be reinstalled.
### Stage 3: `FROM base` (Final stage)
```dockerfile
FROM base
COPY --from=builder /app /app
ENV PATH="/app/.venv/bin:$PATH"
```
The final stage starts from our minimal base image and copies in the `/app` directory from the builder stage. In this case, we set the `PATH` environment variable to include the virtual environment's `bin` directory so that we can run the application without specifying the full path to the `uvicorn` executable.
```dockerfile
EXPOSE 8000
CMD ["uvicorn", "uv_docker_example:app", "--host", "0.0.0.0", "--port", "8000"]
```
After copying in your application, you can expose whichever port your application listens on and set the default command to run your application. In this case, we are running a `uvicorn` application on port `8000`.
## References
- [UV Github](https://github.com/astral-sh/uv)
- [Official UV Docker documentation](https://docs.astral.sh/uv/guides/integration/docker/)
## Best practice Dockerfiles for Python
---
title: Best practice Dockerfiles for Python
ogTitle: Best practice Dockerfiles for Python
description: A set of best practice Dockerfiles for building Docker images for Python
---
We've assembled some best practice Dockerfiles for building Docker images for Python using different package managers. These Dockerfiles are what we recommend when building Docker images for Python applications, but may require modifications based on your specific use case.
## Guides
- [Dockerfile for Python using `uv`](/docs/container-builds/how-to-guides/optimal-dockerfiles/python-uv-dockerfile)
- [Dockerfile for Python using `poetry`](/docs/container-builds/how-to-guides/optimal-dockerfiles/python-poetry-dockerfile)
## Best practice Dockerfile for Rust with cargo-chef and sccache
---
title: Best practice Dockerfile for Rust with cargo-chef and sccache
ogTitle: Best practice Dockerfile for Rust with cargo-chef and sccache
description: A sample best practice example Dockerfile for building images for Rust applications from us at Depot.
---
Below is an example `Dockerfile` that we have used and recommend at Depot for building images for Rust applications.
```dockerfile
FROM rust:1.75 AS base
RUN cargo install --locked cargo-chef sccache
ENV RUSTC_WRAPPER=sccache SCCACHE_DIR=/sccache
FROM base AS planner
WORKDIR /app
COPY . .
RUN cargo chef prepare --recipe-path recipe.json
FROM base AS builder
WORKDIR /app
COPY --from=planner /app/recipe.json recipe.json
RUN --mount=type=cache,target=/usr/local/cargo/registry \
--mount=type=cache,target=/usr/local/cargo/git \
--mount=type=cache,target=$SCCACHE_DIR,sharing=locked \
cargo chef cook --release --recipe-path recipe.json
COPY . .
RUN --mount=type=cache,target=/usr/local/cargo/registry \
--mount=type=cache,target=/usr/local/cargo/git \
--mount=type=cache,target=$SCCACHE_DIR,sharing=locked \
cargo build
```
In addition to the standard best practices when writing Dockerfiles, here we are also leveraging cargo-chef and sccache to speed up our Rust build.
## Using cargo-chef for dependency management
When you install multiple crates with one command like `cargo build`, Docker treats any change in the output of `cargo build` as a change to the **entire** command. This means that Docker will attempt to execute that command again (re-downloading and installing **all **crates) every time you make an unrelated change to your source code or Dockerfile.
There are various workarounds online to manually manage and copy individual packages into your container while building in order to avoid invalidating the cache on every build, but these are cumbersome and prone to bugs. Our preferred solution is to use [cargo-chef](https://github.com/LukeMathWalker/cargo-chef/blob/main/README.md), which allows you to separate building the dependencies and building the source code so that Docker sees them as different steps and can cache them separately.
## Using sccache for additional dependency management
Even though cargo-chef separates your third-party dependencies from your source code, compiling and downloading your third-party dependencies is still considered one operation. This means that if a single dependency changes, there will be a cache miss and all of them will have to be re-downloaded and compiled, even though they haven't changed.
If you have a more fine-grained cache, you only have to rebuild the changed dependencies. Enter [sccache](https://github.com/mozilla/sccache), which caches individual compilation artifacts so that they can be reused at a more granular level during future compilations. This allows you to recompile individual dependencies only when needed, rather than everything or nothing.
## Explanation of the Dockerfile
At a high level, here are the things we're optimizing in our Docker build for a Rust application::
Multi-stage builds via multiple `FROM` statements
- cargo-chef for dependency management
- sccache for dependency caching
- BuildKit cache mounts for finer-grained caching between builds
### Stage 1: `FROM rust:1.75 AS base`
```dockerfile
FROM rust:1.75 AS base
RUN cargo install --locked cargo-chef sccache
ENV RUSTC_WRAPPER=sccache SCCACHE_DIR=/sccache
```
Here, we use `rust:1.75` as our base image and set the stage name to be used in later stages. In addition to this base image, we install sccache and cargo-chef.
We then set the `SCCACHE_DIR` environment variable so that sccache stores compilation artifacts in the `/sccache` directory and the `RUSTC_WRAPPER` environment variable so that Cargo “wraps” the execution of the Rust compiler commands in an sccache call. That way, we can take advantage of sccache's cached dependencies when building the final image.
### Stage 2: `FROM base AS planner`
```dockerfile
FROM base AS planner
WORKDIR /app
COPY . .
RUN cargo chef prepare --recipe-path recipe.json
```
Next, we're building off the base stage by creating the recipe that will later be used to build our application with cargo-chef. We use two commands from cargo-chef that together act as a replacement for the standard `cargo build` command when building dependencies.
#### Using `cargo-chef` to separate building dependencies from building source code
`cargo chef prepare` looks at your `Cargo.toml` and auto-generated `Cargo.lock` files, determines all of your dependencies, and then creates a `recipe.json` file, which is a dependency tree of your project.
By creating the dependency tree separately from the actual installation of dependencies, we can cache them independently so that all dependencies don't need to be rebuilt whenever the source code changes.
### Stage 3: `FROM base as builder`
```dockerfile
FROM base AS builder
WORKDIR /app
COPY --from=planner /app/recipe.json recipe.json
RUN --mount=type=cache,target=/usr/local/cargo/registry \
--mount=type=cache,target=/usr/local/cargo/git \
--mount=type=cache,target=$SCCACHE_DIR,sharing=locked \
cargo chef cook --release --recipe-path recipe.json
COPY . .
RUN --mount=type=cache,target=/usr/local/cargo/registry \
--mount=type=cache,target=/usr/local/cargo/git \
--mount=type=cache,target=$SCCACHE_DIR,sharing=locked \
cargo build
```
`cargo chef cook` takes the` recipe.json` file and runs `cargo build` under the hood on each package independently. In this stage, we're copying the `recipe.json` file from the previous `planner` stage. If the recipe has not changed, then the step to build the dependencies with `cargo chef cook` can be skipped. After the dependencies have been built, we finally build the source code with the final `cargo build` command.
#### Using `sccache` to retain dependencies between builds
We use a [cache mount](https://depot.dev/blog/how-to-use-buildkit-cache-mounts-in-ci) to attach the sccache directory to the build. This type of cache mount gives you a more fine-grained level of caching that allows you to skip recomputing bits of work when the layer cache invalidates. Using sccache with a cache mount allows you to skip rebuilding compiled artifacts that have already been built even when certain layers in the build are invalidated.
#### Caching the Cargo registry and git directories
In this stage, we also use additional cache mounts to store the Cargo registry and git directories. The Cargo registry stores the crates that have already been downloaded, and the git directory stores any git dependencies. Usually only one or a few packages have actually changed and need to be re-downloaded and installed. All the other packages can be reused from previous builds with the cache mounts.
## Accessing Private Registries
---
title: Accessing Private Registries
ogTitle: How to build images that can access private registries with Depot
description: Learn how to build images with Depot that need to access private registry images within them.
---
## How do I build container images that access private registries?
Our `depot` CLI uses your local Docker credentials provider. So, any registry you've logged into with `docker login` or similar will be available when running a Depot build. This means that you can build images that use private registries like the example below.
```Dockerfile
FROM my-private-registry/project/image:version
...
```
If you are experiencing issues with this, you should confirm you have logged into the registry from the machine where you are trying to run `depot build`. One way to ensure this is to try pulling the image via `docker pull my-private-registry/project/image:version`.
## Remote container builds
---
title: Remote container builds
ogTitle: Overview of Depot remote container builds
description: Overview of Depot remote container builds for up to 40x faster builds with faster compute, persistent cache, and native Docker image builds for Intel & Arm
---
import {CheckCircleIcon} from '~/components/icons'
import {DocsCTA} from '~/components/blog/CTA'
When using the Depot remote container build service, a given Docker image build is routed to a fast builder instance with a persistent layer cache. When using our container build service, you can download the image locally or push it to your registry.
Switching to Depot for your container builds is usually a one-line code change once you've [created an account](/start):
1. You need to [install the Depot CLI](/docs/cli/installation) wherever you're running your build
2. Run `depot init` in the root directory of the Docker image you want to build
3. Switch your `docker build` or `docker buildx build` to use `depot build` instead
That's it! You can now build your Docker images up to 40x faster than building them on your local machine or inside a generic CI provider. Our `depot build` command accepts all the same arguments as `docker buildx build`, so you can use it in your existing workflows without any changes.
Best of all, Depot's build infrastructure for container builds requires zero configuration on your part; everything just works, including the build cache!
Take a look at the [quickstart](/docs/container-builds/quickstart) to get started.
## Key features
### Build isolation & acceleration
A remote container build runs on an ephemeral EC2 instance running an optimized version of BuildKit. We launch a builder on-demand in response to your `depot build` command and terminate it when the build is complete. You only pay for the compute you use, and builders are never shared across Depot customers or projects.
Each image builder, by default, has 16 CPUs, 32GB of memory. If you're on a startup or business plan, you can configure your builders to be larger, up to 64 CPUs and 128 GB of memory. Each builder also has a fast NVMe SSD for layer caching. The SSD is 50GB by default but can be expanded up to 500GB.
### Native Intel & Arm builds
We support native multi-platform Docker image builds for both Intel & Arm without the need for emulation. We build Intel images on fast Xeon Scalable Ice Lake CPUs and Arm images on AWS Graviton3 CPUs. You can build multi-platform images with zero emulation and without running additional infrastructure.
### Persistent shared caching
We automatically persist your Docker layer cache to fast NVMe storage and make it instantly available across builds. The layer cache is also shared across your entire team with access to the same project, so you can also benefit from your team's work.
### Drop-in replacement
Using Depot for your Docker image builds is as straightforward as replacing your `docker build` command with `depot build`. We support all the same flags and options as `docker build`. If you're using GitHub Actions, we also have our own version of the [`build-push-action`](/integrations/github-actions) and [`bake-action`](/integrations/github-actions) that you can use as a drop-in replacement.
### Integrate with any CI provider
We have extensive integrations with most major CI providers and developer tools to make it easy to use Depot remote container builds in your existing workflows. You can read more about how to leverage our remote container build service in your existing CI provider:
- [AWS CodeBuild](/docs/container-builds/reference/aws-codebuild)
- [Bitbucket Pipelines](/docs/container-builds/reference/bitbucket-pipelines)
- [Buildkite](/docs/container-builds/reference/buildkite)
- [CircleCI](/docs/container-builds/reference/circleci)
- [GitHub Actions](/docs/container-builds/reference/github-actions)
- [GitLab CI](/docs/container-builds/reference/gitlab-ci)
- [Google Cloud Build](/docs/container-builds/reference/google-cloud-build)
- [Jenkins](/docs/container-builds/reference/jenkins)
- [Travis CI](/docs/container-builds/reference/travis-ci)
#### OIDC support
We support OIDC trust relationships with GitHub, CircleCI, Buildkite, and Mint so that you don't need any static access tokens in your CI provider to leverage Depot. You can learn more about configuring a trust relationship in our [authentication docs.](/docs/cli/authentication)
### Integrate with your existing dev tools
We can accelerate your image builds for other developer tools like Dev Containers & Docker Compose. You can either use our drop-in replacements for `docker build` and `docker bake`, or configure Docker to use Depot as the remote builder.
- [How to use Depot in local development](/docs/container-builds/how-to-guides/local-development)
- [How to use Depot with Docker & Docker Compose](/docs/container-builds/how-to-guides/docker-build)
- [How to use Depot with Dev Containers](/docs/container-builds/how-to-guides/devcontainers)
### Build autoscaling
We offer autoscaling for our remote container builds. By default, all builds for a project are routed to a single BuildKit host per architecture you're building. With build autoscaling, you can configure the maximum number of builds to run on a single host before launching another host with a copy of your layer cache. This can help you parallelize builds across multiple hosts and reduce build times even further by giving them dedicated resources.
### Depot Registry
We offer a built-in registry that you can use to save the images from your `depot build` and `depot bake` commands to a registry. You can then pull those images back down or push them to your final registry as you see fit.
[Learn more about the Depot Registry](/docs/registry/overview)
## Pricing
Depot remote container builds are available on [all of our pricing plans](/pricing). Each plan includes a bucket of both Docker build minutes and GitHub Actions minutes. Business plan customers can [contact us](mailto:help@depot.dev) for custom plans.
| Feature | Developer Plan | Startup Plan | Business Plan |
| ----------------------------------- | ---------------------------------------------------------------- | ---------------------------------------------------------------- | ---------------------------------------------------------------- |
| **Cost** | $20/month | $200/month | Custom |
| **Users** | 1 | Unlimited | Unlimited |
| **Docker Build Minutes** | 500 included | 5,000 included
+ $0.04/minute after | Custom |
| **GitHub Actions Minutes** | 2,000 included | 20,000 included
+ $0.004/minute after | Custom |
| **Cache storage** | 25 GB included | 250 GB included
+ $0.20/GB/month after | Custom |
| **Support** | [Discord Community](https://discord.gg/MMPqYSgDCg) | Email support | Slack Connect support |
| **Unlimited concurrency** | | | |
| **Multi-platform builds** | | | |
| **US & EU regions** | | | |
| **Depot Registry** | | | |
| **Build Insights** | | | |
| **API Access** | | | |
| **Tailscale integration** | | | |
| **Windows GitHub Actions Runners** | | | |
| **macOS M2 GitHub Actions Runners** | × | | |
| **Usage caps** | × | | |
| **SSO & SCIM add-on** | × | | |
| **Volume discounts** | × | × | |
| **GPU enabled builds** | × | × | |
| **Docker build autoscaling** | | | |
| **Dedicated infrastructure** | × | × | |
| **Static outbound IPs** | × | × | |
| **Deploy to your own AWS account** | × | × | |
| **AWS Marketplace** | × | × | |
| **Invoice / ACH payment** | × | × | |
You can try out Depot on any plan free for 7 days, no credit card required →
## How does it work?
Container builds must be associated with a project in your organization. Projects usually represent a single application, repository, or Dockerfile. Once you've made your project, you can leverage Depot builders from your local machine or an existing CI workflow by swapping `docker` for `depot`.
By default, builder instances come with 16 CPUs and 32GB of memory. If you're on a startup or business plan, you can configure your builders to be larger in project settings, with up to 64 CPUs and 128 GB of memory. Each builder also comes with an SSD disk for layer caching (the default size is 50GB, but you can expand this up to 500GB). A builder instance runs an optimized version of [BuildKit](https://github.com/moby/buildkit), the advanced build engine that backs Docker.
We offer native Intel and Arm builder instances for all projects. Hence, both architectures build with zero emulation, and you don't have to run your own build runners to get native multi-platform images.
Once built, the image can be left in the build cache (the default) or downloaded to the local Docker daemon with `--load` or pushed to a registry with `--push`. If `--push` is specified, the image is pushed to the registry directly from the remote builder via high-speed network links and does not use your local network connection. See our [private registry guide](/docs/container-builds/how-to-guides/private-registries) for more details on pushing to private Docker registries like Amazon ECR or Docker Hub.
You can generally plug Depot into your existing Docker image build workflows with minimal changes, whether you're building locally or in CI.
### Architecture

The general architecture for Depot remote container builds consists of our `depot` CLI, a control plane, an open-source `cloud-agent`, and builder virtual machines running our open-source `machine-agent` and BuildKit with associated cache volumes. This design provides faster Docker image builds with as little configuration change as possible.
The flow of a given Docker image build when using Depot looks like this:
1. The Depot CLI asks the Depot API for a new builder machine connection (with organization ID, project ID, and the required architecture) and polls the API for when a machine is ready
2. The Depot API stores that pending request for a builder
3. A `cloud-agent` process periodically reports the current status to the Depot API and asks for any pending infrastructure changes
- For a pending build, it receives a description of the machine to start and launches it
4. When the machine launches, a `machine-agent` process running inside the VM registers itself with the Depot API and receives the instruction to launch BuildKit with specific mTLS certificates provisioned for the build
5. After the `machine-agent` reports that BuildKit is running, the Depot API returns a successful response to the Depot CLI, along with new mTLS certificates to secure and authenticate the build connection
6. The Depot CLI uses the new mTLS certificates to directly connect to the builder instance, using that machine and cache volume for the build
The same architecture is used for [self-hosted builders](/docs/managed/overview), the only difference being where the `cloud-agent` and builder virtual machines launch.
### Local commands
If you're running build or bake commands locally, you can swap to using the same commands in `depot`:
```sh
depot build -t my-image:latest --platform linux/amd64,linux/arm64 .
depot bake -f docker-bake.hcl
```
### CI integrations
We have built several integrations to make it easy to plug Depot into your existing CI workflows. For example, we have drop-in replacements for the GitHub Actions like `docker/build-push-action` and `docker/bake-action`
```diff
- uses: docker/build-push-action
+ uses: depot/build-push-action
- uses: docker/bake-action
+ uses: depot/bake-action
```
You can read more about how to leverage our remote container build service in your existing CI provider of choice:
- [AWS CodeBuild](/docs/container-builds/reference/aws-codebuild)
- [Bitbucket Pipelines](/docs/container-builds/reference/bitbucket-pipelines)
- [Buildkite](/docs/container-builds/reference/buildkite)
- [CircleCI](/docs/container-builds/reference/circleci)
- [GitHub Actions](/docs/container-builds/reference/github-actions)
- [GitLab CI](/docs/container-builds/reference/gitlab-ci)
- [Google Cloud Build](/docs/container-builds/reference/google-cloud-build)
- [Jenkins](/docs/container-builds/reference/jenkins)
- [Travis CI](/docs/container-builds/reference/travis-ci)
## Common opportunities to use Depot remote container builds
We built Depot based on our experience with Docker as both application and platform engineers, primarily as the tool we wanted to use ourselves — a fast container builder service that supported all `Dockerfile` features without additional configuration or maintenance.
Depot works best in the following scenarios:
1. **Building the Docker image is slow in CI** — common CI providers often do not have native support for the Docker build cache. Instead, they require layer cache to be saved to and loaded from tarballs over slow networks. Often, CI providers offer limited resources as well, causing overall build time to be long.
Depot works within your existing CI workflow by swapping out the call to `docker build` with `depot build`. Or by configuring `docker` in your environment to leverage Depot. See [our continuous integration guides](/docs/container-builds/how-to-guides/continuous-integration) for more information.
2. **You need to build images for multiple platforms/multiple architectures (Intel and Arm)** — today, you're often stuck with managing your own build runner or relying on slow emulation in order to build multi-platform images. For example, CI providers usually run their workflows on Intel machines. So, to create a Docker image for Arm, you either have to launch your own BuildKit builder for Arm and connect to it from your CI provider. Or build your Arm image with slow QEMU emulation.
Depot can [build multi-platform and Arm images](/docs/container-builds/how-to-guides/arm-containers) natively with zero-emulation and without running additional infrastructure.
3. **Building the Docker image on your local machine is slow or expensive** — Docker can hog resources on developer machines, taking up valuable network, CPU, and memory resources. Depot executes builds on remote compute infrastructure; it offloads the CPU, memory, disk, and network resources required to that remote builder. If builds on your local machine are slow due to constrained compute, disk, or network, `depot build` eliminates the need to rely on your local environment.
Additionally, since the project build cache is available remotely, multiple people can send builds to the same project and benefit from the same cache. If your coworker has already built the same image, your `depot build` command will re-use the previous result. This is especially useful for very slow builds, or for example, in reviewing a coworker's branch, you can pull their Docker image from the cache without an expensive rebuild.
## Quickstart for faster Docker image builds with Depot
---
title: Quickstart for faster Docker image builds with Depot
ogTitle: Getting started with Depot
description: Get started with Depot for up to 40x faster container image builds locally and in CI.
---
Below is a guide to leveraging Depot for up to 40x faster container image builds with a literal drop-in replacement for `docker build`.
We also offer managed GitHub Actions Runners with 10x faster caching. You can get started with our runners in our [GitHub Actions Overview docs](/docs/github-actions/overview).
## Installing the CLI
For Mac, you can install the CLI with Homebrew:
```shell
brew install depot/tap/depot
```
For Linux, you can install the CLI with [our installation script](https://depot.dev/install-cli.sh):
```shell
# Install the latest version
curl -L https://depot.dev/install-cli.sh | sh
# Install a specific version
curl -L https://depot.dev/install-cli.sh | sh -s 2.45.5
```
For all other platforms, you can download the binary directly from [the latest release](https://github.com/depot/cli/releases).
## Creating an organization
Organizations are the top level entity in Depot. They typically represent a single company or team. Billing details are attached to an organization.
1. Login to your Depot account to get to your [list of organizations](/orgs)
2. Click on the `Create Organization` button
3. Enter an organization name
4. Click `Create organization`
5. Click `New project` and specify your preferred region, cache storage policy, and connection.
If you're not quite ready to create your own project, every organization comes pre-configured with a `default` project that you can use for any container image build. The default project is placed in our US East region with a cache storage policy of 50 GB per image architecture. If you'd like to change those defaults, you can go into the Project > Settings and make any changes.
## Running a local build
There are two options for running local builds with Depot.
#### Using Depot with our `depot build` command
Our `depot build` command is a drop-in replacement for your existing `docker build` command.
Once you've created your project in the Depot app, you can run `depot build` to build your Docker image. The [`build` command](/docs/cli/reference#depot-build) takes all of the same parameters as your normal `docker build` command.
```shell
depot build -t repo/image:tag .
```
Your first `depot build` locally will ask you to authenticate with Depot and choose the project for your build. The CLI will prompt you to save this project in a `depot.json` file in your repository. This file is used to remember your project for future builds.
**Note: You can also specify a `DEPOT_PROJECT_ID` environment variable instead of saving a `depot.json` file.**
#### Using Depot with your existing `docker build` command
There is the option to configure your existing `docker build` commmands to leverage Depot behind the scenes for the build. This is done by configuring Depot as a plugin for the Docker CLI. You can see our [`depot configure-docker` docs](/docs/cli/reference#depot-configure-docker) for more information.
## Running a build in CI
Integrating Depot into your CI workflow is a very similar process. Depot works with any CI provider. You can find guides for our most popular providers:
- [AWS CodeBuild](/docs/container-builds/reference/aws-codebuild)
- [Bitbucket Pipelines](/docs/container-builds/reference/bitbucket-pipelines)
- [Buildkite](/docs/container-builds/reference/buildkite)
- [CircleCI](/docs/container-builds/reference/circleci)
- [GitHub Actions](/docs/container-builds/reference/github-actions)
- [GitLab CI](/docs/container-builds/reference/gitlab-ci)
- [Google Cloud Build](/docs/container-builds/reference/google-cloud-build)
- [Jenkins](/docs/container-builds/reference/jenkins)
- [Travis CI](/docs/container-builds/reference/travis-ci)
## Adding a build minute usage cap
By default, an organization is allowed to use unlimited build minutes in a month. However, you can configure a usage cap on your organization to avoid runaway costs.
1. Go to your [organizations inside of Depot](/orgs) and select your organization
2. Click on the `Settings` button
3. Under the `Usage caps` section you can choose between two options:
- **Unlimited**: By default organizations are configured to use unlimited build minutes in a month
- **Limit build minutes**: You can enter a fixed number of build minutes that your organization is allowed to use in a month. Once the limit is reached, builds will fail to start until the limit is raised or reset.
## Authentication
---
title: Authentication
ogTitle: How to authenticate with the Depot API
description: How to generate organization level API tokens for authenticating to the Depot API
---
You need to generate an API token to authenticate with the Depot API. API tokens are scoped to a single organization and grant access to manage projects and builds within your Depot organization.
## Generating an API token
You can generate an API token for an organization by going through the following steps:
1. Open your Organization Settings
2. Enter a description for your token under API Tokens
3. Click Create token
This token can create, update, and delete projects and run builds within your organization. You can revoke this token at any time by clicking `Remove API token` in the token submenu.
## Using the API token
To authenticate with the Depot API you must pass the token in the `Authorization` header of the request. For example, to list the projects in your organization you would make the following request via our Node SDK:
```typescript
import {depot} from '@depot/sdk-node'
const headers = {
Authorization: `Bearer ${process.env.DEPOT_API_TOKEN}`,
}
async function example() {
const result = await depot.core.v1.ProjectService.listProjects({}, {headers})
console.log(result.projects)
}
```
## Depot API Overview
---
title: Depot API Overview
ogTitle: Overview of the Depot API
description: Create and manage Depot projects and builders for running image builds on behalf of your own users
---
The Depot API is a collection of endpoints that grant access to our underlying architecture that make Docker image builds fast and reliable. It allows organizations to manage projects, acquire BuildKit endpoints, and run image builds for their applications or services using our build architecture.
Our API is built with Connect, offering [multiprotocol support](https://connectrpc.com/docs/introduction#seamless-multi-protocol-support) for GRPC and HTTP JSON. We currently generate the following SDKs for interacting with Depot:
- [Node](https://github.com/depot/sdk-node)
- [Go](https://github.com/depot/depot-go)
## Authentication
Authentication to the API is handled via an `Authorization` header with the value being an Organization Token that you generate inside of your Organization Settings. See the [Authentication docs](/docs/container-builds/reference/api-authentication) for more details.
## Security
If you're going to be using the Depot Build API to build untrusted code, you need **one Depot project per customer entity in your system**. This is to ensure secure cache isolation between your customers so that one customer's build can't access another customer's build cache.
## API Reference
### Project Service
Docs: [`depot.core.v1.ProjectService`](https://buf.build/depot/api/docs/main:depot.core.v1#depot.core.v1.ProjectService)
A project is an isolated cache. Projects belong to a single organization and are never shared. They represent the layer cache associated with the images built inside of it; you can build multiple images for different platforms with a single project. Or you can choose to have one project per image built.
When you want to segregate your customer builds from one another, we recommend one project per customer.
#### List projects for an organization
You can list all of the projects for your org with an empty request payload.
```typescript
const headers = {Authorization: `Bearer ${process.env.DEPOT_TOKEN}`}
const result = await depot.core.v1.ProjectService.listProjects({}, {headers})
console.log(result.projects)
```
#### Create a project
To create a project, you need to pass a request that contains the name of the project, the id of your organization, the region you want to create the project in, and the cache volume size you want to use with the project.
Supported regions:
- `us-east-1`
- `eu-central-1`
```typescript
const headers = {Authorization: `Bearer ${process.env.DEPOT_TOKEN}`}
const result = await depot.core.v1.ProjectService.createProject(
{
name: 'my-project',
organizationId: 'org-id',
regionId: 'us-east-1',
cachePolicy: {keepBytes: 50 * 1024 * 1024 * 1024, keepDays: 14},
},
{headers},
)
console.log(result.project)
```
#### Get a project
To get a project, you need to pass the ID of the project you want to get.
```typescript
const headers = {Authorization: `Bearer ${process.env.DEPOT_TOKEN}`}
const result = await depot.core.v1.ProjectService.getProject({projectId: 'project-id'}, {headers})
console.log(result.project)
```
#### Update a project
To update a project, you can pass the ID of the project you want to update and the fields you want to update.
```typescript
const headers = {Authorization: `Bearer ${process.env.DEPOT_TOKEN}`}
const result = await depot.core.v1.ProjectService.updateProject(
{
projectId: 'project-id',
name: 'my-project',
regionId: 'us-east-1',
cachePolicy: {keepBytes: 50 * 1024 * 1024 * 1024, keepDays: 14},
hardware: Hardware.HARDWARE_32X64,
},
{headers},
)
console.log(result.project)
```
#### Delete a project
You can delete a project by ID. This will destroy any underlying volumes associated with the project.
```typescript
await depot.core.v1.ProjectService.deleteProject({projectId: 'project-id'}, {headers})
```
#### List tokens for a project
You can list the tokens for a project by ID.
```typescript
const headers = {Authorization: `Bearer ${process.env.DEPOT_TOKEN}`}
const result = await depot.core.v1.ProjectService.listTokens(
{
projectId: 'project-id',
},
{headers},
)
```
#### Create a project token
You can create a token for a given project ID.
```typescript
const headers = {Authorization: `Bearer ${process.env.DEPOT_TOKEN}`}
const result = await depot.core.v1.ProjectService.createToken(
{
projectId: 'project-id',
description: 'my-token',
},
{headers},
)
```
#### Update a project token
You can update a project token by ID.
```typescript
const headers = {Authorization: `Bearer ${process.env.DEPOT_TOKEN}`}
const result = await depot.core.v1.ProjectService.updateToken(
{
tokenId: 'token-id',
description: 'new-description',
},
{headers},
)
```
#### Delete a project token
You can delete a project token by ID.
```typescript
const headers = {Authorization: `Bearer ${process.env.DEPOT_TOKEN}`}
const result = await depot.core.v1.ProjectService.deleteToken(
{
tokenId: 'token-id',
},
{headers},
)
```
#### List trust policies for a project
```typescript
const policies = await depot.core.v1.ProjectService.listTrustPolicies({projectId: 'project-id'}, {headers})
```
#### Add a trust policy for a project
```typescript
// GitHub
await depot.core.v1.ProjectService.addTrustPolicy(
{
projectId: 'project-id',
provider: {
case: 'github',
value: {
repositoryOwner: 'org',
repository: 'repo',
},
},
},
{headers},
)
```
```typescript
// BuildKite
await depot.core.v1.ProjectService.addTrustPolicy(
{
projectId: 'project-id',
provider: {
case: 'buildkite',
value: {
organizationSlug: 'org',
pipelineSlug: 'pipeline',
},
},
},
{headers},
)
```
```typescript
// GitHub
await depot.core.v1.ProjectService.addTrustPolicy(
{
projectId: 'project-id',
provider: {
case: 'circleci',
value: {
organizationUuid: 'uuid',
projectUuid: 'uuid',
},
},
},
{headers},
)
```
#### Remove a trust policy for a project
```typescript
await depot.core.v1.ProjectService.removeTrustPolicy({projectId: 'project-id', trustPolicyId: 'policy-id'}, {headers})
```
### Build Service
Docs: [`depot.build.v1.BuildService`](https://buf.build/depot/api/docs/main:depot.build.v1#depot.build.v1.BuildService)
A build is a single image build within a given project. Once you create a build for a project, you get back an ID to reference it and a token for authentication.
#### Create a build
To create a build, you need to pass a request that contains the ID of the project you want to build in.
```typescript
const headers = {Authorization: `Bearer ${process.env.DEPOT_TOKEN}`}
const result = await depot.build.v1.BuildService.createBuild({projectId: 'project-id'}, {headers})
console.log(result.buildId)
console.log(result.buildToken)
```
##### Using the build id & token
If you're not managing the build context yourself in code via `buildx`, you can use the Depot CLI to build a given `Dockerfile` as we wrap `buildx` inside our CLI. With a build created via our API, you pass along the project, build ID, and token as environment variables:
```bash
DEPOT_BUILD_ID=
DEPOT_TOKEN=
DEPOT_PROJECT_ID=
depot build -f Dockerfile
```
#### Finish a build
**Note: You only need to do this if you're managing the build context yourself in code via `buildx`.**
To mark a build as finished and clean up the underlying BuildKit endpoint, you need to pass the ID of the build you want to finish and the error result if there was one.
```typescript
const headers = {Authorization: `Bearer ${process.env.DEPOT_TOKEN}`}
await depot.build.v1.BuildService.finishBuild({buildId: 'build-id', result: {error: 'error message'}}, {headers})
```
#### List the steps for a build
To list the steps for a build, you need to pass the build ID, the project ID, the number of steps to page, and an optional page token returned from a previous API call.
```typescript
const headers = {Authorization: `Bearer ${process.env.DEPOT_TOKEN}`}
const result = await depot.build.v1.BuildService.getBuildSteps(
{buildId: 'build-id', projectId: 'project-id', pageSize: 100, pageToken: 'page-token'},
{headers},
)
```
#### Get the logs for a build step
To get the logs for a build step, you need to pass the build ID, the project ID, and the build step's digest. You can also pass the number of lines to page and an optional page token returned from a previous API call.
```typescript
const headers = {Authorization: `Bearer ${process.env.DEPOT_TOKEN}`}
const result = await depot.build.v1.BuildService.getBuildStepLogs(
{
buildId: 'build-id',
projectId: 'project-id',
buildStepDigest: 'step-digest',
pageSize: 100,
pageToken: 'page-token',
},
{headers},
)
```
### Registry Service
Docs: [`depot.build.v1.RegistryService`](https://buf.build/depot/api/docs/main:depot.build.v1#depot.build.v1.RegistryService)
The Registry service provides access to the underlying registry that stores the images built by Depot. You can use this service to list and delete images.
#### List the images for a project
To list the images for a project, you need to pass the ID of the project you want to list the images for. When listing more than 100 images, you can use the `pageSize` and `pageToken` fields to paginate the results.
```typescript
const headers = {Authorization: `Bearer ${process.env.DEPOT_TOKEN}`}
const result = await depot.build.v1.RegistryService.listImages(
{projectId: 'project-id', pageSize: 100, pageToken: undefined},
{headers},
)
console.log(result.images)
console.log(result.nextPageToken)
```
The images returned will consist of an image tag, digest, a pushedAt timestamp, and the size of the image in bytes.
#### Delete images
To delete images, you need to pass the ID of the project and the list of image tags you want to removed.
```typescript
const headers = {Authorization: `Bearer ${process.env.DEPOT_TOKEN}`}
await depot.build.v1.RegistryService.deleteImages(
{projectId: 'project-id', imageTags: ['image-tag-1', 'image-tag-2']},
{headers},
)
```
### BuildKit Service
Docs: [`depot.buildkit.v1.BuildKitService`](https://buf.build/depot/api/docs/main:depot.buildkit.v1#depot.buildkit.v1.BuildKitService)
The BuildKit service provides lower level access to the underlying BuildKit endpoints that power the image builds. They give you the ability to interact with the underlying builders without needing the Depot CLI as a dependency. For example, you can use the [`buildx` Go library](https://pkg.go.dev/github.com/docker/buildx) with the given BuildKit endpoint to build images from your own code via Depot.
#### Get a BuildKit endpoint
To get a BuildKit endpoint, you need to pass the ID of the build you want to get the endpoint for and the platform you want to build.
Supported platforms:
- `PLATFORM_AMD64` for `linux/amd64` builds
- `PLATFORM_ARM64` for `linux/arm64` builds
```typescript
const headers = {Authorization: `Bearer ${process.env.DEPOT_TOKEN}`}
const createBuildResult = await depot.build.v1.BuildService.createBuild({projectId: 'project-id'}, {headers})
const getEndpointResult = await depot.buildkit.v1.BuildKitService.getEndpoint(
{buildId: 'build-id', platform: 'PLATFORM_AMD64'},
{Authorization: `Bearer ${createBuildResult.build_token}`},
)
console.log(getEndpointResult.connection)
```
When a connection is active and ready to be used the `connection` property will be populated with the following fields:
- `endpoint`: The BuildKit endpoint to connect to
- `server_name`: The server name to use for TLS verification
- `certificate`: The certificate to use for TLS verification to the endpoint
- `ca_cert`: The CA certificate to use for TLS verification to the endpoint
#### Report the health of a build
To report the health of a build, you need to pass the ID of the build you want to report and the platform.
**Once you acquire a BuildKit endpoint, you must report the health of the build to Depot or the underlying resources will be removed after 5 minutes of inactivity.**
```typescript
const headers = {Authorization: `Bearer ${process.env.DEPOT_TOKEN}`}
const result = await depot.build.v1.BuildKitService.reportHealth(
{buildId: 'build-id', platform: 'PLATFORM_AMD64'},
{headers},
)
```
#### Release the endpoint for a build
To release the endpoint for a build, you need to pass the ID of the build you want to release and the platform.
This endpoint tells Depot you're are done using that endpoint and we can schedule it for removal.
```typescript
const headers = {Authorization: `Bearer ${process.env.DEPOT_TOKEN}`}
const result = await depot.build.v1.BuildKitService.releaseEndpoint(
{buildId: 'build-id', platform: 'PLATFORM_AMD64'},
{Authorization: `Bearer ${createBuildResult.build_token}`},
)
```
## AWS CodeBuild
---
title: AWS CodeBuild
ogTitle: Use Depot in your AWS CodeBuild workflow
description: Use Depot's persistent caching and native Arm support for faster Docker image builds in AWS CodeBuild
---
## Authentication
For AWS CodeBuild, you can use project or user access tokens for authenticating your build with Depot. We recommend using project tokens as they are scoped to the specific project and are owned by the organization.
### [Project token](/docs/cli/authentication#project-tokens)
You can inject project access tokens into the CodeBuild environment for `depot` CLI authentication. Project tokens are tied to a specific project in your organization and not a user.
### [User access token](/docs/cli/authentication#user-access-tokens)
You can inject a user access token into the CodeBuild environment for `depot` CLI authentication. User tokens are tied to a specific user and not a project. Therefore, it can be used to build all projects across all organizations which the user has access.
## Configuration
To build a Docker image from AWS CodeBuild, you must set the `DEPOT_TOKEN` environment variable by [injecting it from Secrets Manager](https://docs.aws.amazon.com/codebuild/latest/userguide/build-spec-ref.html#secrets-manager-build-spec). Note that you also need to grant your IAM service role for CodeBuild permission to access the secret.
```yaml
{
'Version': '2012-10-17',
'Statement':
[
{
'Sid': 'Statement1',
'Effect': 'Allow',
'Action': 'secretsmanager:GetSecretValue',
'Resource': '',
},
],
}
```
### CodeBuild EC2 compute type
With a project or user token stored in Secrets Manager, you can add the `DEPOT_TOKEN` environment variable to your `buildspec.yml` file, install the `depot` CLI, and run `depot build` to build your Docker image. The following example shows the configuration steps when using the EC2 compute type.
```yaml showLineNumbers
version: 0.2
env:
secrets-manager:
DEPOT_TOKEN: ''
phases:
pre_build:
commands:
- echo Installing Depot CLI...
- curl -L https://depot.dev/install-cli.sh | DEPOT_INSTALL_DIR="/usr/local/bin" sh
build:
commands:
- depot build .
```
### CodeBuild Lambda compute type
The CodeBuild Lambda compute type requires installing the `depot` CLI in a different directory that is in the `$PATH` by default. The following example shows the configuration steps when using the Lambda compute type.
```yaml showLineNumbers
version: 0.2
env:
secrets-manager:
DEPOT_TOKEN: ''
phases:
pre_build:
commands:
- echo Installing Depot CLI...
- curl -L https://depot.dev/install-cli.sh | DEPOT_INSTALL_DIR="/tmp/codebuild/bin" sh
build:
commands:
- depot build .
```
**Note:** The CodeBuild Lambda compute type does not support privileged mode. Therefore, you cannot use the `--load` flag to load the image back into the Docker daemon as there is no Docker daemon running in the Lambda environment.
## Examples
### Build multi-platform images natively without emulation
This example shows how you can use the `--platform` flag to build a multi-platform image for Intel and Arm architectures natively without emulation.
```yaml showLineNumbers
version: 0.2
env:
secrets-manager:
DEPOT_TOKEN: ''
phases:
pre_build:
commands:
- echo Installing Depot CLI...
- curl -L https://depot.dev/install-cli.sh | DEPOT_INSTALL_DIR="/usr/local/bin" sh
build:
commands:
- depot build --platform linux/amd64,linux/arm64 .
```
### Build and push to AWS ECR
This example demonstrates building and pushing a Docker image to AWS ECR from AWS CodeBuild via Depot.
Note that you need to grant your IAM service role for CodeBuild permission to access the ECR repository by adding the following statement to its IAM policy:
```json
{
"Action": [
"ecr:BatchCheckLayerAvailability",
"ecr:CompleteLayerUpload",
"ecr:GetAuthorizationToken",
"ecr:InitiateLayerUpload",
"ecr:PutImage",
"ecr:UploadLayerPart"
],
"Resource": "*",
"Effect": "Allow"
}
```
### Logging into ECR with the EC2 compute type
When using the EC2 compute type in CodeBuild, you can login to your ECR registry with `docker login` via the [documented methods](https://docs.aws.amazon.com/codebuild/latest/userguide/sample-docker.html#sample-docker-files) provided by ECR. To access `docker login`, you must make sure that you're CodeBuild environment is configured with Privileged mode turned on.
```yaml showLineNumbers
version: 0.2
env:
secrets-manager:
DEPOT_TOKEN: ''
phases:
pre_build:
commands:
- echo Installing Depot CLI...
- curl -L https://depot.dev/install-cli.sh | DEPOT_INSTALL_DIR="/usr/local/bin" sh
- echo Logging in to Amazon ECR...
- aws ecr get-login-password --region | docker login --username AWS --password-stdin
build:
commands:
- depot build -t : --push .
```
### Logging into ECR with the Lambda compute type
You can build a Docker image with the Lambda compute type in CodeBuild and push it to ECR without using the `docker login` command by writing the Docker authentication file yourself at `$HOME/.docker/config.json` and use the [`--push`](/docs/cli/reference#depot-build) flag. Note that you can't load the image back into the Docker daemon with the Lambda compute type.
```yaml showLineNumbers
version: 0.2
env:
secrets-manager:
DEPOT_TOKEN: ''
phases:
pre_build:
commands:
- ecr_stdin=$(aws ecr get-login-password --region )
- registry_auth=$(printf "AWS:$ecr_stdin" | openssl base64 -A)
- mkdir $HOME/.docker
- echo "{\"auths\":{\"\":{\"auth\":\"$registry_auth\"}}}" > $HOME/.docker/config.json
- echo Installing Depot CLI...
- curl -L https://depot.dev/install-cli.sh | DEPOT_INSTALL_DIR="/tmp/codebuild/bin" sh
build:
commands:
- depot build -t :latest --push .
```
#### Obtaining an authenticated Docker config.json
Alternatively, you can copy a pre-configured, authenticated `config.json` by logging into the Docker registry and copying the `config.json` file.
```bash
$ docker login -u your-username
Password:
$ cat ~/.docker/config.json
```
You can now copy the contents of the `config.json` file and use it in your CodeBuild configuration.
### Build and load the image back for testing
You can download the built container image into the workflow using the [`--load` flag](/docs/cli/reference#depot-build).
```yaml showLineNumbers
version: 0.2
env:
secrets-manager:
DEPOT_TOKEN: ''
phases:
pre_build:
commands:
- echo Installing Depot CLI...
- curl -L https://depot.dev/install-cli.sh | DEPOT_INSTALL_DIR="/usr/local/bin" sh
build:
commands:
- depot build --load .
```
### Build, push, and load the image back in one command
You can simultaneously push the built image to a registry and load it back into the CI job using the [`--load` and `--push`](/docs/cli/reference#depot-build) flags together.
```yaml showLineNumbers
version: 0.2
env:
secrets-manager:
DEPOT_TOKEN: ''
phases:
pre_build:
commands:
- echo Installing Depot CLI...
- curl -L https://depot.dev/install-cli.sh | DEPOT_INSTALL_DIR="/usr/local/bin" sh
- echo Logging in to Amazon ECR...
- aws ecr get-login-password --region | docker login --username AWS --password-stdin
build:
commands:
- depot build -t : --push --load .
```
## Bitbucket Pipelines
---
title: Bitbucket Pipelines
ogTitle: Use Depot in your Bitbucket Pipelines
description: Speed up your container builds by using Depot in your existing Bitbucket Pipelines.
---
## Authentication
For Bitbucket Pipelines, you can use project or user access tokens for authenticating your build with Depot. We recommend using project tokens as they are scoped to a specific project and owned by the organization.
**Note:** The CLI looks for the `DEPOT_TOKEN` environment variable by default. For both token options, you should configure this variable for your build environment via [repository variables](https://support.atlassian.com/bitbucket-cloud/docs/variables-and-secrets/).
### [Project token](/docs/cli/authentication#project-tokens)
You can inject project access tokens into the Pipeline environment for `depot` CLI authentication. These tokens are tied to a specific project in your organization and not a user.
### [User access token](/docs/cli/authentication#user-access-tokens)
It is also possible to generate a user access token to inject into the Pipeline environment for `depot` CLI authentication. This token is tied to a specific user and not a project. Therefore, it can be used to build all projects across all organizations that the user can access.
## Configuration
To build a Docker image from Bitbucket Pipelines, you must set the `DEPOT_TOKEN` environment variable in your repository settings. You can do this through the UI for your repository via the [`Repository Settings > Pipelines > Repository variables`](https://support.atlassian.com/bitbucket-cloud/docs/variables-and-secrets/#Variablesinpipelines-Repositoryvariables).
In addition, you must also install the `depot` CLI before you run `depot build`.
```yaml showLineNumbers
pipelines:
branches:
master:
- step:
name: Install Depot CLI and build
script:
- curl -L https://depot.dev/install-cli.sh | DEPOT_INSTALL_DIR=/usr/local/bin sh
- depot build .
```
## Examples
### Build multi-platform images natively without emulation
This example shows how you can use the `--platform` flag to build a multi-platform image for Intel and Arm architectures natively without emulation.
```yaml showLineNumbers
pipelines:
branches:
master:
- step:
name: Build multi-architecture image
script:
- curl -L https://depot.dev/install-cli.sh | DEPOT_INSTALL_DIR=/usr/local/bin sh
- depot build --platform linux/amd64,linux/arm64 .
```
### Build and push to Docker Hub
This example installs the `depot` CLI to be used directly in the pipeline. Then, `docker login` is invoked with the environment variables for `DOCKERHUB_USERNAME` and `DOCKERHUB_TOKEN` for the authentication context of the build to push to the registry.
```yaml showLineNumbers
pipelines:
branches:
master:
- step:
name: Authenticate, Build, Push to Docker Hub
script:
- curl -L https://depot.dev/install-cli.sh | DEPOT_INSTALL_DIR=/usr/local/bin sh
- docker login --username $DOCKERHUB_USERNAME --password $DOCKERHUB_TOKEN
- depot build -t : --push .
services:
- docker # Needed just for logging the Docker build context into a registry
```
### Build and push to Amazon ECR
This example installs the `depot` and `aws` CLIs to be used directly in the pipeline. Then, `aws ecr get-login-password` is piped into `docker login` for the authentication context of the build to push to the registry.
```yaml showLineNumbers
pipelines:
branches:
master:
- step:
name: Authenticate, Build, Push to ECR
script:
- curl -L https://depot.dev/install-cli.sh | DEPOT_INSTALL_DIR=/usr/local/bin sh
- curl "https://awscli.amazonaws.com/awscli-exe-linux-x86_64.zip" -o "awscliv2.zip"
- unzip awscliv2.zip
- ./aws/install
- aws --version
- aws ecr get-login-password --region | docker login --username AWS --password-stdin
- depot build -t : --push .
services:
- docker # Needed just for logging the Docker build context into a registry
```
### Build and load the image back into the Pipeline for testing
You can use the [`--load` flag](/docs/cli/reference#depot-build) to download the built container image into the workflow.
```yaml showLineNumbers
pipelines:
branches:
master:
- step:
name: Install Depot CLI, build, load image back into the Pipeline
script:
- curl -L https://depot.dev/install-cli.sh | DEPOT_INSTALL_DIR=/usr/local/bin sh
- depot build --load .
```
### Build, push, and load the image back in one command
You can simultaneously push the built image to a registry and load it back into the CI job by using the [`--load` and `--push`](/docs/cli/reference#depot-build) flag together.
```yaml showLineNumbers
pipelines:
branches:
master:
- step:
name: Install Depot CLI, build, load image back into the Pipeline
script:
- curl -L https://depot.dev/install-cli.sh | DEPOT_INSTALL_DIR=/usr/local/bin sh
- depot build -t --push --load .
```
## Buildkite
---
title: Buildkite
ogTitle: Use Depot in your Buildkite Pipelines
description: Speed up your container builds by using Depot in your existing Buildkite Pipelines.
---
## Authentication
For Buildkite, you can use OIDC, project, or user access tokens for authenticating your build with Depot. Because Buildkite supports the OIDC flow, we recommend using that for the best experience.
### [OIDC token](/docs/cli/authentication#oidc-trust-relationships)
The easiest option is to use a [Buildkite OIDC token](https://buildkite.com/docs/agent/v3/cli-oidc) as authentication for `depot build`. Our CLI supports authentication via OIDC by default in Buildkite when you have a trust relationship configured for your project.
### [Project token](/docs/cli/authentication#project-tokens)
You can inject a project access token into the pipeline for `depot` CLI authentication. Project tokens are tied to a specific project in your organization and not a user.
### [User access token](/docs/cli/authentication#user-access-tokens)
You can inject a user access token into the pipeline for `depot` CLI authentication. User tokens are tied to a specific user and not a project. Therefore, it can be used to build all projects across all organizations that the user can access.
## Configuration
To build a Docker image from Buildkite, you must either configure an OIDC trust relationship for your project or set the `DEPOT_TOKEN` environment variable via a Buildkite [`environment` hook](https://buildkite.com/docs/pipelines/security/secrets/managing#exporting-secrets-with-environment-hooks).
This guide also assumes that you are defining a `pipeline.yml` configuration file located in a `.buildkite` directory at the root of your repository. See the [Buildkite documentation](https://buildkite.com/docs/pipelines/defining-steps#step-defaults-pipeline-dot-yml-file) for more information on how to configure your pipeline this way.
To build a Docker image with Depot inside of your Buildkite pipeline, you must first install the `depot` CLI, and then you can run `depot build`.
```yaml showLineNumbers
steps:
- label: 'Build image with Depot'
command:
- 'curl -L https://depot.dev/install-cli.sh | DEPOT_INSTALL_DIR=/usr/local/bin sh'
- 'depot build .'
```
## Examples
### Build multi-platform images natively without emulation
This example shows how you can use the `--platform` flag to build a multi-platform image for Intel and Arm architectures natively without emulation.
```yaml showLineNumbers
steps:
- label: 'Build image with Depot'
command:
- 'curl -L https://depot.dev/install-cli.sh | DEPOT_INSTALL_DIR=/usr/local/bin sh'
- 'depot build --platform linux/amd64,linux/arm64 .'
```
### Build and push to Docker Hub
This example assumes you have set the `DOCKERHUB_USERNAME` and `DOCKERHUB_TOKEN` environment variables as part of the [`environment` hook](https://buildkite.com/docs/pipelines/security/secrets/managing#exporting-secrets-with-environment-hooks) and you have the `docker` CLI installed in your Buildkite agent.
We then install the `depot` CLI to be used directly in the pipeline. Then, `docker login` is invoked with the environment variables for `DOCKERHUB_USERNAME` and `DOCKERHUB_TOKEN` for the authentication context of the build to push to the registry.
```yaml showLineNumbers
steps:
- label: 'Build image with Depot and push to Docker Hub'
command:
- 'curl -L https://depot.dev/install-cli.sh | DEPOT_INSTALL_DIR=/usr/local/bin sh'
- 'docker login --username $DOCKERHUB_USERNAME --password $DOCKERHUB_TOKEN'
- 'depot build -t : --push .'
```
### Build and push to Amazon ECR
This example installs the `depot` and `aws` CLIs to be used directly. Then, `aws ecr get-login-password` is piped into `docker login` for the authentication context of the build to push to the registry.
```yaml showLineNumbers
steps:
- label: 'Build image with Depot and push to Docker Hub'
command:
- 'curl -L https://depot.dev/install-cli.sh | DEPOT_INSTALL_DIR=/usr/local/bin sh'
- 'curl https://awscli.amazonaws.com/awscli-exe-linux-x86_64.zip -o awscliv2.zip'
- 'unzip awscliv2.zip'
- './aws/install'
- 'aws ecr get-login-password --region | docker login --username AWS --password-stdin '
- 'depot build -t : --push .'
```
### Build and load the image back for testing
You can use the [`--load` flag](/docs/cli/reference#depot-build) to download the built container image into the workflow.
```yaml showLineNumbers
steps:
- label: 'Build image with Depot'
command:
- 'curl -L https://depot.dev/install-cli.sh | DEPOT_INSTALL_DIR=/usr/local/bin sh'
- 'depot build --load .'
```
### Build, push, and load the image back in one command
You can simultaneously push the built image to a registry and load it back into the CI job by using the [`--load` and `--push`](/docs/cli/reference#depot-build) flag together.
```yaml showLineNumbers
steps:
- label: 'Build image with Depot'
command:
- 'curl -L https://depot.dev/install-cli.sh | DEPOT_INSTALL_DIR=/usr/local/bin sh'
- 'depot build -t --push --load .'
```
## CircleCI
---
title: CircleCI
ogTitle: Use Depot in your CircleCI workflow
description: Get faster container builds with persistent caching and zero emulation in CircleCI
---
## Authentication
For CircleCI, you can use OIDC, project, or user access tokens for authenticating your build with Depot. We recommend OIDC tokens for the best experience, as they work automatically without provisioning a static access token.
### [OIDC token](/docs/cli/authentication#oidc-trust-relationships)
The easiest option is to use a [CircleCI OIDC token](https://circleci.com/docs/openid-connect-tokens/) as authentication for `depot build`. Our CLI supports authentication via OIDC by default in CircleCI when you have a trust relationship configured for your project.
### [Project token](/docs/cli/authentication#project-tokens)
You can set the `DEPOT_TOKEN` environment variable to a project access token in your [CircleCI environment variable settings](https://circleci.com/docs/set-environment-variable/#set-an-environment-variable-in-a-project). Project tokens are tied to a specific project in your organization and not a user.
### [User access token](/docs/cli/authentication#user-access-tokens)
You can also set the `DEPOT_TOKEN` environment variable to a user access token in your [CircleCI environment variable settings](https://circleci.com/docs/set-environment-variable/#set-an-environment-variable-in-a-project). User tokens are tied to a specific user and not a project. Therefore, it can be used to build all projects across all organizations that the user has access.
## Configuration
To build a Docker image from CircleCI, you must set the `DEPOT_TOKEN` environment variable in your project settings. This is done through the [UI for your project](https://circleci.com/docs/set-environment-variable/#set-an-environment-variable-in-a-project).
CircleCI has two executor types that allow you to build Docker images. The `machine` executor runs your job on the entire VM with `docker` pre-installed. The `docker` executor runs your job in a container. Depot can be used in either executor type.
### Using the CircleCI machine executor
To install `depot` and run a Docker image build in CircleCI, add the following to your `config.yml` file:
```yaml showLineNumbers
version: 2.1
jobs:
build:
machine: true
resource_class: medium
steps:
- checkout
- run:
name: Install Depot
command: |
curl -L https://depot.dev/install-cli.sh | sudo env DEPOT_INSTALL_DIR=/usr/local/bin sh
- run:
name: Build with Depot
command: |
depot build .
```
### Using the CircleCI docker executor
If you would prefer to use the `docker` executor, you can use the following configuration:
```yaml showLineNumbers
version: 2.1
jobs:
build:
docker:
- image: cimg/node:lts
resource_class: small
steps:
- checkout
- setup_remote_docker
- run:
name: Install Depot
command: |
curl -L https://depot.dev/install-cli.sh | sudo env DEPOT_INSTALL_DIR=/usr/local/bin sh
- run:
name: Build with Depot
command: depot build .
workflows:
run_build:
jobs:
- build
```
**Note:** The `setup_remote_docker` step is required for the `docker` executor if you want to execute Docker commands in your build before or after the `depot` CLI builds your image. See the examples below
## Examples
The examples below use the machine executor. However, the same commands can be used with the docker executor as well.
### Build multi-platform images without emulation in CircleCI
This example shows how you can use the `--platform` flag to build a multi-platform image for Intel and Arm architectures natively without emulation.
```yaml showLineNumbers
version: 2.1
jobs:
build:
machine: true
resource_class: medium
steps:
- checkout
- run:
name: Install Depot
command: |
curl -L https://depot.dev/install-cli.sh | sudo env DEPOT_INSTALL_DIR=/usr/local/bin sh
- run:
name: Build multi-architecture image
command: |
depot build --platform linux/amd64,linux/arm64 .
workflows:
run_build:
jobs:
- build
```
### Build and push to Docker Hub
This examples assumes you have set the `DOCKERHUB_PASS` and `DOCKERHUB_USERNAME` environment variables in your CircleCI project settings.
```yaml showLineNumbers
version: 2.1
jobs:
build:
machine: true
resource_class: medium
steps:
- checkout
- run:
name: Install Depot
command: |
curl -L https://depot.dev/install-cli.sh | sudo env DEPOT_INSTALL_DIR=/usr/local/bin sh
- run:
name: Build and push to Docker Hub with Depot
command: |
echo "$DOCKERHUB_PASS" | docker login -u "$DOCKERHUB_USERNAME" --password-stdin
depot build -t --push .
workflows:
run_build:
jobs:
- build
```
### Build and push to Amazon ECR
This examples assumes you have set the `AWS_ACCESS_KEY_ID`, `AWS_SECRET_ACCESS_KEY`, and `AWS_ECR_REGISTRY_ID` environment variables in your CircleCI project settings. See the [`circleci/aws-ecr` orb documentation](https://circleci.com/developer/orbs/orb/circleci/aws-ecr) for more information.
```yaml showLineNumbers
version: 2.1
orbs:
aws-ecr: circleci/aws-ecr@8.2.1
jobs:
build:
machine: true
resource_class: medium
steps:
- checkout
- aws-ecr/ecr-login:
region: us-east-1
- run:
name: Install Depot
command: |
curl -L https://depot.dev/install-cli.sh | sudo env DEPOT_INSTALL_DIR=/usr/local/bin sh
- run:
name: Build and push to Amazon ECR with Depot
command: |
depot build -t --push .
workflows:
run_build:
jobs:
- build
```
### Build and load the image back into the CircleCI job for testing
You can use the [`--load` flag](/docs/cli/reference#depot-build) to download the built container image into the workflow.
```yaml showLineNumbers
version: 2.1
jobs:
build:
machine: true
resource_class: medium
steps:
- checkout
- run:
name: Install Depot
command: |
curl -L https://depot.dev/install-cli.sh | sudo env DEPOT_INSTALL_DIR=/usr/local/bin sh
- run:
name: Build and push to Docker Hub with Depot
command: |
depot build --load .
workflows:
run_build:
jobs:
- build
```
### Build, push, and load the image back in one command
You can simultaneously push the built image to a registry and load it back into the CI job by using the [`--load` and `--push`](/docs/cli/reference#depot-build) flag together.
```yaml showLineNumbers
version: 2.1
jobs:
build:
machine: true
resource_class: medium
steps:
- checkout
- run:
name: Install Depot
command: |
curl -L https://depot.dev/install-cli.sh | sudo env DEPOT_INSTALL_DIR=/usr/local/bin sh
- run:
name: Build and push to Docker Hub with Depot
command: |
echo "$DOCKERHUB_PASS" | docker login -u "$DOCKERHUB_USERNAME" --password-stdin
depot build -t --push --load .
workflows:
run_build:
jobs:
- build
```
## Fly.io
---
title: Fly.io
ogTitle: Use Depot to build your images for Fly.io
description: Speed up the container image builds for your deployments to Fly.io
---
You can use Depot to build your container images for Fly.io. This guide will show you how to integrate Depot into your Fly.io deployment pipeline.
## Getting started with Fly.io
Once you have a Fly.io account, you can create and deploy a new app using the Fly CLI. You can install the Fly CLI using the methods described in the [Fly.io documentation](https://fly.io/docs/flyctl/install/).
You have two options for integrating Depot with Fly.io, you may build the image with `depot build` using your Depot account and push it to Fly.io, or you can use the `--depot` flag with the `flyctl deploy` command to use Depot as the builder on Fly.
## Getting started with Depot
Before you can build and push your container images with Depot to your Fly registry, you need an account with Depot. If you don't already have one, you can sign up at [depot.dev/start](/start). Once you have an account, you need to create a Depot project for accelerated Docker image builds.
With an account and project, all that is left is [installing the Depot CLI](/docs/cli/installation) by running the following command:
```shell
brew install depot/tap/depot # for Mac
curl -L https://depot.dev/install-cli.sh | sh # for Linux
```
## Using Depot with Fly.io
### Fly CLI
When using Depot as the builder for your Fly.io apps, you will not need to connect a Depot account.
Simply specify Depot as the builder with the `--depot` flag when deploying and automatically take advantage of Depot's accelerated builds.
```shell
flyctl deploy --depot
```
Alternatively, if you are running Fly machines directly you can use the `--build-depot` flag.
```shell
flyctl machine run --build-depot
```
Depot's optimized build process will provide instant caching across all builds within your Fly.io organization, sharing layers between all your apps and deployments.
### Using Depot to build and push images to Fly.io
Once an app is created in Fly.io, you will also have a container registry at `registry.fly.io/`. You can push your container images to Fly.io from Depot.
#### Authenticate to Depot
If you haven't already, run `depot init` in the root directory of the container image you're building with Depot. This will prompt you to authenticate your CLI and choose the project you created earlier.
#### Authenticate to Fly.io registry
Next, you need to authenticate to the Fly registry for your app using the Fly CLI. You can do this by running:
```shell
flyctl auth docker
```
#### Build and push the image
Using Depot, you can now build and push your container image to the Fly registry. Replace `` with the name of your Fly.io app and `` with the tag you want to use for the image.
```shell
depot build -t registry.fly.io/: --platform linux/amd64 --push .
```
#### Deploy the image
Finally, using the Fly CLI, you can deploy the image to your Fly.io app. Replace `` with the name of your Fly.io app and `` with the tag you used for the image.
```shell
flyctl deploy --image registry.fly.io/:
```
## GitHub Actions
---
title: GitHub Actions
ogTitle: Use Depot in your GitHub Actions workflow
description: Get faster container builds with persistent caching and zero emulation in GitHub Actions
---
If you're looking to use our fully-managed GitHub Actions Runners as a drop-in replacement for your existing runners, head over to [Quickstart for GitHub Actions Runners](/docs/github-actions/quickstart).
If you're looking to use Depot just for your container image builds in GitHub Actions, read on.
## Authentication
For GitHub Actions, you can use OIDC, project, or user access tokens for authenticating your build with Depot. Because GitHub Actions supports the OIDC flow, we recommend using that for the best experience.
### [OIDC token](/docs/cli/authentication#oidc-trust-relationships)
The easiest option is to use [GitHub's OIDC token](https://docs.github.com/en/actions/deployment/security-hardening-your-deployments/about-security-hardening-with-openid-connect) as authentication for `depot build`. Our [`depot/build-push-action`](#option-1--depot-build-and-push-action) & [`depot/bake-action`](#option-2--depot-bake-action) supports authentication via OIDC.
### [Project token](/docs/cli/authentication#project-tokens)
You can inject a project access token into the Action workflow for `depot` CLI authentication. Project tokens are tied to a specific project in your organization and not a user.
### [User access token](/docs/cli/authentication#user-access-tokens)
You can inject a user access token into the Action workflow for `depot` CLI authentication. User tokens are tied to a specific user and not a project. Therefore, it can be used to build all projects across all organizations that the user can access.
## Configuration
### Option 1 — Depot build and push action
We publish a GitHub Action ([depot/build-push-action](https://github.com/depot/build-push-action)) that implements the same inputs and outputs as [docker/build-push-action](https://github.com/docker/build-push-action) but uses the `depot` CLI to run the Docker build.
```yaml showLineNumbers
jobs:
build:
runs-on: ubuntu-20.04
# Set permissions if you're using OIDC token authentication
permissions:
contents: read
id-token: write
steps:
- name: Checkout repo
uses: actions/checkout@v4
- name: Set up Depot CLI
uses: depot/setup-action@v1
- uses: depot/build-push-action@v1
with:
# if no depot.json file is at the root of your repo, you must specify the project id
project:
# Pass project token or user access token if you're not using OIDC token authentication
token: ${{ secrets.DEPOT_TOKEN }}
context: .
```
### Option 2 — Depot bake action
Another option is to make use of the GitHub Action ([depot/bake-action](https://github.com/depot/bake-action)) that
allows you to build all of the images defined in an HCL, JSON or Docker Compose file. Bake is a great action to use when you are looking to build multiple images with a single build request.
```yaml showLineNumbers
jobs:
build:
runs-on: ubuntu-20.04
# Set permissions if you're using OIDC token authentication
permissions:
contents: read
id-token: write
steps:
- name: Checkout repo
uses: actions/checkout@v4
- name: Set up Depot CLI
uses: depot/setup-action@v1
- name: Bake Docker images
uses: depot/bake-action@v1
with:
# if no depot.json file is at the root of your repo, you must specify the project id
project:
files: docker-bake.hcl
```
### Option 3 — Depot CLI
You can also use the GitHub Action ([depot/setup-action](https://github.com/depot/setup-action)) that installs the `depot` CLI to run Docker builds directly from your existing workflows.
```yaml showLineNumbers
jobs:
build:
runs-on: ubuntu-20.04
steps:
- name: Checkout repo
uses: actions/checkout@v4
- name: Set up Depot CLI
uses: depot/setup-action@v1
- run: depot build --project --push --tag repo/image:tag .
env:
DEPOT_TOKEN: ${{ secrets.DEPOT_TOKEN }}
```
## Examples
### Build multi-platform images natively without emulation
This example shows how you can use the `platforms` input to build a multi-platform image for Intel and Arm architectures natively without emulation.
```yaml
name: Build image
on:
push:
branches:
- main
jobs:
docker-image:
runs-on: ubuntu-latest
steps:
- name: Checkout repo
uses: actions/checkout@v4
- name: Set up Depot CLI
uses: depot/setup-action@v1
- name: Login to DockerHub
uses: docker/login-action@v2
with:
username: ${{ secrets.DOCKERHUB_USERNAME }}
password: ${{ secrets.DOCKERHUB_TOKEN }}
- name: Build and push
uses: depot/build-push-action@v1
with:
# if no depot.json file is at the root of your repo, you must specify the project id
project:
token: ${{ secrets.DEPOT_PROJECT_TOKEN }}
context: .
platforms: linux/amd64,linux/arm64
push: true
tags: user/app:latest
```
### Build and push to Docker Hub with OIDC token exchange
This example uses our recommended way of authenticating builds from GitHub Actions to Depot via [OIDC trust relationships](/docs/cli/authentication#oidc-trust-relationships). It builds an image with a tag to be pushed to DockerHub.
```yaml
name: Build image
on:
push:
branches:
- main
jobs:
docker-image:
runs-on: ubuntu-latest
permissions:
contents: read
id-token: write
steps:
- name: Checkout repo
uses: actions/checkout@v4
- name: Set up Depot CLI
uses: depot/setup-action@v1
- name: Login to DockerHub
uses: docker/login-action@v2
with:
username: ${{ secrets.DOCKERHUB_USERNAME }}
password: ${{ secrets.DOCKERHUB_TOKEN }}
- name: Build and push
uses: depot/build-push-action@v1
with:
# if no depot.json file is at the root of your repo, you must specify the project id
project:
context: .
push: true
tags: user/app:latest
```
### Build and push to Docker Hub with Depot API tokens
This example uses the `token` input for our `depot/build-push-action` to authenticate builds from GitHub Actions to Depot. Of course, the `token` input can be a user token. Still, we recommended using a [project token](/docs/cli/authentication#project-tokens) to limit the token's scope to a single project.
```yaml
name: Build image
on:
push:
branches:
- main
jobs:
docker-image:
runs-on: ubuntu-latest
steps:
- name: Checkout repo
uses: actions/checkout@v4
- name: Set up Depot CLI
uses: depot/setup-action@v1
- name: Login to DockerHub
uses: docker/login-action@v2
with:
username: ${{ secrets.DOCKERHUB_USERNAME }}
password: ${{ secrets.DOCKERHUB_TOKEN }}
- name: Build and push
uses: depot/build-push-action@v1
with:
# if no depot.json file is at the root of your repo, you must specify the project id
project:
token: ${{ secrets.DEPOT_PROJECT_TOKEN }}
context: .
push: true
tags: user/app:latest
```
### Build and push an image to Amazon ECR
Use the `configure-aws-credentials` and `amazon-ecr-login` actions from AWS to configure GitHub Actions to authenticate to your ECR registry. Then build and push the image to your ECR registry using the `depot/build-push-action`.
```yaml
name: Build image
on:
push:
branches:
- main
jobs:
docker-image:
runs-on: ubuntu-latest
steps:
- name: Checkout repo
uses: actions/checkout@v4
- name: Set up Depot CLI
uses: depot/setup-action@v1
# Login to ECR
- name: Configure AWS Credentials
uses: aws-actions/configure-aws-credentials@v1.6.1
with:
aws-access-key-id: ${{ secrets.AWS_ACCESS_KEY_ID }}
aws-secret-access-key: ${{ secrets.AWS_SECRET_ACCESS_KEY }}
aws-region:
- name: Login to Amazon ECR
id: ecr-login
uses: aws-actions/amazon-ecr-login@v1.5.0
- name: Build and push
uses: depot/build-push-action@v1
with:
# if no depot.json file is at the root of your repo, you must specify the project id
project:
token: ${{ secrets.DEPOT_PROJECT_TOKEN }}
context: .
push: true
tags: ${{ steps.ecr-login.outputs.registry }}/:latest
```
### Build and push an image to GCP Artifact Registry
Use the `setup-gcloud` action from GCP to configure `gcloud` in GitHub Actions to authenticate to your Artifact Registry. Then build and push the image to your GCP registry using the `depot/build-push-action`.
```yaml
name: Build image
on:
push:
branches:
- main
jobs:
docker-image:
runs-on: ubuntu-latest
steps:
- name: Checkout repo
uses: actions/checkout@v4
- name: Set up Depot CLI
uses: depot/setup-action@v1
# Login to Google Cloud registry
- uses: google-github-actions/auth@v2
with:
credentials_json: ${{ secrets.GCP_SERVICE_ACCOUNT_KEY }}
- uses: google-github-actions/setup-gcloud@v2
with:
project_id: gcp-project-id
- name: Configure docker for GCP
run: gcloud auth configure-docker
- name: Build and push
uses: depot/build-push-action@v1
with:
# if no depot.json file is at the root of your repo, you must specify the project id
project:
token: ${{ secrets.DEPOT_PROJECT_TOKEN }}
context: .
push: true
tags: -docker.pkg.dev//:latest
provenance: false
```
### Build and push an image to Azure Container Registry with OIDC
After adding a [trust relationship](https://depot.dev/docs/cli/authentication#adding-a-trust-relationship-for-github-actions) between Depot and GitHub Actions, you'll be able to log in to Azure Container Registry using the `docker/login-action` and build and push an image to the registry using the `depot/build-push-action` via the image tag(s).
```yaml
name: Build and push to Azure Container Registry
on:
push:
branches:
- main
jobs:
docker-image:
runs-on: ubuntu-latest
permissions:
contents: read
id-token: write
steps:
- name: Checkout repo
uses: actions/checkout@v3
- name: Set up Depot CLI
uses: depot/setup-action@v1
- name: Login to Azure Container Registry
uses: docker/login-action@v2
with:
registry: .azurecr.io
username: ${{ secrets.AZURE_CLIENT_ID }}
password: ${{ secrets.AZURE_CLIENT_SECRET }}
- name: Build and push
uses: depot/build-push-action@v1
with:
# if no depot.json file is at the root of your repo, you must specify the project id
project:
context: .
push: true
tags: .azurecr.io/:
```
### Build and push to multiple registries
Build and tag an image to push to multiple registries by logging into each one individually.
```yaml
name: Build image
on:
push:
branches:
- main
jobs:
docker-image:
runs-on: ubuntu-latest
steps:
- name: Checkout repo
uses: actions/checkout@v4
- name: Set up Depot CLI
uses: depot/setup-action@v1
- name: Configure AWS Credentials
uses: aws-actions/configure-aws-credentials@v1.6.1
with:
aws-access-key-id: ${{ secrets.AWS_ACCESS_KEY_ID }}
aws-secret-access-key: ${{ secrets.AWS_SECRET_ACCESS_KEY }}
aws-region:
- name: Login to DockerHub
uses: docker/login-action@v2
with:
username: ${{ secrets.DOCKERHUB_USERNAME }}
password: ${{ secrets.DOCKERHUB_TOKEN }}
- name: Login to Amazon ECR
id: ecr-login
uses: aws-actions/amazon-ecr-login@v1.5.0
- name: Build and push
uses: depot/build-push-action@v1
with:
# if no depot.json file is at the root of your repo, you must specify the project id
project:
token: ${{ secrets.DEPOT_PROJECT_TOKEN }}
context: .
push: true
tags: |
/:latest
${{ steps.ecr-login.outputs.registry }}/:latest
```
### Export an image to Docker
By default, like `docker buildx`, Depot doesn't return the built image to the client. However, for cases where you need the built image in your GitHub Actions workflow, you can pass the `load: true` input, and Depot will return the image to the workflow.
```yaml
name: Build image
on:
push:
branches:
- main
jobs:
docker-image:
runs-on: ubuntu-latest
steps:
- name: Checkout repo
uses: actions/checkout@v4
- name: Set up Depot CLI
uses: depot/setup-action@v1
- name: Login to DockerHub
uses: docker/login-action@v2
with:
username: ${{ secrets.DOCKERHUB_USERNAME }}
password: ${{ secrets.DOCKERHUB_TOKEN }}
- name: Build and load
uses: depot/build-push-action@v1
with:
# if no depot.json file is at the root of your repo, you must specify the project id
project:
token: ${{ secrets.DEPOT_PROJECT_TOKEN }}
context: .
load: true
tags: test-container
- name: Run integration test with built container
run: ...
```
### Build an image with Software Bill of Materials
Build an image with a Software Bill of Materials (SBOM) using the `sbom` and `sbom-dir` inputs. The `sbom` input will generate an SBOM for the image, and the `sbom-dir` input will output the SBOM to the specified directory. You can then use the `actions/upload-artifact` action to upload the SBOM directory as a build artifact.
```yaml
name: Build an image with SBOM
on:
push:
branches:
- main
jobs:
docker-image:
runs-on: ubuntu-latest
steps:
- name: Checkout repo
uses: actions/checkout@v4
- name: Set up Depot CLI
uses: depot/setup-action@v1
- name: Build and load
uses: depot/build-push-action@v1
with:
# if no depot.json file is at the root of your repo, you must specify the project id
project:
token: ${{ secrets.DEPOT_PROJECT_TOKEN }}
context: .
sbom: true
sbom-dir: ./sbom-output
- name: upload SBOM directory as a build artifact
uses: actions/upload-artifact@v3.1.0
with:
path: ./sbom-output
name: 'SBOM'
```
## GitLab CI
---
title: GitLab CI
ogTitle: Use Depot in your GitLab CI job
description: Use Depot to get faster container image builds without needing Docker in Docker for GitLab CI
---
## Authentication
For GitLab, you can use project or user access tokens for authenticating your build with Depot. We recommend using project tokens as they are scoped to the specific project and are owned by the organization.
### [Project token](/docs/cli/authentication#project-tokens)
A project access token can be injected into your GitLab job for `depot` CLI authentication via [CI/CD variables](https://docs.gitlab.com/ee/ci/variables/) or [external secrets](https://docs.gitlab.com/ee/ci/secrets/). Project tokens are tied to a specific project in your organization and not a user.
### [User access token](/docs/cli/authentication#user-access-tokens)
It is also possible to generate a user access token that can be injected into your GitLab job for `depot` CLI authentication via [CI/CD variables](https://docs.gitlab.com/ee/ci/variables/) or [external secrets](https://docs.gitlab.com/ee/ci/secrets/). User tokens are tied to a specific user and not a project. Therefore, it can be used to build all projects across all organizations the user can access.
## Configuration
To build a Docker image from GitLab, you must set the `DEPOT_TOKEN` environment variable in your CI/CD settings for your repository. You can do this through the UI for your repository via [this documentation](https://docs.gitlab.com/ee/ci/variables/index.html). We recommend using a [project token](/docs/cli/authentication#project-tokens).
In addition, you must also install the `depot` CLI before you run `depot build`.
```yaml showLineNumbers
build-image:
before_script:
- curl https://depot.dev/install-cli.sh | DEPOT_INSTALL_DIR=/usr/local/bin sh
script:
- depot build .
variables:
# Pass project token or user access token
DEPOT_TOKEN: $DEPOT_TOKEN
```
## Examples
### Build and push to GitLab registry
To build a Docker image from GitLab and push it to a registry, you have two options to choose from because of how GitLab CI/CD with Docker allows you to build Docker images.
#### Option 1: Use the `DOCKER_AUTH_CONFIG` variable
This example demonstrates how you can use the CI/CD variable `DOCKER_AUTH_CONFIG` ([see these docs](https://docs.gitlab.com/ee/ci/docker/using_docker_images.html#determine-your-docker_auth_config-data)) to inject a [GitLab Deploy Token](https://docs.gitlab.com/ee/user/project/deploy_tokens/) you have created that can read/write to the GitLab registry.
You then inject that file before the build, which allows `depot build . --push` to authenticate to your registry.
**Note:** This requires configuring an additional CI/CD variable, but it avoids using Docker-in-Docker.
```yaml showLineNumbers
build-image:
before_script:
- curl https://depot.dev/install-cli.sh | DEPOT_INSTALL_DIR=/usr/local/bin sh
- mkdir -p $HOME/.docker
- echo $DOCKER_AUTH_CONFIG > $HOME/.docker/config.json
script:
- depot build -t registry.gitlab.com/repo/image:tag . --push
variables:
# Pass project token or user access token
DEPOT_TOKEN: $DEPOT_TOKEN
```
#### Option 2: Using Docker-in-Docker
This example demonstrates using the [Docker-in-Docker](https://docs.gitlab.com/ee/ci/docker/using_docker_build.html#use-docker-in-docker-executor) executor. This method allows you to install the `depot` CLI in the `before_script` block and use `docker login` to authenticate to whichever registry you use.
```yaml showLineNumbers
image: docker:20.10.16
services:
- docker:20.10.16-dind
variables:
DOCKER_HOST: tcp://docker:2376
DOCKER_TLS_CERTDIR: '/certs'
build-image:
before_script:
- apk add --no-cache curl
- curl https://depot.dev/install-cli.sh | DEPOT_INSTALL_DIR=/usr/local/bin sh
script:
- echo "$DOCKER_REGISTRY_PASS" | docker login registry.gitlab.com --username --password-stdin
- depot build --project -t registry.gitlab.com/repo/image:tag . --push
variables:
# Pass project token or user access token
DEPOT_TOKEN: $DEPOT_TOKEN
```
### Build multi-platform images natively without emulation
This example shows how you can use the `platforms` flag to build a multi-platform image for Intel and Arm architectures natively without emulation.
```yaml showLineNumbers
build-image:
before_script:
- curl https://depot.dev/install-cli.sh | DEPOT_INSTALL_DIR=/usr/local/bin sh
- mkdir -p $HOME/.docker
- echo $DOCKER_AUTH_CONFIG > $HOME/.docker/config.json
script:
- depot build -t registry.gitlab.com/repo/image:tag --platform linux/amd64,linux/arm64 . --push
variables:
# Pass project token or user access token
DEPOT_TOKEN: $DEPOT_TOKEN
```
### Export an image to Docker
By default, like `docker buildx`, Depot doesn't return the built image to the client. However, for cases where you need the built image in your GitLab workflow, you can pass the `--load` flag, and Depot will return the image to the workflow.
```yaml showLineNumbers
build-image:
before_script:
- curl https://depot.dev/install-cli.sh | DEPOT_INSTALL_DIR=/usr/local/bin sh
- mkdir -p $HOME/.docker
- echo $DOCKER_AUTH_CONFIG > $HOME/.docker/config.json
script:
- depot build -t your-tag --load .
variables:
# Pass project token or user access token
DEPOT_TOKEN: $DEPOT_TOKEN
```
### Build an image with Software Bill of Materials
Build an image with a Software Bill of Materials (SBOM) using the `--sbom` and `--sbom-dir` flags. The `sbom` flag will generate an SBOM for the image, and the `sbom-dir` flag will output the SBOM to the specified directory.
```yaml showLineNumbers
build-image:
before_script:
- curl https://depot.dev/install-cli.sh | DEPOT_INSTALL_DIR=/usr/local/bin sh
- mkdir -p $HOME/.docker
- echo $DOCKER_AUTH_CONFIG > $HOME/.docker/config.json
script:
- depot build -t your-tag --sbom=true --sbom-dir=sboms .
variables:
# Pass project token or user access token
DEPOT_TOKEN: $DEPOT_TOKEN
```
## Google Cloud Build
---
title: Google Cloud Build
ogTitle: Use Depot in your Google Cloud Build workflow
description: Use Depot's persistent caching and native Arm support for faster Docker image builds in Google Cloud Build
---
## Authentication
For Google Cloud Build, you can use project or user access tokens for authenticating your build with Depot. We recommend using project tokens as they are scoped to the specific project and are owned by the organization.
### [Project token](/docs/cli/authentication#project-tokens)
You can inject project access tokens into the Cloud Build environment for `depot` CLI authentication. Project tokens are tied to a specific project in your organization and not a user.
### [User access token](/docs/cli/authentication#user-access-tokens)
You can also inject a user access token into the Cloud Build environment for `depot` CLI authentication. User tokens are tied to a specific user and not a project. Therefore, it can be used to build all projects across all organizations that the user has access.
## Configuration
To build a Docker image from Google Cloud Build, you must set the `DEPOT_TOKEN` environment variable by [injecting it from Secrets Manager](https://cloud.google.com/build/docs/securing-builds/use-secrets#example_accessing_secrets_from_scripts_and_processes).
We publish a [container image](https://github.com/depot/cli/pkgs/container/cli) of the `depot` CLI that you can use to run Docker builds from your existing Cloud Build config file.
```yaml showLineNumbers
steps:
- name: ghcr.io/depot/cli:latest
id: Build with Depot
args:
- build
- --project
-
- .
secretEnv: ['DEPOT_TOKEN']
availableSecrets:
secretManager:
- versionName: projects//secrets//versions/latest
env: DEPOT_TOKEN
```
## Examples
### Build multi-platform images natively without emulation
This example shows how you can use the `--platform` flag to build a multi-platform image for Intel and Arm architectures natively without emulation.
```yaml showLineNumbers
steps:
- name: ghcr.io/depot/cli:latest
id: Build with Depot
args:
- build
- --project
-
- --platform
- linux/amd64,linux/arm64
- .
secretEnv: ['DEPOT_TOKEN']
availableSecrets:
secretManager:
- versionName: projects//secrets//versions/latest
env: DEPOT_TOKEN
```
### Build and push to Artifact Registry
This example demonstrates how you can use the `depot/cli` image inside of Cloud Build to build and push a Docker image to an Artifact Registry in the same GCP project.
```yaml showLineNumbers
steps:
- name: ghcr.io/depot/cli:latest
id: Build with Depot
args:
- build
- --project
-
- -t
- us-docker.pkg.dev/$PROJECT_ID//:$COMMIT_SHA
- --push
- .
secretEnv: ['DEPOT_TOKEN']
availableSecrets:
secretManager:
- versionName: projects//secrets//versions/latest
env: DEPOT_TOKEN
```
### Build and load the image back for testing
You can use the [`--load` flag](/docs/cli/reference#depot-build) to download the built container image into the workflow.
```yaml showLineNumbers
steps:
- name: ghcr.io/depot/cli:latest
id: Build with Depot
args:
- build
- --project
-
- --load
- .
secretEnv: ['DEPOT_TOKEN']
availableSecrets:
secretManager:
- versionName: projects//secrets//versions/latest
env: DEPOT_TOKEN
```
### Build, push, and load the image back in one command
You can simultaneously push the built image to a registry and load it back into the CI job by using the [`--load` and `--push`](/docs/cli/reference#depot-build) flag together.
```yaml showLineNumbers
steps:
- name: ghcr.io/depot/cli:latest
id: Build with Depot
args:
- build
- --project
-
- -t
- us-docker.pkg.dev/$PROJECT_ID//:$COMMIT_SHA
- --push
- --load
- .
secretEnv: ['DEPOT_TOKEN']
availableSecrets:
secretManager:
- versionName: projects//secrets//versions/latest
env: DEPOT_TOKEN
```
## Jenkins
---
title: Jenkins
ogTitle: Use Depot in your Jenkins Pipeline
description: Speed up your container builds by using Depot in your existing Jenkins Pipeline.
---
## Authentication
For Jenkins, you can use project or user access tokens for authenticating your build with Depot. We recommend using project tokens as they are scoped to a specific project and owned by the organization.
**Note:** The CLI looks for the `DEPOT_TOKEN` environment variable by default. For both token options, you should configure this variable for your build environment via [global credentials](https://www.jenkins.io/doc/book/using/using-credentials/#configuring-credentials).
### [Project token](/docs/cli/authentication#project-tokens)
You can inject project access tokens into the Pipeline environment for `depot` CLI authentication. These tokens are tied to a specific project in your organization and not a user.
### [User access token](/docs/cli/authentication#user-access-tokens)
It is also possible to generate a user access token to inject into the Pipeline environment for `depot` CLI authentication. This token is tied to a specific user and not a project. Therefore, it can be used to build all projects across all organizations that the user can access.
## Configuration
To build a Docker image from Jenkins, you must set the `DEPOT_TOKEN` environment variable in your global credentials. You can do this through the UI for your Pipeline via [`Manage Jenkins > Manage Credentials`](https://www.jenkins.io/doc/book/using/using-credentials/#configuring-credentials).
In addition, you must also install the `depot` CLI before you run `depot build`.
```groovy showLineNumbers
pipeline {
agent any
environment {
DEPOT_TOKEN = credentials('depot-token')
}
stages {
stage('Build') {
steps {
sh 'curl -L https://depot.dev/install-cli.sh | DEPOT_INSTALL_DIR=/usr/local/bin sh'
sh 'depot build .'
}
}
}
}
```
## Examples
### Build multi-platform images natively without emulation in Jenkins
This example shows how you can use the `--platform` flag to build a multi-platform image for Intel and Arm architectures natively without emulation.
```groovy showLineNumbers
pipeline {
agent any
environment {
DEPOT_TOKEN = credentials('depot-token')
}
stages {
stage('Build') {
steps {
sh 'curl -L https://depot.dev/install-cli.sh | DEPOT_INSTALL_DIR=/usr/local/bin sh'
sh 'depot build --platform linux/amd64,linux/arm64 .'
}
}
}
}
```
### Build and push to Docker Hub
This example installs the `depot` CLI to be used directly in the pipeline. Then, `docker login` is invoked with the environment variables for `DOCKERHUB_USERNAME` and `DOCKERHUB_TOKEN` for the authentication context of the build to push to the registry.
```groovy showLineNumbers
pipeline {
agent any
environment {
DEPOT_TOKEN = credentials('depot-token')
DOCKERHUB_USERNAME = credentials('dockerhub-username')
DOCKERHUB_TOKEN = credentials('dockerhub-token')
}
stages {
stage('Build') {
steps {
sh 'curl -L https://depot.dev/install-cli.sh | DEPOT_INSTALL_DIR=/usr/local/bin sh'
sh 'docker login --username $DOCKERHUB_USERNAME --password $DOCKERHUB_TOKEN'
sh 'depot build -t : --push .'
}
}
}
}
```
### Build and push to Amazon ECR
This example installs the `depot` and `aws` CLIs to be used directly in the pipeline. Then, `aws ecr get-login-password` is piped into `docker login` for the authentication context of the build to push to the registry.
```groovy showLineNumbers
pipeline {
agent any
environment {
DEPOT_TOKEN = credentials('depot-token')
DOCKERHUB_USERNAME = credentials('dockerhub-username')
DOCKERHUB_TOKEN = credentials('dockerhub-token')
}
stages {
stage('Build') {
steps {
sh 'curl -L https://depot.dev/install-cli.sh | DEPOT_INSTALL_DIR=/usr/local/bin sh'
sh 'curl "https://awscli.amazonaws.com/awscli-exe-linux-x86_64.zip" -o "awscliv2.zip"'
sh 'unzip awscliv2.zip'
sh 'aws ecr get-login-password --region | docker login --username AWS --password-stdin '
sh 'depot build -t : --push .'
}
}
}
}
```
### Build and load the image back into the Pipeline for testing
You can download the built container image into the workflow using the [`--load` flag](/docs/cli/reference#depot-build).
```groovy showLineNumbers
pipeline {
agent any
environment {
DEPOT_TOKEN = credentials('depot-token')
}
stages {
stage('Build') {
steps {
sh 'curl -L https://depot.dev/install-cli.sh | DEPOT_INSTALL_DIR=/usr/local/bin sh'
sh 'depot build --load .'
}
}
}
}
```
### Build, push, and load the image back in one command
You can simultaneously push the built image to a registry and load it back into the CI job using the [`--load` and `--push`](/docs/cli/reference#depot-build) flags together.
```groovy showLineNumbers
pipeline {
agent any
environment {
DEPOT_TOKEN = credentials('depot-token')
}
stages {
stage('Build') {
steps {
sh 'curl -L https://depot.dev/install-cli.sh | DEPOT_INSTALL_DIR=/usr/local/bin sh'
sh 'depot build -t --load --push .'
}
}
}
}
```
## Travis CI
---
title: Travis CI
ogTitle: Use Depot in your Travis CI workflow
description: Get faster container image builds from your existing Travis CI workflow.
---
## Authentication
For Travis CI, you can use project or user access tokens for authenticating your build with Depot. We recommend using project tokens as they are scoped to the specific project and are owned by the organization.
### [Project token](/docs/cli/authentication#project-tokens)
You can inject project access tokens into the Travis CI environment for `depot` CLI authentication. Project tokens are tied to a specific project in your organization and not a user.
### [User access token](/docs/cli/authentication#user-access-tokens)
You can also inject user access tokens into the Travis CI environment for `depot` CLI authentication. User tokens are tied to a specific user and not a project. Therefore, it can be used to build all projects across all organizations that the user has access.
## Configuration
To build a Docker image from Travis CI, you must set the `DEPOT_TOKEN` environment variable in your repository settings. This can be done through the [UI for your repository](https://docs.travis-ci.com/user/environment-variables#defining-variables-in-repository-settings) or via the Travis CLI:
```bash
travis env set DEPOT_TOKEN your-user-access-token
```
In addition, you must also install the `depot` CLI before you run `depot build`.
```yaml showLineNumbers
sudo: required
env:
- DEPOT_INSTALL_DIR=/usr/local/bin
before_install:
- curl -L https://depot.dev/install-cli.sh | sudo sh
script:
- depot build .
```
## Examples
### Build multi-platform images natively without emulation
This example shows how you can use the `--platform` flag to build a multi-platform image for Intel and Arm architectures natively without emulation.
```yaml showLineNumbers
sudo: required
env:
- DEPOT_INSTALL_DIR=/usr/local/bin
before_install:
- curl -L https://depot.dev/install-cli.sh | sudo sh
script:
- depot build --platform linux/amd64,linux/arm64 .
```
### Build and push to Docker Hub
This example installs the `depot` CLI to be used directly in the pipeline. Then, `docker login` is invoked with the environment variables for `DOCKERHUB_USERNAME` and `DOCKERHUB_TOKEN` for the authentication context of the build to push to the registry.
```yaml showLineNumbers
sudo: required
# Needed just for logging the Docker build context into a registry
services:
- docker
env:
- DEPOT_INSTALL_DIR=/usr/local/bin
before_install:
- curl -L https://depot.dev/install-cli.sh | sudo sh
script:
- docker login --username $DOCKERHUB_USERNAME --password $DOCKERHUB_TOKEN
- depot build -t : --push .
```
### Build and push to Amazon ECR
This example installs the `depot` and `aws` CLIs to be used directly in the pipeline. Then, `aws ecr get-login-password` is piped into `docker login` for the authentication context of the build to push to the registry.
```yaml showLineNumbers
sudo: required
# Needed just for logging the Docker build context into a registry
services:
- docker
env:
- DEPOT_INSTALL_DIR=/usr/local/bin
before_install:
- curl -L https://depot.dev/install-cli.sh | sudo sh
- curl "https://awscli.amazonaws.com/awscli-exe-linux-x86_64.zip" -o "awscliv2.zip"
- unzip awscliv2.zip
- ./aws/install
script:
- aws ecr get-login-password --region | docker login --username AWS --password-stdin
- depot build -t : --push .
```
### Build and load the image back for testing
You can use the [`--load` flag](/docs/cli/reference#depot-build) to download the built container image into the workflow.
```yaml showLineNumbers
sudo: required
env:
- DEPOT_INSTALL_DIR=/usr/local/bin
before_install:
- curl -L https://depot.dev/install-cli.sh | sudo sh
script:
- depot build --load .
```
### Build, push, and load the image back in one command
You can simultaneously push the built image to a registry and load it back into the CI job by using the [`--load` and `--push`](/docs/cli/reference#depot-build) flag together.
```yaml showLineNumbers
sudo: required
# Needed just for logging the Docker build context into a registry
services:
- docker
env:
- DEPOT_INSTALL_DIR=/usr/local/bin
before_install:
- curl -L https://depot.dev/install-cli.sh | sudo sh
script:
- docker login --username $DOCKERHUB_USERNAME --password $DOCKERHUB_TOKEN
- depot build -t : --push --load .
```
## Troubleshooting
---
title: Troubleshooting
ogTitle: How to troubleshoot common problems using Depot
description: Learn about common errors with Depot and how to resolve them.
---
## Resetting build cache for a project
Each project in Depot represents a cache namespace shared among all systems and users that build it. The cache allows certain steps in your `Dockerfile` to be skipped in subsequent runs if their associated layer hasn't changed since the last time it was built. There can be times when you want to purge this cache.
- The build is hung because of a deadlock in BuildKit
- A builder isn't coming online to serve the build request
- The build cache is full and needs to be cleared
We optimize Depot so that these issues rarely happen. However, if you see any of these issues, you can reset the build cache for a project. Resetting the build cache purges the cache volume and launches a new build machine with a clean slate. You can reset the build cache for a project via these steps:
1. Go to the project's `Settings` page
2. Click the `Reset build cache` button at the bottom
## Multi-platform/multi-architecture image has a 3rd image with platform `unknown/unknown`
Docker introduced a new [provenance feature](https://docs.docker.com/build/attestations/slsa-provenance/) that tracks some info about the build itself, and it's implemented by attaching the data to the final image "manifest list". Many registries like GitHub Container Registry display the provenance data as an `unknown/unknown` image architecture. If you don't care about provenance or want a cleaner list in your registry, you can disable provenance during your image build.
```bash
depot build --provenance false
```
### Disabling provenance when using `depot/build-push-action` or `depot/bake-action`
You can set `provenance` to `false` in your workflow step to disable provenance.
```yaml
- uses: depot/build-push-action@v1
with:
...
provenance: false
...
```
## Faster GitHub Actions Runners
---
title: Faster GitHub Actions Runners
ogTitle: Overview of Depot-managed GitHub Action Runners
description: Overview of Depot-managed GitHub Action Runners with 30% faster compute, 10x faster caching, and half the cost of GitHub hosted runners per minute.
---
import {CheckCircleIcon} from '~/components/icons'
import {DocsCTA} from '~/components/blog/CTA'
Our fully-managed GitHub Actions Runners are a drop-in replacement for your existing runners in any GitHub Action jobs.
Our [Ultra Runner](/docs/github-actions/runner-types) is up to 3x faster than a GitHub-hosted runner. All runners are integrated into our cache orchestration system, so you get 10x faster caching without having to change anything in your jobs. We charge half the cost of GitHub-hosted runners, and we bill you by the second.
## Key features
### Single tenant
All builds run on ephemeral EC2 instances that are never reused. We launch a GitHub Actions runner in response to a webhook event from your organization requesting a runner for a job.
### Faster caching
Our runners are automatically integrated into our distributed cache architecture for upload and download speeds up to 1000 MiB/s on 12.5 Gbps of network throughput. We've brought 10x faster caching to GitHub Actions jobs by plugging in the same cache orchestration system that we use for our Docker image builds. You don't have to do anything to get this benefit; it's just there.
### Faster compute
Each runner is optimized for performance with our newest generation Ultra Runner that comes with a portion of memory reserved for disk. We launch with 4th Gen AMD EPYC Genoa CPUs for Intel runners and AWS Graviton2 CPUs for Arm runners.
### No limits
We don't enforce any concurrency limits, cache size limits, or network limits. You can run as many jobs as you want in parallel and we'll handle the rest.
### Per second billing
We track builds by the second and only bill for whole minutes used at the end of the month. We don't enforce a one minute minimum.
### Self-hostable
We can run our optimized runners in our cloud or your AWS account for additional security and compliance. We also support dedicated infrastructure and VPC peering options for something more custom to your needs.
### Integrates with Docker image builds
If you use Depot for faster Docker image builds via our [remote container builds](/docs/container-builds/overview), your BuildKit builder runs right next to your managed GitHub Action runner, allowing for faster CI builds by mimizing network latency and data transfer.
### Integrates with Dagger Cloud
[Connect with Dagger Cloud](/docs/github-actions/reference/dagger) and run your Dagger Engine builds on Depot's [Ultra Runners for GitHub Actions](/products/github-actions) with our accelerated cache enabled.
## Pricing
Depot-managed GitHub Action Runners are available on [all of our pricing plans](/pricing). Each plan includes a bucket of both Docker build minutes and GitHub Actions minutes. Business plan customers can [contact us](mailto:help@depot.dev) for custom plans.
| Feature | Developer Plan | Startup Plan | Business Plan |
| ----------------------------------- | ---------------------------------------------------------------- | ---------------------------------------------------------------- | ---------------------------------------------------------------- |
| **Cost** | $20/month | $200/month | Custom |
| **Users** | 1 | Unlimited | Unlimited |
| **Docker Build Minutes** | 500 included | 5,000 included
+ $0.04/minute after | Custom |
| **GitHub Actions Minutes** | 2,000 included | 20,000 included
+ $0.004/minute after | Custom |
| **Cache storage** | 25 GB included | 250 GB included
+ $0.20/GB/month after | Custom |
| **Support** | [Discord Community](https://discord.gg/MMPqYSgDCg) | Email support | Slack Connect support |
| **Unlimited concurrency** | | | |
| **Multi-platform builds** | | | |
| **US & EU regions** | | | |
| **Depot Registry** | | | |
| **Build Insights** | | | |
| **API Access** | | | |
| **Tailscale integration** | | | |
| **Windows GitHub Actions Runners** | | | |
| **macOS M2 GitHub Actions Runners** | × | | |
| **Usage caps** | × | | |
| **SSO & SCIM add-on** | × | | |
| **Volume discounts** | × | × | |
| **GPU enabled builds** | × | × | |
| **Docker build autoscaling** | × | × | |
| **Dedicated infrastructure** | × | × | |
| **Static outbound IPs** | × | × | |
| **Deploy to your own AWS account** | × | × | |
| **AWS Marketplace** | × | × | |
| **Invoice / ACH payment** | × | × | |
You can try out Depot on any plan free for 7 days, no credit card required →
#### Estimating your cost savings
You can estimate the potential cost savings by switching to Depot GitHub Action Runners by entering in your current usage by runner type on our [GitHub Actions Price calculator](/github-actions-price-calculator).
### Additional usage pricing for GitHub Actions minutes
The **Startup** and **Business** plans have the option to pay for additional GitHub Actions minutes on a per-minute basis. See the [runner type list](/docs/github-actions/runner-types) for the per-minute pricing for each runner type.
## Managing GitHub Actions Cache
Our **10x faster** Github Actions Cache implementation is billed at **$0.20 per GB of usage**. The usage is calculated by taking a snapshot every hour and then averaging out those snapshots over the course of the month.
### Cache retention policy
When using our GitHub Actions Cache, we store the cache entries in a distributed storage system that is optimized for high throughput and low latency. The cache storage is encrypted at rest and in transit. The **default retention policy** is that we store the cache entries for **14 days** and there is **no limit** on total cache size.
You can configure this retention policy in your Organization Settings to control time based retention and cache size limits.
**Available values for time based retention:** 7, 14 **(default)**, and 30 days
**Available values for size based retention:** 25GB, 50GB, 100GB, 150GB, 250GB, 500GB, No limit **(default)**
## Egress Filtering
Egress filtering allows you to control which external services your GitHub Actions runners can connect to.
### Configuration
You can configure egress rules in your organization's settings page under the **GitHub Actions Runners** section. Look for the **Egress Rules** subsection.
By default, Depot Runners will allow outbound connections to any external service. However, you can set the default rule, "`*`", to either `Deny` or `Allow` by default. You can also add specific rules to allow or deny connections to specific IPs, CIDRs, or hostnames.
Below is an example set of rules to get a docker build with golang working:
[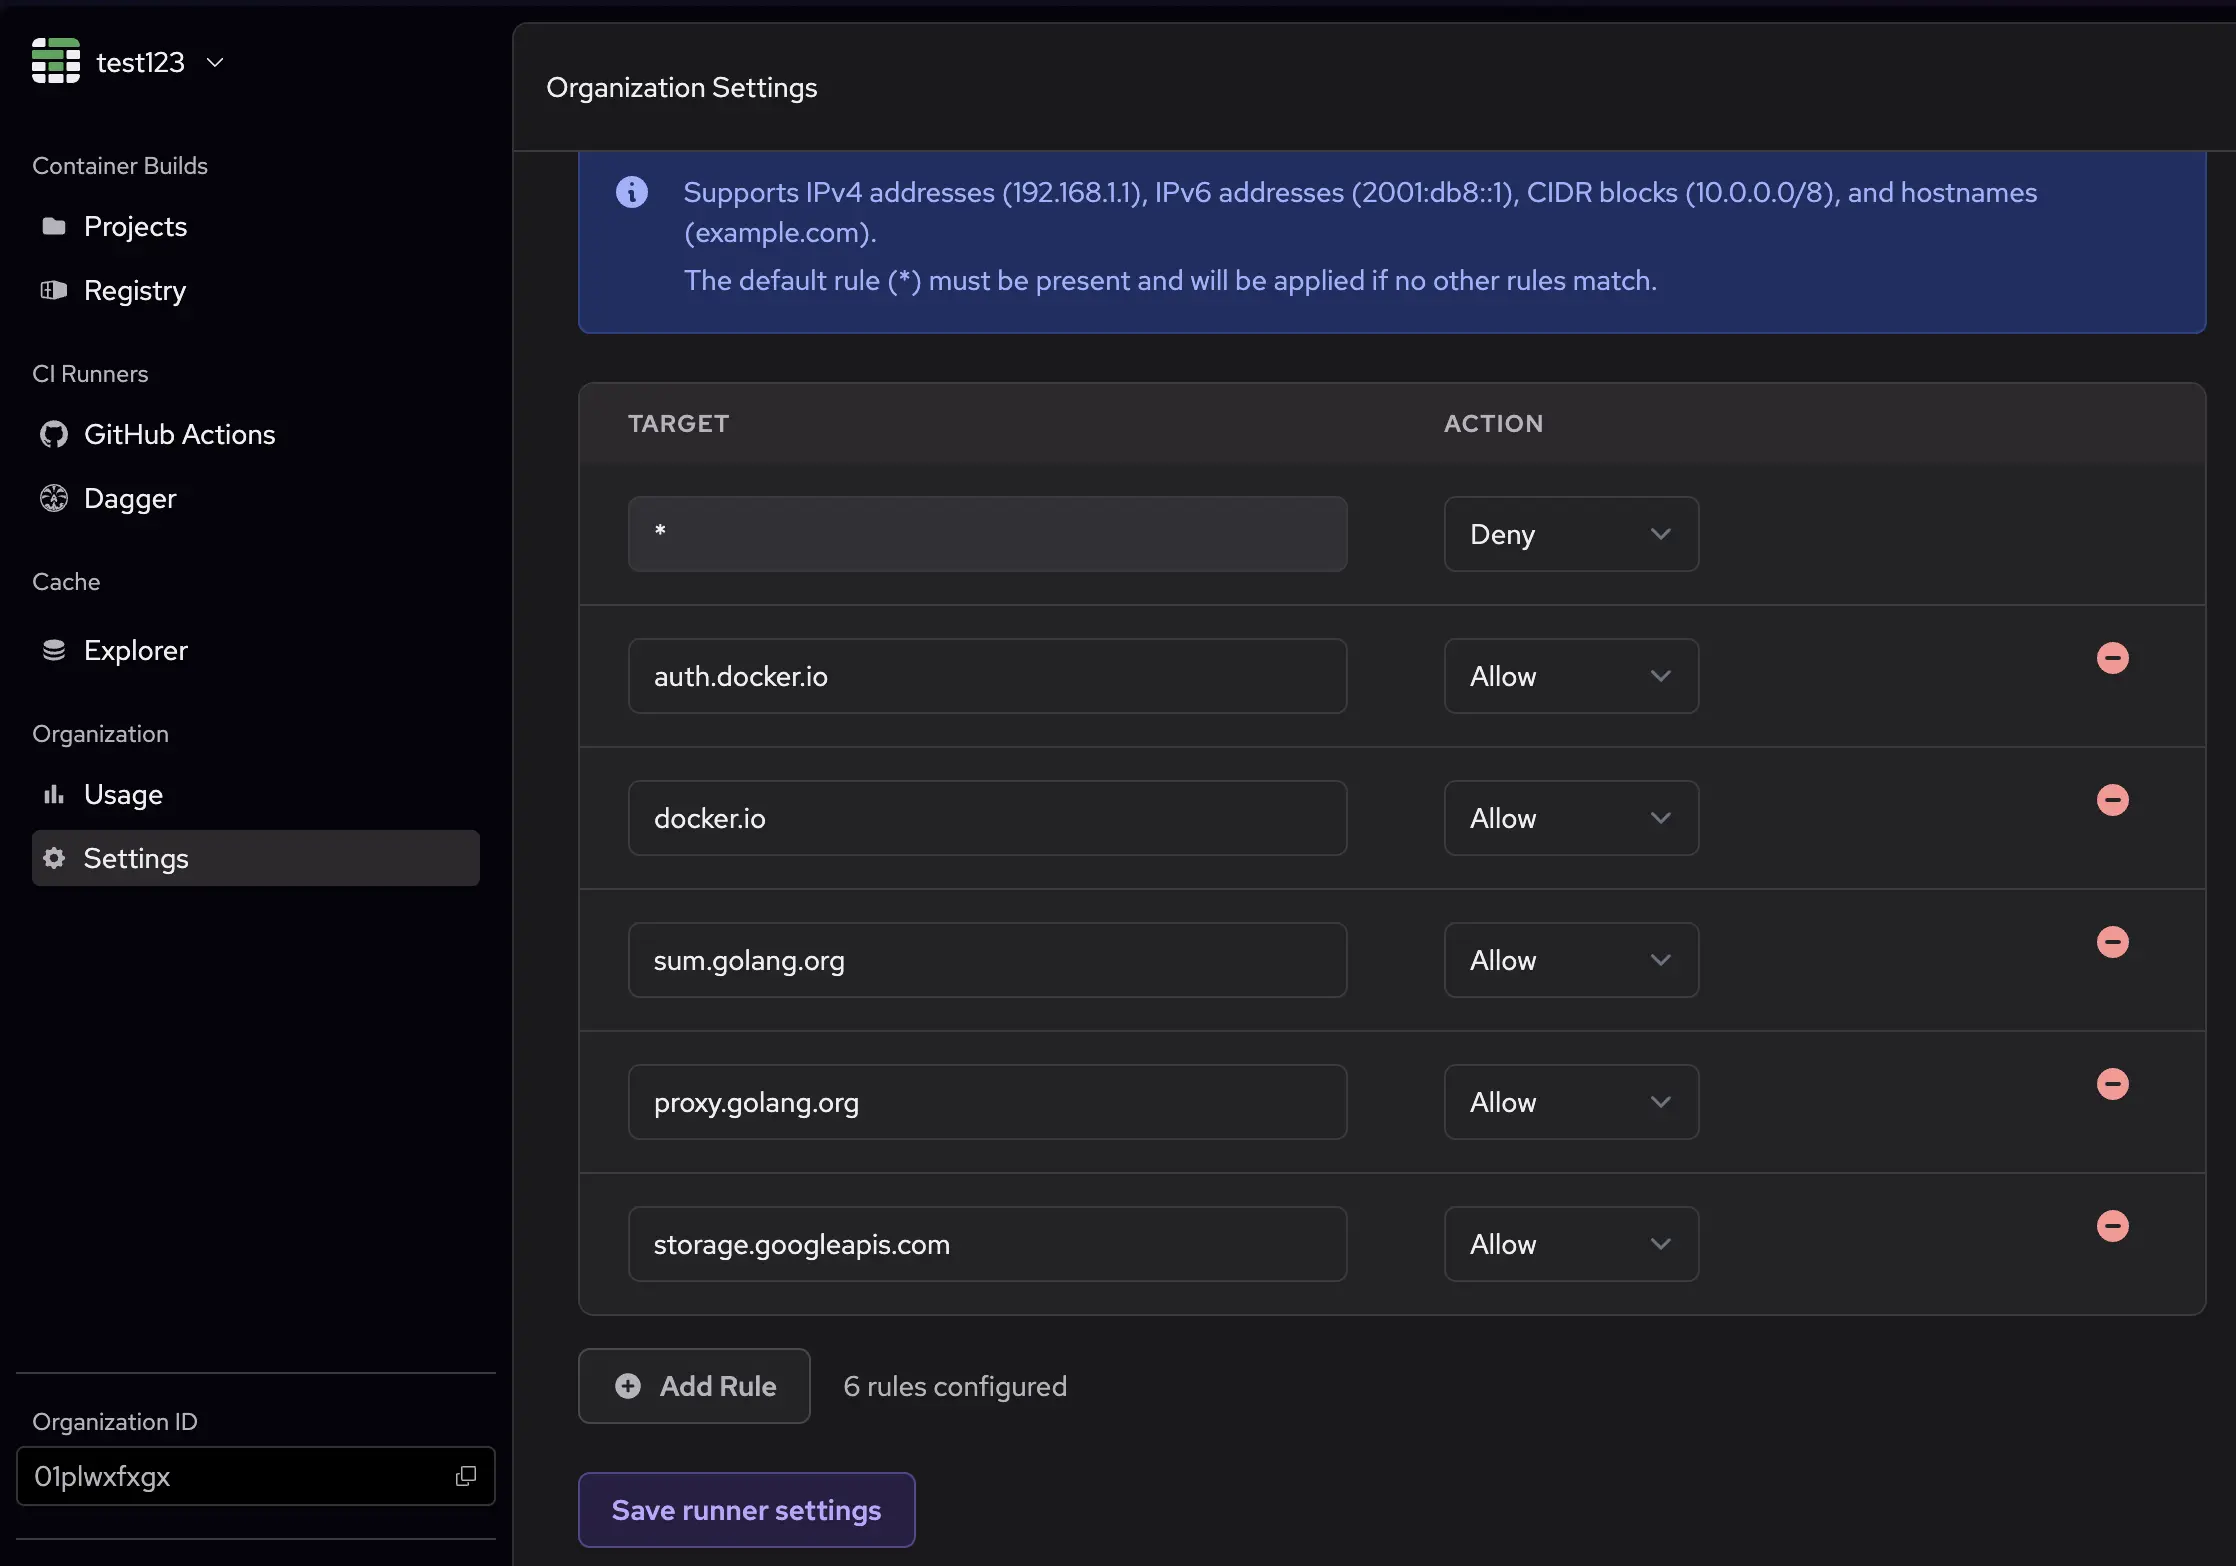](/images/egress-filter-rules.webp)
This example first applies a blanket deny rule, which blocks all outbound connections by default. Then, it allows connections to the following:
- `auth.docker.io` and `docker.io` for Docker Hub authentication and registry access
- `sum.golang.org` and `proxy.golang.org` for Go modules and proxy access
- `storage.googleapis.com` for Google Cloud Storage access
### Pre-configured rules
To ensure that runners can still connect to necessary services, we automatically add certain IPs and hosts to the allowlist:
- **depot.dev domains**
- **GitHub Actions service IPs**
- **AWS service IPs**
Additionally, `depot build` works out of the box with egress filtering enabled.
### Limitations
There are a few limitations to keep in mind when using egress filtering:
- Tailscale cannot be used together with egress filters because both modify network config in incompatible ways
- Any process that's given root access can modify the egress filter rules, so it's important to ensure that untrusted processes don't run with higher privileges than necessary.
- The egress filter currently isn't supported on macOS and Windows runners
## Quickstart for GitHub Actions Runners
---
title: Quickstart for GitHub Actions Runners
ogTitle: Getting started with Depot
description: Get started with Depot for up to 40x faster container image builds locally and in CI.
---
Below is a quickstart guide for connecting your Depot organization to GitHub and configuring your GitHub Actions to use Depot managed runners.
## Create an organization
If you have not already created an Organization, you will need to create one before proceeding. Organizations are the top-level entity in Depot. They typically represent a single company or team. Billing details are attached to an organization.
1. Log in to your Depot account to get to your [list of organizations](/orgs)
2. Click on the `Create Organization` button
3. Enter an organization name
4. Click `Create organization`
## Connect to GitHub
To configure Depot GitHub Action Runners, you must connect to your GitHub organization and install the Depot GitHub App. You can do this from the `GitHub Actions` tab in your organization's Depot dashboard.
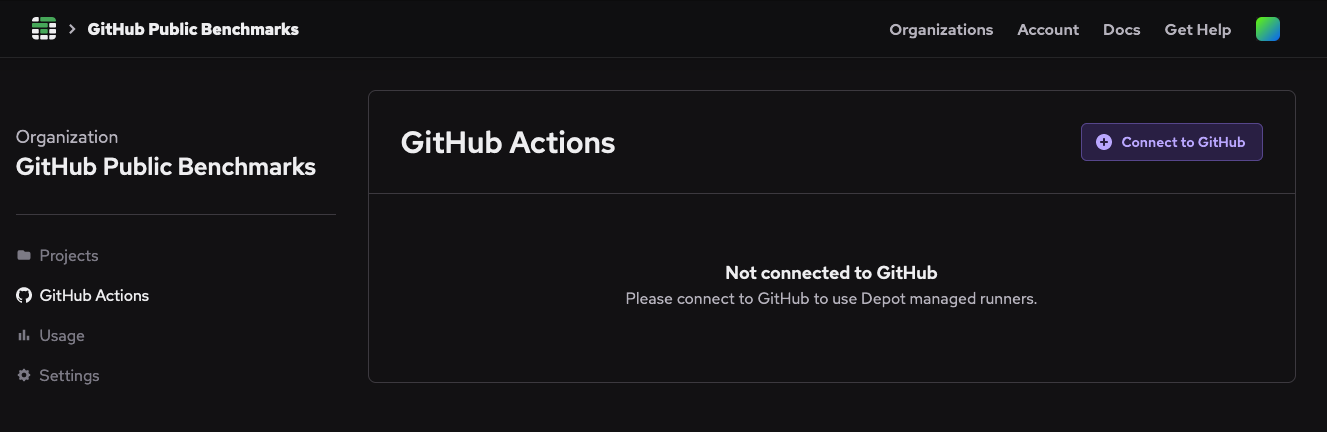
#### Approval for private repositories
Some GitHub organizations are configured such that an Organization Administrator must approve the new Depot GitHub app before jobs can run on Depot runners. You can confirm your app is active and approved inside of Depot in the `GitHub Actions` tab.
#### Permissions for public repositories
If you're going to use Depot runners with public repositories, you will need to update your Actions runner group to allow runners to be used in public repositories. You can find this setting in the `Actions` section in your GitHub organization settings: `github.com/organizations//settings/actions/runner-groups`.
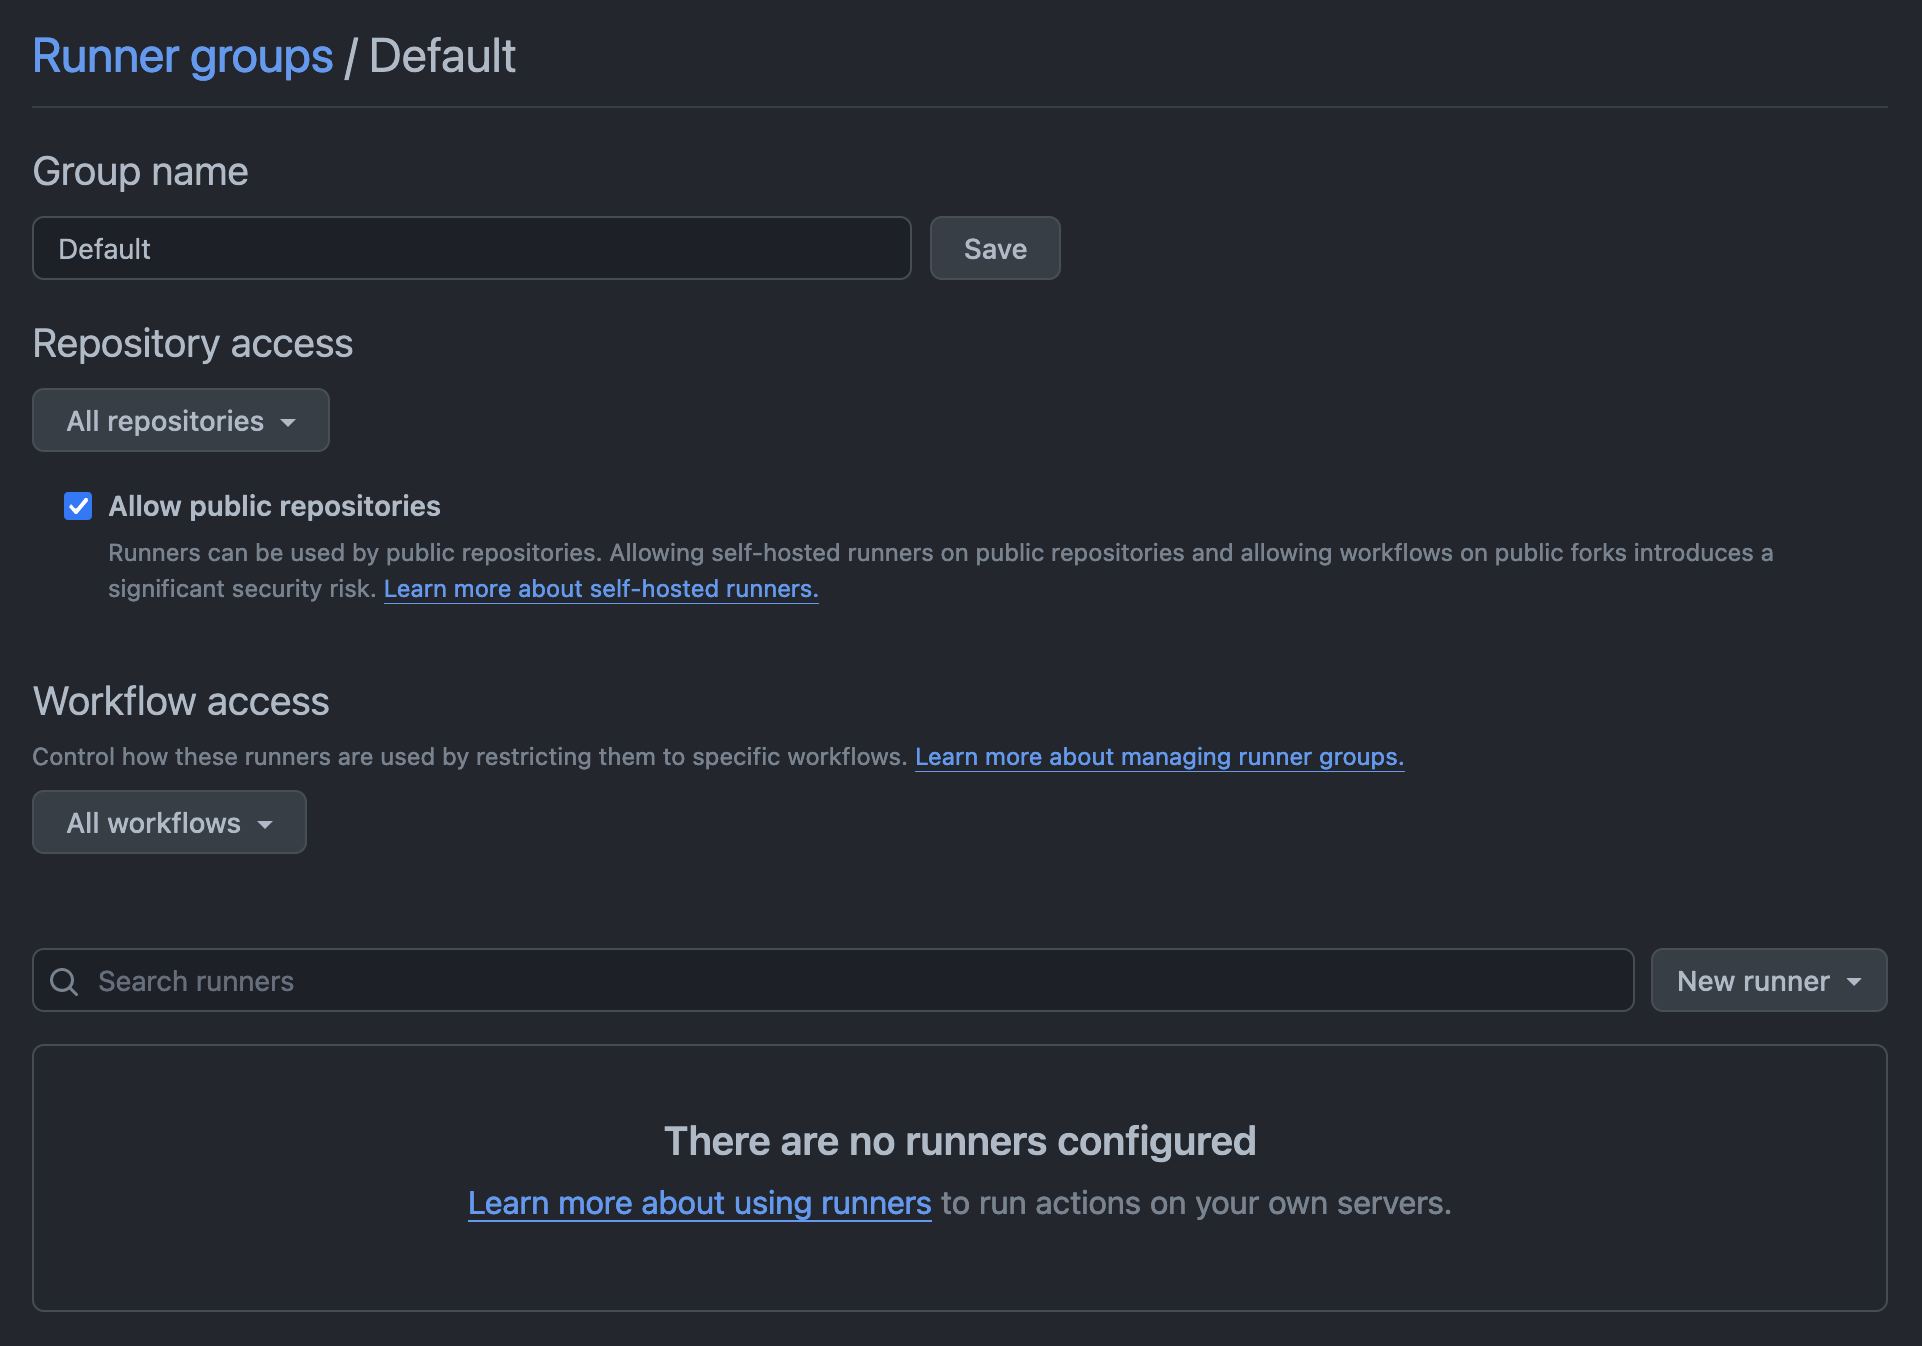
## Configure your GitHub Actions workflow
### Depot-supported labels
Depot supports a variety of different runner types and sizes depending on your CI job needs, including Intel and Arm runners with up to 64 CPUs. See the [runner type docs](/docs/github-actions/runner-types) for a full list of available labels.
Once Depot is connected to your GitHub organization and the application is approved, you can configure your GitHub Actions to use your chosen runners by specifying the runner label in your `.github/workflows/*.yaml` file.
```diff
jobs:
build:
name: Build
- runs-on: ubuntu-22.04
+ runs-on: depot-ubuntu-22.04
steps:
...
```
## View GitHub Actions jobs
After configuring your GitHub Actions workflow to use Depot runners, you can view the jobs that have run on Depot runners in your organization's `GitHub Actions` tab.
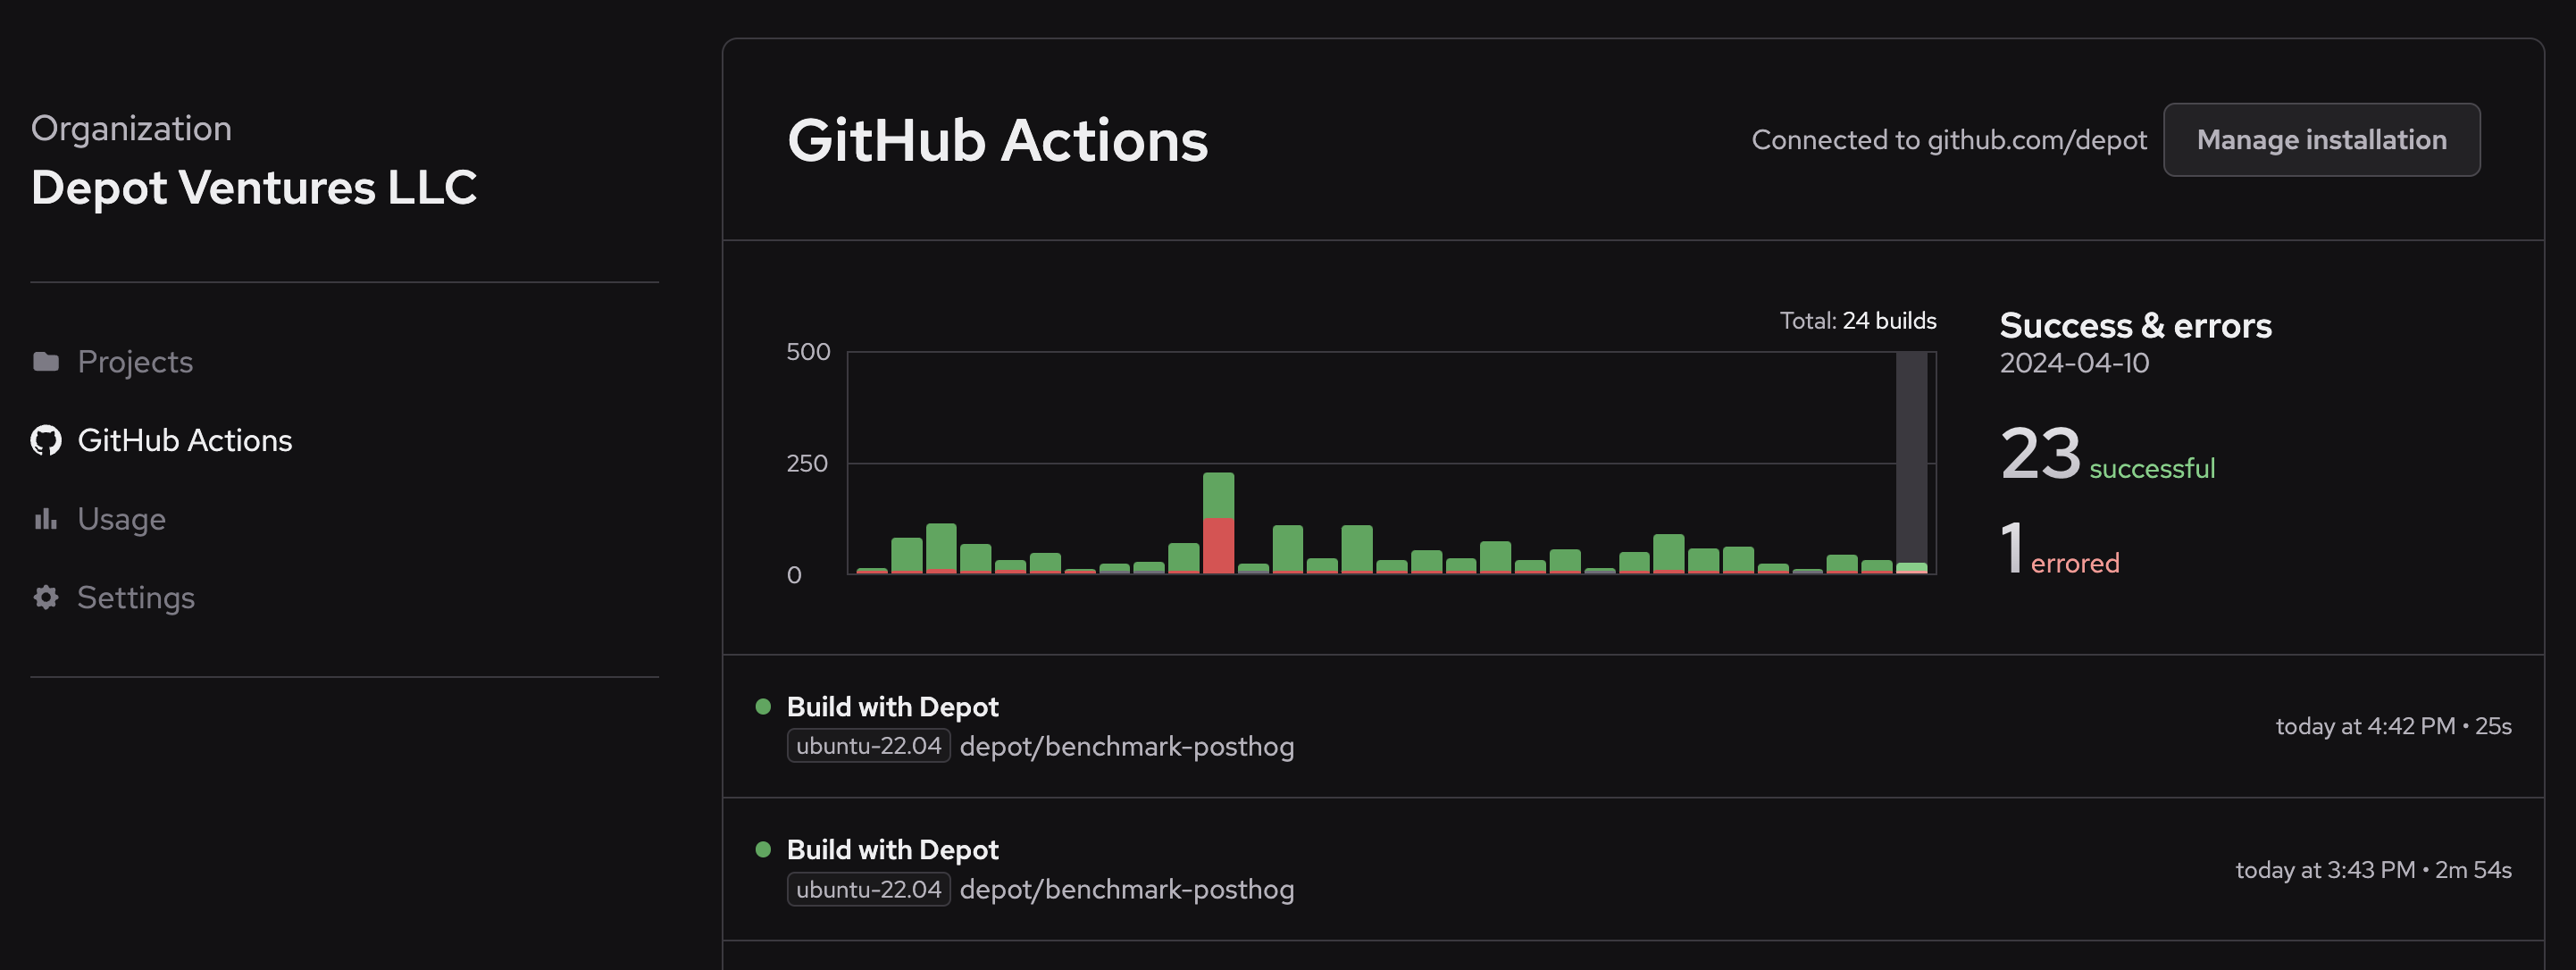
## View GitHub Actions usage
Once you've started running GitHub Actions jobs on Depot runners, you can view the usage information in your organization's `Usage` tab. This includes the number of jobs, total job time, successes and errors, build time, and cache storage used.
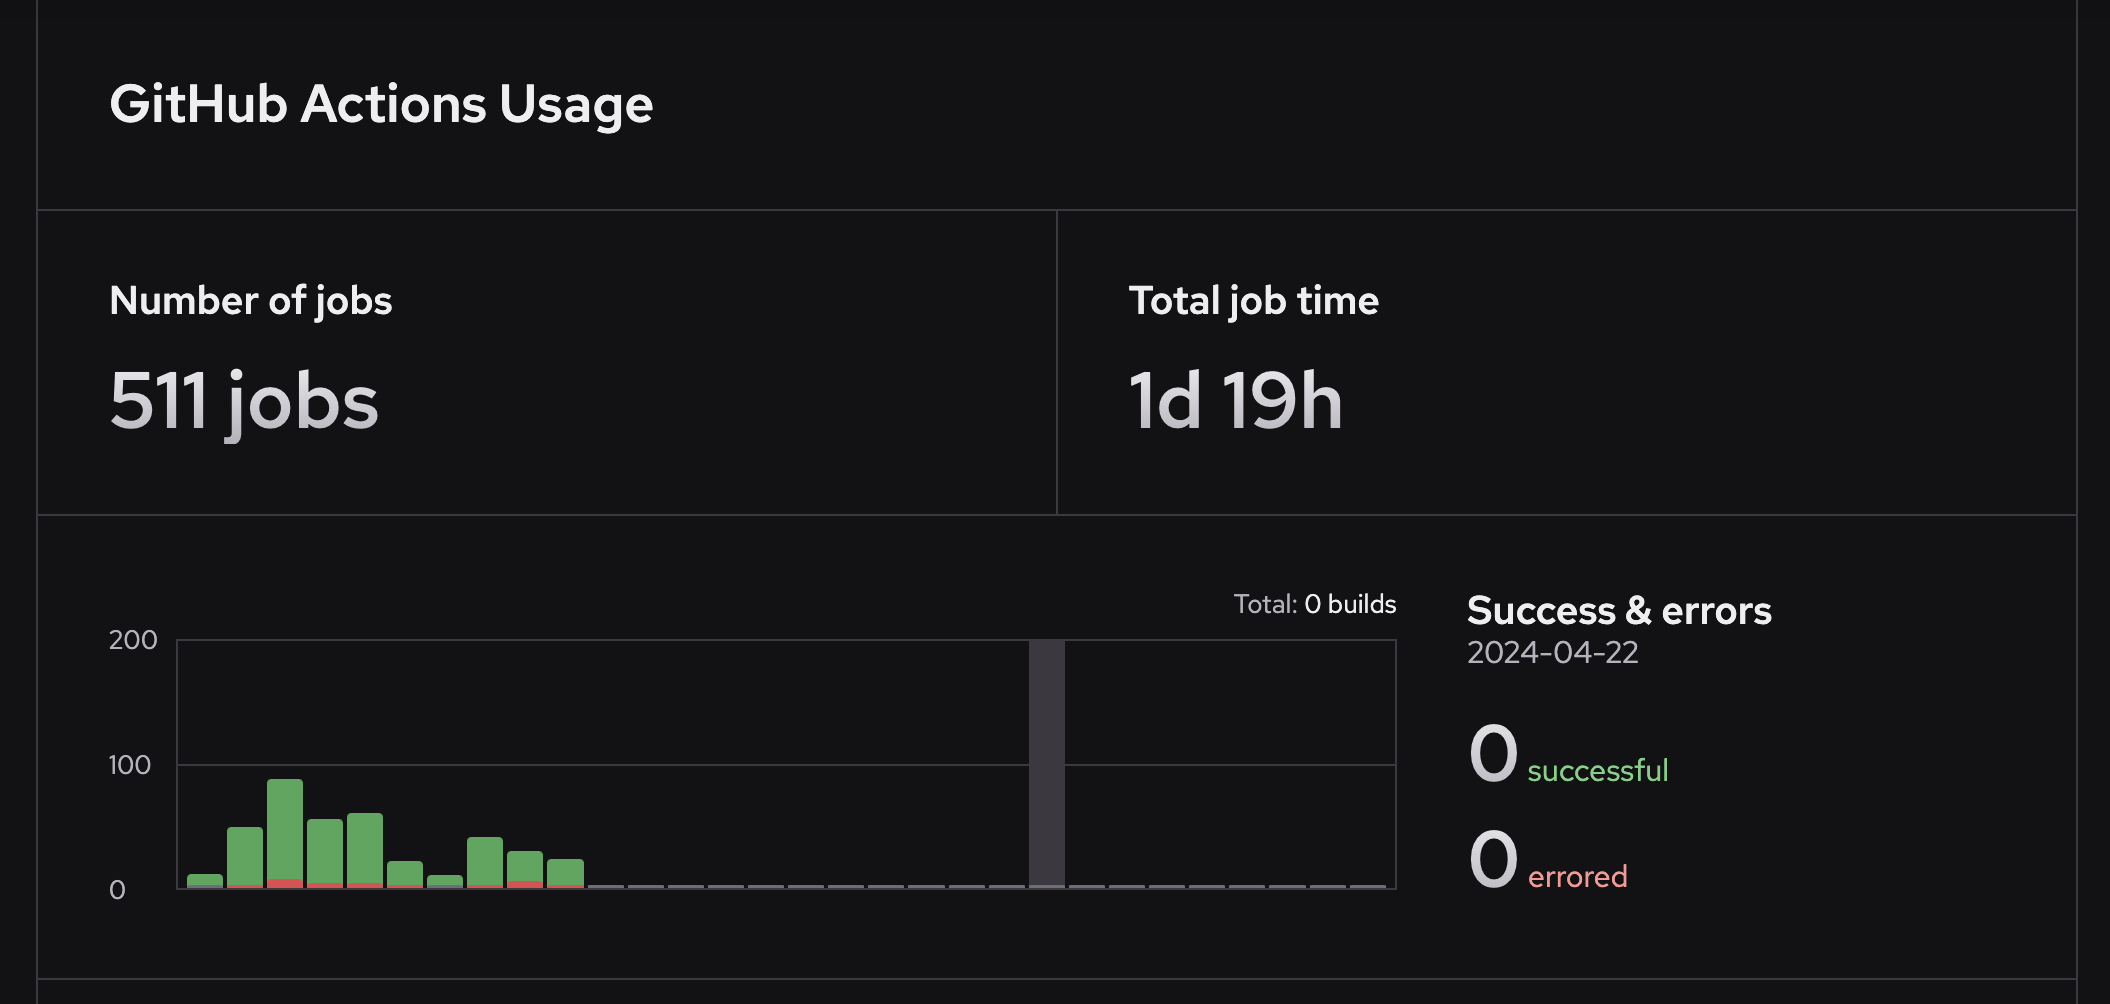
## Dagger
---
title: Dagger
ogTitle: Run your Dagger Engine builds with Depot Runners for GitHub Actions.
description: Accelerate your Dagger Engine builds with Depot Runners
---
Connect with Dagger Cloud and run your Dagger Engine builds on Depot's [Ultra Runners for GitHub Actions](/products/github-actions) with our accelerated cache enabled.
## Authentication
Accessing Dagger Engines in Depot requires that you connect Depot to your Dagger Cloud account and access the Engine via Depot GitHub Actions Runners.
### Connect to Dagger Cloud
From the [Dagger Cloud](https://dagger.cloud/) UI, generate a [Dagger Cloud token](https://docs.dagger.io/configuration/cloud) and copy it to your clipboard.
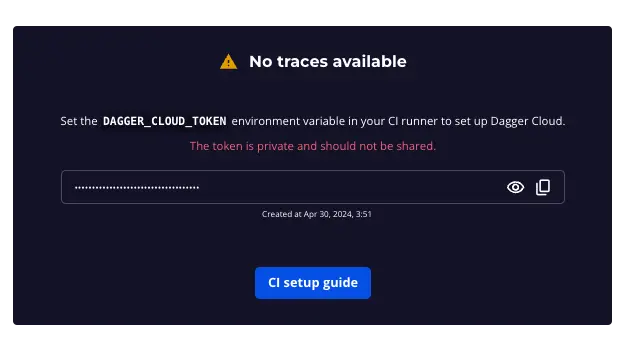 From your [Depot Dashboard](/orgs), you will see "Dagger" listed in the left-hand navigation under "CI Runners". Click on "Dagger" and in the top right corner you will see the "Add Token" button. Add your token, and you should see a message that you have successfully connected.
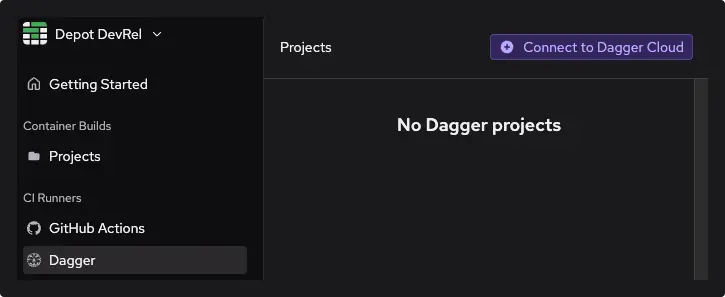 ### Connect to GitHub
Finally, ensure you are connected to GitHub. Under the "CI Runners" section, click on "GitHub Actions" and connect your GitHub account. You will be prompted to connect with your GitHub organization and specify all or specific repositories to enable access to Depot Runners.
## Configuration
In your GitHub Actions workflow, you can specify both the [**Depot Runner** label](/docs/github-actions/runner-types) and the **Dagger Engine** version directly in the `runs-on` key using a comma-separated format. `,dagger=`.
```yaml {6}
name: dagger
on: push
jobs:
build:
runs-on: depot-ubuntu-latest,dagger=0.18.4
steps:
- uses: actions/checkout@v4
- run: dagger -m github.com/kpenfound/dagger-modules/golang@v0.2.0 call \
build --source=https://github.com/dagger/dagger --args=./cmd/dagger \
export --path=./build
```
You can locate the latest Dagger Engine release version and all potentially breaking changes in the [Dagger Engine Changelog](https://github.com/dagger/dagger/blob/main/CHANGELOG.md).
The Dagger CLI will be available and pre-authenticated with your Dagger Cloud token. Once a Dagger request is made, Depot initializes a new Dagger project for that repository without additional configuration.
With these steps, your workflow is now ready to run on Depot’s accelerated infrastructure using Dagger and GitHub Actions.
## How does it work?
Using Dagger engines via Depot GitHub Actions Runners allows you to execute your Dagger pipelines and functions inside of a dedicated VM with a persistent NVMe device for cache storage that lives next to the GitHub Actions runners without having to do any additional configuration outside of the above.
### Architecture
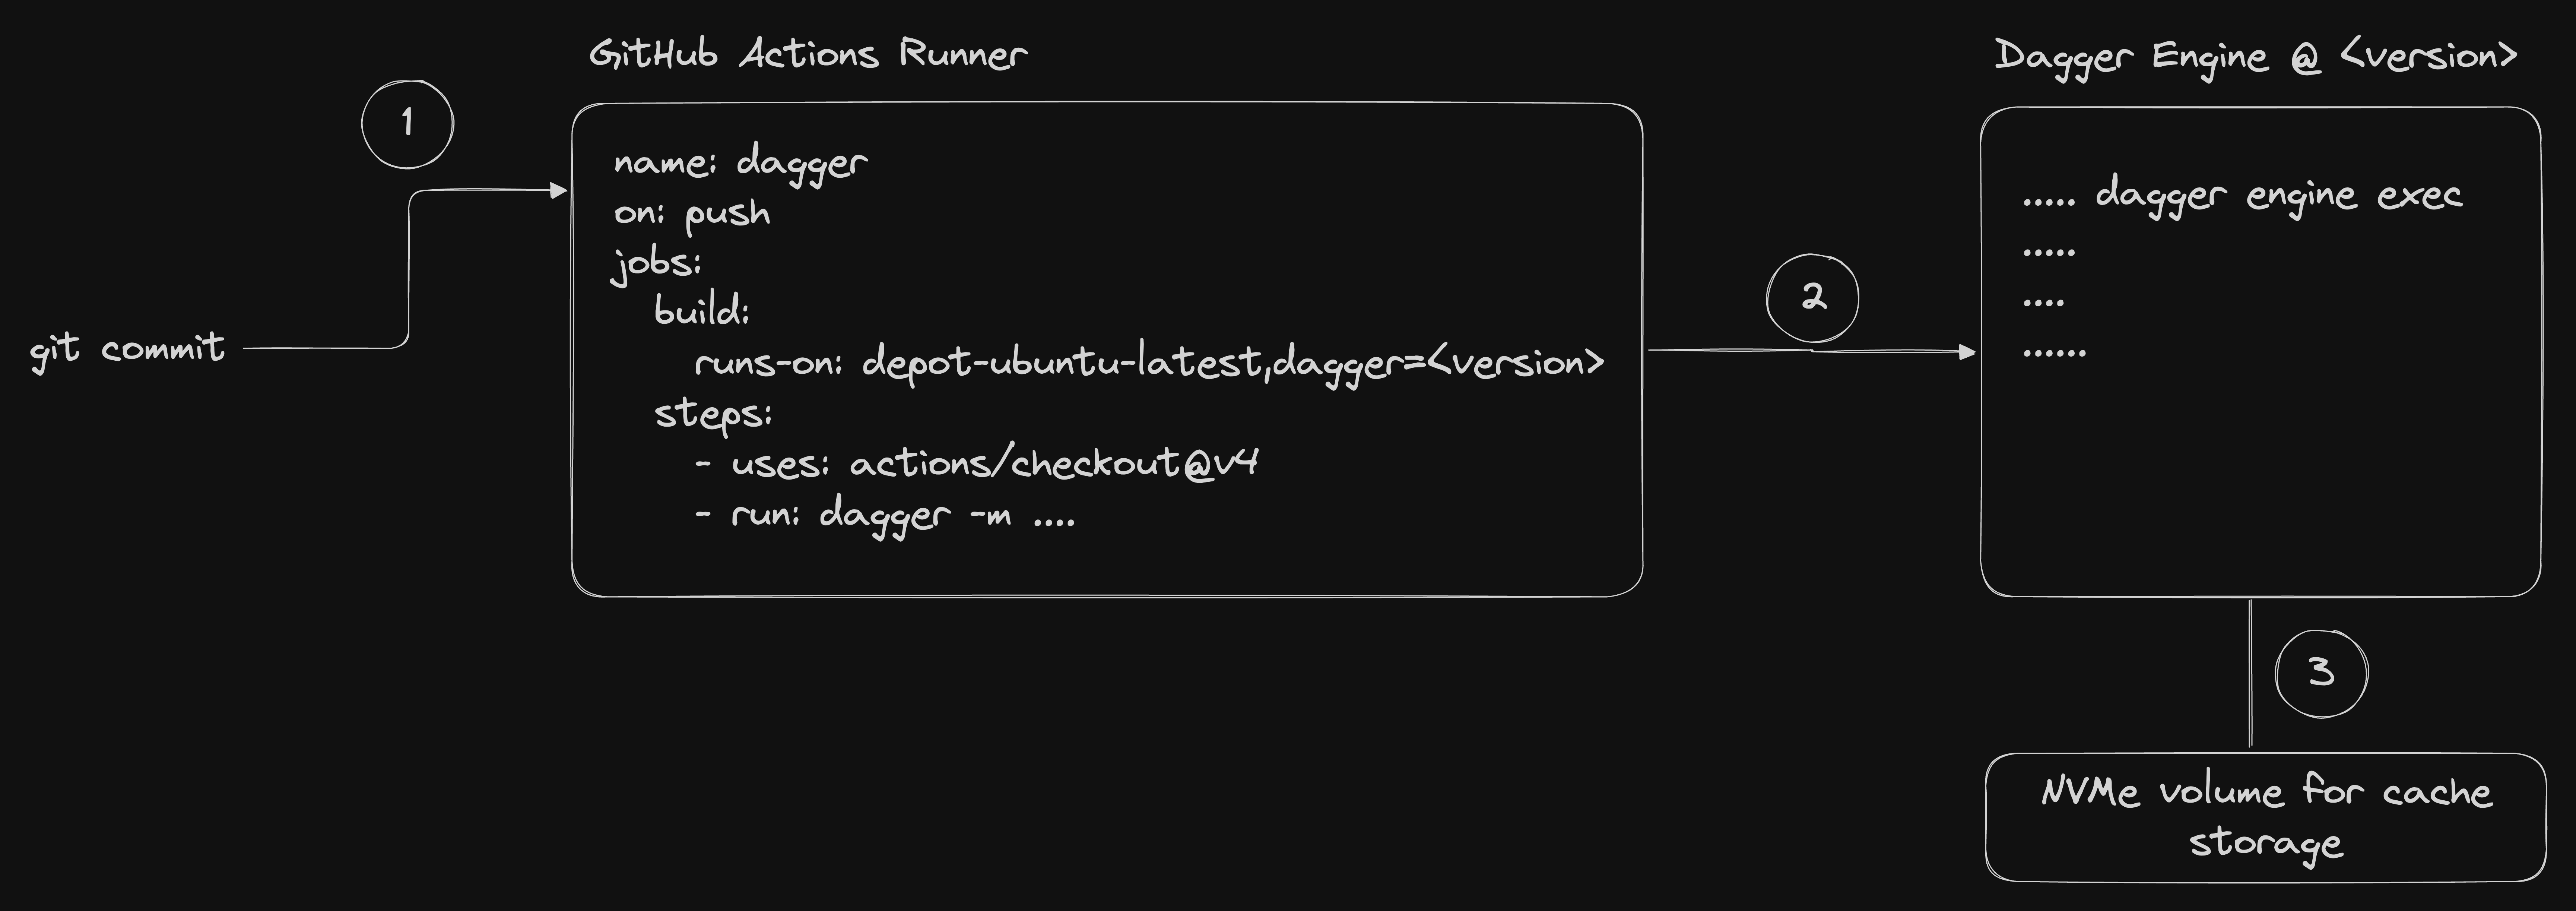
The general architecture allows for fast persistent cache for your Dagger projects automatically across builds. Here is the flow of information and what happens at each step when you specify `runs-on: depot-ubuntu-latest,dagger=` in your GitHub Actions workflow:
1. The Depot control plane receives the request for your GitHub Actions job and takes note of your request for a Dagger engine as well. We launch the Dagger Engine VM at the specified version next to your GitHub Actions runner, attaching your cache volume from previous builds to that VM. We then tell the GitHub Actions runner to pre-configure the GitHub Actions environment, installing the specific `dagger` CLI version for you and point it at the Dagger Engine running next door, and automatically authenticate to your Dagger Cloud account for logs and telemetry.
2. The GitHub Actions runner starts up and runs the job, which includes the Dagger CLI. The Dagger CLI is pre-configured to use the Dagger Engine running next door, the `dagger` step is thus kicked off on the separate Dagger Engine VM with it's persistent cache. The Dagger execution runs to completion and logs + telemetry are shipped to your Dagger Cloud account.
3. The Dagger Engine VM is automatically shut down after the job completes, and the cache volume is detached from the VM and returned to Depot's control plane for future use.
4. The GitHub Actions runner completes the job and returns the results to GitHub.
## Pricing
Dagger engines accessed via our GitHub Actions Runners are charged by the build minute at $0.04/minute, in addition to the GitHub Actions Runner build time.
## Dependabot
---
title: Dependabot
ogTitle: Running Dependabot on Depot GitHub Actions Runners
description: How to configure Dependabot to run dependency updates on Depot's optimized GitHub Actions runners
---
Depot GitHub Actions runners support running Dependabot jobs, allowing your dependency update workflows to benefit from the same performance improvements as your regular workflows.
## Overview
When Dependabot is configured to run on self-hosted runners, it can automatically use Depot runners for all dependency update jobs. This provides several benefits:
- **Faster dependency resolution** - Leverage Depot's optimized CPU and memory resources
- **Private registry access** - Access dependencies from private registries within your network (e.g. via [Tailscale](/docs/integrations/tailscale))
- **Consistent infrastructure** - Use the same high-performance runners for both regular workflows and dependency updates
## Setup
To enable Dependabot on Depot runners:
### 1. Enable Dependabot on self-hosted runners
Navigate to your repository or organization settings and enable "Dependabot on self-hosted runners". This setting allows Dependabot to use your configured self-hosted runners instead of GitHub's hosted runners.
For detailed instructions, see [GitHub's documentation on enabling self-hosted runners for Dependabot updates](https://docs.github.com/en/code-security/dependabot/maintain-dependencies/managing-dependabot-on-self-hosted-runners#enabling-self-hosted-runners-for-dependabot-updates).
### 2. Configure Depot runners
Ensure your organization is already configured to use Depot runners. If not, follow our [quickstart guide](/docs/github-actions/quickstart) to set up Depot runners with your organization.
### 3. Automatic routing
Once both settings are enabled, Dependabot jobs will automatically run on `depot-ubuntu-latest` runners. No additional configuration is required.
## GitHub Actions Runner Types
---
title: GitHub Actions Runner Types
ogTitle: Types of Depot-managed GitHub Action Runners
description: Depot offers several different types of GitHub Actions runners, depending on your CI job needs.
---
Depot offers several different types of GitHub Actions runners, depending on your CI job needs. You can choose the type on a per-job basis by specifying the runner label in your `.github/workflows/*.yaml` file:
```yaml
jobs:
build:
runs-on: depot-ubuntu-24.04
```
**Note**: We support the depot-ubuntu-latest alias for depot-ubuntu-24.04 if you prefer to use an evergreen Ubuntu version.
**In-memory Disk Accelerator**:
Depot runners reserve a portion of the memory on the runner host for a disk accelerator, backed by a RAM disk. The accelerator acts as buffer between reading and writing to the root disk, which allows Actions runs to perform incredibly fast I/O operations, much quicker than the physical disk would allow.
## Intel runners
Intel runners use AMD EC2 instances. Their EBS volume is provisioned with 8000 IOPS and 250 MB/s throughput.
The following labels are available:
| Label | CPUs | Memory | Disk size | Disk accelerator size | Per-minute price | Minutes multiplier |
| :------------------------- | :--- | :----- | :-------- | :-------------------- | :--------------- | :----------------- |
| `depot-ubuntu-24.04-small` | 2 | 2 GB | 100 GB | 512MB | $0.002 | 0.5x |
| `depot-ubuntu-24.04` | 2 | 8 GB | 100 GB | 2GB | $0.004 | 1x |
| `depot-ubuntu-24.04-4` | 4 | 16 GB | 130 GB | 4GB | $0.008 | 2x |
| `depot-ubuntu-24.04-8` | 8 | 32 GB | 150 GB | 8GB | $0.016 | 4x |
| `depot-ubuntu-24.04-16` | 16 | 64 GB | 180 GB | 8GB | $0.032 | 8x |
| `depot-ubuntu-24.04-32` | 32 | 128 GB | 200 GB | 16GB | $0.064 | 16x |
| `depot-ubuntu-24.04-64` | 64 | 256 GB | 250 GB | 32GB | $0.128 | 32x |
## Arm runners
Arm runners use Graviton4 EC2 instances. Their EBS volume is provisioned with 8000 IOPS and 250 MB/s throughput.
The following labels are available:
| Label | CPUs | Memory | Disk size | Disk accelerator size | Per-minute price | Minutes multiplier |
| :----------------------------- | :--- | :----- | :-------- | :-------------------- | :--------------- | :----------------- |
| `depot-ubuntu-24.04-arm-small` | 2 | 2 GB | 100 GB | 512MB | $0.002 | 0.5x |
| `depot-ubuntu-24.04-arm` | 2 | 8 GB | 100 GB | 2GB | $0.004 | 1x |
| `depot-ubuntu-24.04-arm-4` | 4 | 16 GB | 130 GB | 4GB | $0.008 | 2x |
| `depot-ubuntu-24.04-arm-8` | 8 | 32 GB | 150 GB | 8GB | $0.016 | 4x |
| `depot-ubuntu-24.04-arm-16` | 16 | 64 GB | 180 GB | 8GB | $0.032 | 8x |
| `depot-ubuntu-24.04-arm-32` | 32 | 128 GB | 200 GB | 16GB | $0.064 | 16x |
| `depot-ubuntu-24.04-arm-64` | 64 | 256 GB | 250 GB | 32GB | $0.128 | 32x |
## Ubuntu 22.04 runners
These runners use the same instances as the Ubuntu 24.04 runners.
The following labels are available:
| Label | CPUs | Memory | Disk size | Disk accelerator size | Per-minute price | Minutes multiplier |
| :----------------------------- | :--- | :----- | :-------- | :-------------------- | :--------------- | :----------------- |
| `depot-ubuntu-22.04-small` | 2 | 2 GB | 100 GB | 512MB | $0.002 | 0.5x |
| `depot-ubuntu-22.04` | 2 | 8 GB | 100 GB | 2GB | $0.004 | 1x |
| `depot-ubuntu-22.04-4` | 4 | 16 GB | 130 GB | 4GB | $0.008 | 2x |
| `depot-ubuntu-22.04-8` | 8 | 32 GB | 150 GB | 8GB | $0.016 | 4x |
| `depot-ubuntu-22.04-16` | 16 | 64 GB | 180 GB | 8GB | $0.032 | 8x |
| `depot-ubuntu-22.04-32` | 32 | 128 GB | 200 GB | 16GB | $0.064 | 16x |
| `depot-ubuntu-22.04-64` | 64 | 256 GB | 250 GB | 32GB | $0.128 | 32x |
| `depot-ubuntu-22.04-arm-small` | 2 | 2 GB | 100 GB | 512MB | $0.002 | 0.5x |
| `depot-ubuntu-22.04-arm` | 2 | 8 GB | 100 GB | 2GB | $0.004 | 1x |
| `depot-ubuntu-22.04-arm-4` | 4 | 16 GB | 130 GB | 4GB | $0.008 | 2x |
| `depot-ubuntu-22.04-arm-8` | 8 | 32 GB | 150 GB | 8GB | $0.016 | 4x |
| `depot-ubuntu-22.04-arm-16` | 16 | 64 GB | 180 GB | 8GB | $0.032 | 8x |
| `depot-ubuntu-22.04-arm-32` | 32 | 128 GB | 200 GB | 16GB | $0.064 | 16x |
| `depot-ubuntu-22.04-arm-64` | 64 | 256 GB | 250 GB | 32GB | $0.128 | 32x |
## Windows runners
Windows runners use instances with Intel chips running Windows Server 2022. These runners don't currently have a disk accelerator (i.e. [Ultra Runners](/blog/introducing-github-actions-ultra-runners)).
The following labels are available:
| Label | CPUs | Memory | Disk size | Per-minute price | Minutes multiplier |
| :------------------------- | :--- | :----- | :-------- | :--------------- | :----------------- |
| `depot-windows-2022-small` | 2 | 2 GB | 100 GB | $0.004 | 1x |
| `depot-windows-2022` | 2 | 8 GB | 100 GB | $0.008 | 2x |
| `depot-windows-2022-4` | 4 | 16 GB | 130 GB | $0.016 | 4x |
| `depot-windows-2022-8` | 8 | 32 GB | 150 GB | $0.032 | 8x |
| `depot-windows-2022-16` | 16 | 64 GB | 180 GB | $0.064 | 16x |
| `depot-windows-2022-32` | 32 | 128 GB | 200 GB | $0.128 | 32x |
| `depot-windows-2022-64` | 64 | 256 GB | 250 GB | $0.256 | 64x |
**Note**: Windows runners don't come equipped with Hyper-v because of an AWS limitation on EC2. Therefore, if you use things that require it like `docker`, than Depot Windows Runners are unlikely to work for you.
## macOS runners
**Status: Beta**
macOS runners use instances with M2 chips running macOS 14. Their EBS volume is provisioned with 8000 IOPS and 1000 MB/s throughput. Like the Linux runners, the macOS runners also have a disk accelerator.
**Note**: These runners are only available on the [Startup plan](/pricing) during beta.
The following labels are available:
| Label | CPUs | Memory | Disk size | Per-minute price |
| :------------------- | :--- | :----- | :-------- | :--------------- |
| `depot-macos-latest` | 8 | 24 GB | 150GB | $0.08 |
| `depot-macos-14` | 8 | 24 GB | 150GB | $0.08 |
## Billing
Note that on your Billing summary, costs are broken down by `Billed minutes` and `Elapsed minutes`. Here are several things to know about the difference:
- `Elapsed minutes` is the clock time spent executing your jobs.
- `Billed minutes` multiples the `Minutes multiplier` (from the table above) by the `Elapsed minutes`.
- The rate at which `Billed minutes` accumulates is based on the size of the `Minutes multiplier`.
- What you pay is the total `Billed minutes` minus the included minutes of your plan.
## What software and tools are included?
If you'd like to see what tools and software are installed in each runner image, please see the links to the `README` in GitHub's repository:
- [`depot-ubuntu-24.04`](https://github.com/actions/runner-images/blob/main/images/ubuntu/Ubuntu2404-Readme.md) and `depot-ubuntu-latest`
- [`depot-ubuntu-22.04`](https://github.com/actions/runner-images/blob/main/images/ubuntu/Ubuntu2204-Readme.md)
- [`depot-macos-14`](https://github.com/actions/runner-images/blob/main/images/macos/macos-14-Readme.md) and `depot-macos-latest`
- [`depot-windows-2022`](https://github.com/actions/runner-images/blob/main/images/windows/Windows2022-Readme.md)
_Note: We do our best to keep our images in sync with GitHub's, but there may be a slight delay between when GitHub updates their images and when we update ours. If you need a specific version of a tool or software, please check the links above to see if it's available in the image you're using._
## Tailscale
---
title: Tailscale
ogTitle: Tailscale
description: Learn how to connect Depot to your Tailscale tailnet to enable secure access to private services.
---
[Tailscale](https://tailscale.com/) is a zero-config VPN that connects your devices, services, and cloud networks to enable secure access to resources on any infrastructure.
By connecting Depot to your Tailscale network, you can enable secure access to private services, such as databases, within your tailnet without opening up those services to the public internet and without maintaining static IP allow lists.
Using Tailscale, Depot GitHub Actions runners and container builders join your tailnet as [ephemeral nodes](https://tailscale.com/kb/1111/ephemeral-nodes), and you can control their access to the rest of your infrastructure using Tailscale ACLs.
## Connecting Depot to your tailnet
Connecting your Depot organization to a Tailscale tailnet is a three-step process:
1. Configure your Tailnet ACLs to define a tag for your Depot runners
2. Generate new OAuth client credentials using this new tag
3. Configure your Depot organization to use those OAuth client credentials
### Step 1: Create a new tag in your Tailnet ACLs
First, you will need to create a tag that will be assigned to all Depot runners. [Tailscale tags](https://tailscale.com/kb/1068/tags) are used by Tailscale to group non-user devices, such as Depot runners, and let you manage access control policies based on these tags.
We recommend creating a new tag named `tag:depot-runner` for this purpose. This tag will later be used in your ACL rules to determine what Depot runners should have access to.
In your Tailscale [admin console](https://login.tailscale.com/admin/acls/file) access controls, [define a new tag under `tagOwners`](https://tailscale.com/kb/1337/acl-syntax#tag-owners):
```json
{
"tagOwners": {
"tag:depot-runner": ["group:platform-team"]
}
}
```
### Step 2: Generate a new OAuth client
Next, [generate a new OAuth client](https://login.tailscale.com/admin/settings/oauth) from your tailnet's settings. This client can be given a descriptive name and should be granted Write access to the `Keys > Auth Keys` scope. You should select the tag you created in the previous step as chosen tag for this scope:
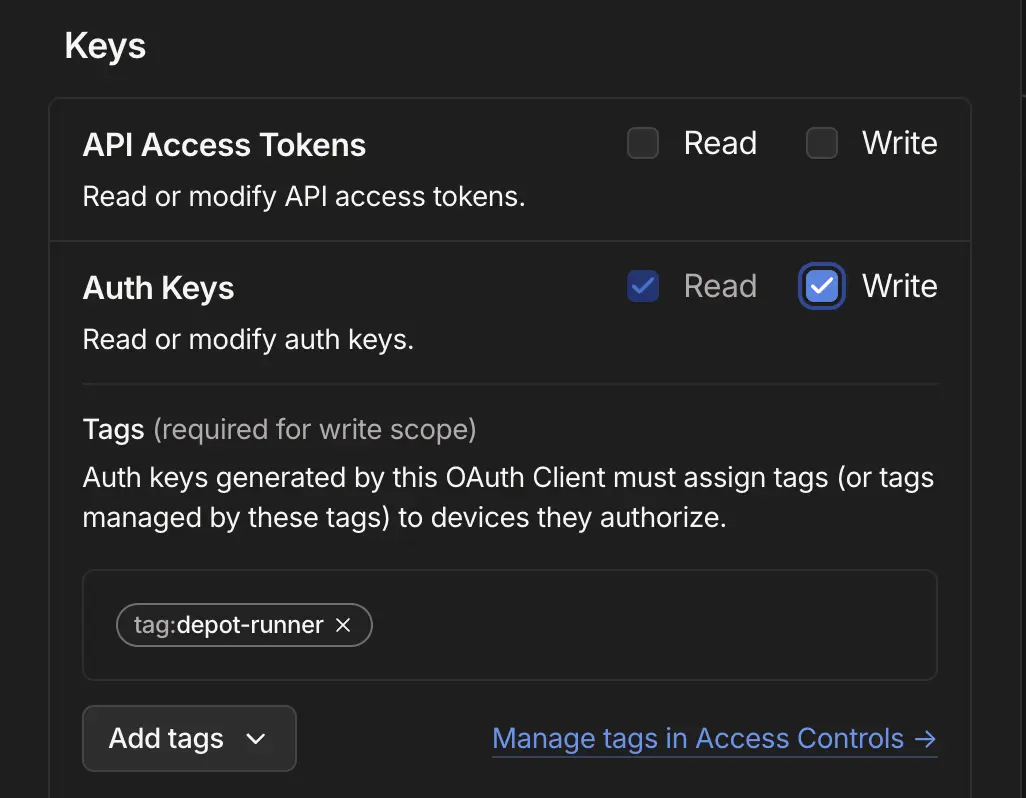
You will be given a client ID and client secret that you can use in the next step.
### Step 3: Configure Depot to use the new OAuth client
Finally, you will need to configure your Depot organization to use the new OAuth client credentials. From your organization settings page, navigate to the Tailscale section and click **Connect to Tailscale**. Enter the client ID and secret from the previous step and click **Connect**:
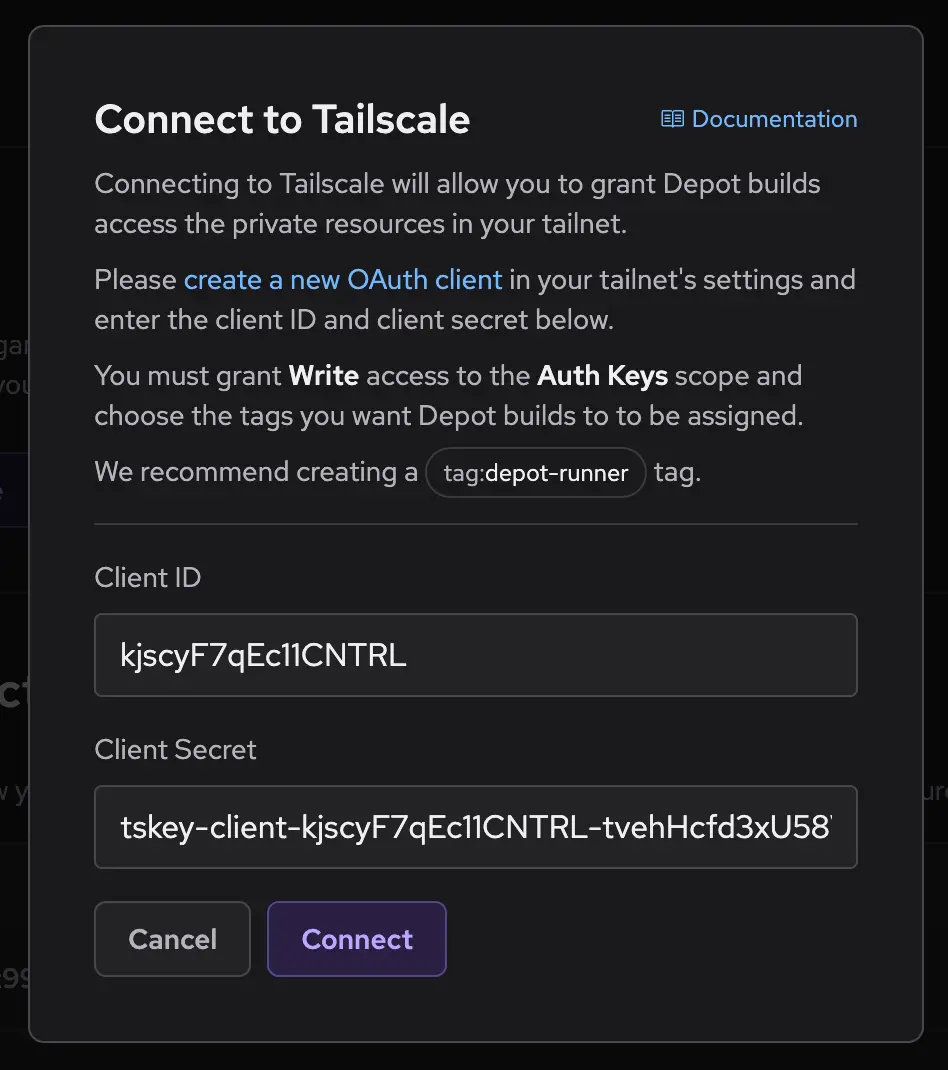
Your Depot organization is now connected to your Tailscale tailnet. Depot runners and container builders will now join your tailnet as [ephemeral nodes](https://tailscale.com/kb/1111/ephemeral-nodes), using the tag you have created.
## Granting access to private services
Now that your Depot runners are connected to your tailnet, you can use Tailscale ACLs to control their access to the rest of your infrastructure. Depot runners will be [tagged](https://tailscale.com/kb/1068/tags) with your chosen tag, which you can then reference in your ACL rules.
For example, you can grant your Depot runners access to a private database service by creating a new [ACL rule](https://tailscale.com/kb/1337/acl-syntax#access-rules) in the [admin console](https://login.tailscale.com/admin/acls/file):
```json
{
"acls": [{"action": "accept", "src": ["tag:depot-runner"], "dst": ["database-hostname"]}]
}
```
Using [Tailscale subnet routers](https://tailscale.com/kb/1019/subnets), you can additionally grant your Depot runners access to entire subnets in any cloud provider VPC or on-premises network.
```json
{
"acls": [{"action": "accept", "src": ["tag:depot-runner"], "dst": ["192.0.2.0/24:*"]}]
}
```
## Disconnecting from Tailscale
If you wish to disconnect your Depot organization from Tailscale, navigate to the Tailscale section in your organization settings and click **Disconnect from Tailscale**. This will remove the OAuth client credentials from your organization and your Depot runners will no longer join your tailnet as ephemeral nodes:
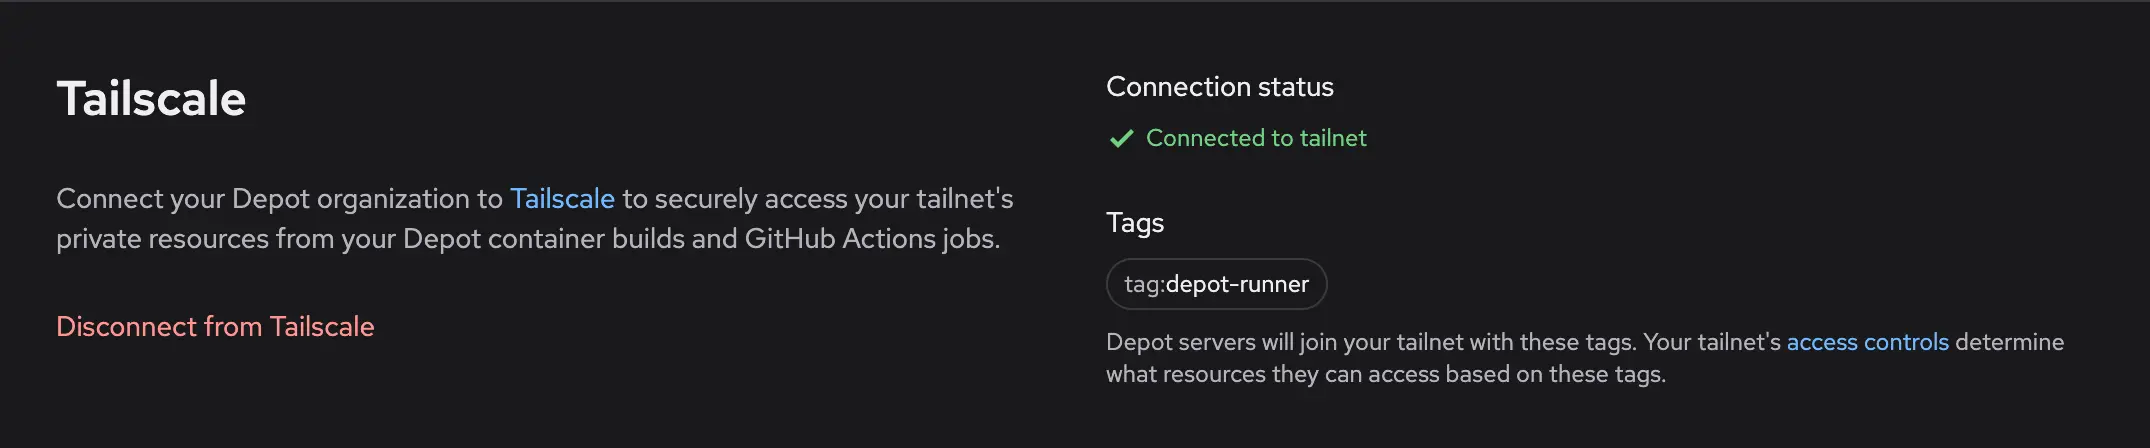
Note: disconnecting prevents new Depot runners from joining your tailnet. Any in-flight Actions jobs or container builds will remain connected until they complete. To immediately disconnect any running jobs, you can remove any of the connected nodes from your [Tailscale admin console](https://login.tailscale.com/admin/machines).
## Depot Managed on AWS
---
title: Depot Managed on AWS
ogTitle: Deploying Depot Managed on AWS
description: Depot Managed allows you to deploy the Depot data plane in your own AWS account. This provides data residency, compliance, and cost control benefits.
---
With Depot Managed on Amazon Web Services (AWS), the Depot data plane is deployed within an isolated sub-account of your AWS organization. You can use the Depot CLI, web application, and API, but the underlying build compute and cache infrastructure reside entirely within your own AWS account.
## Architecture
[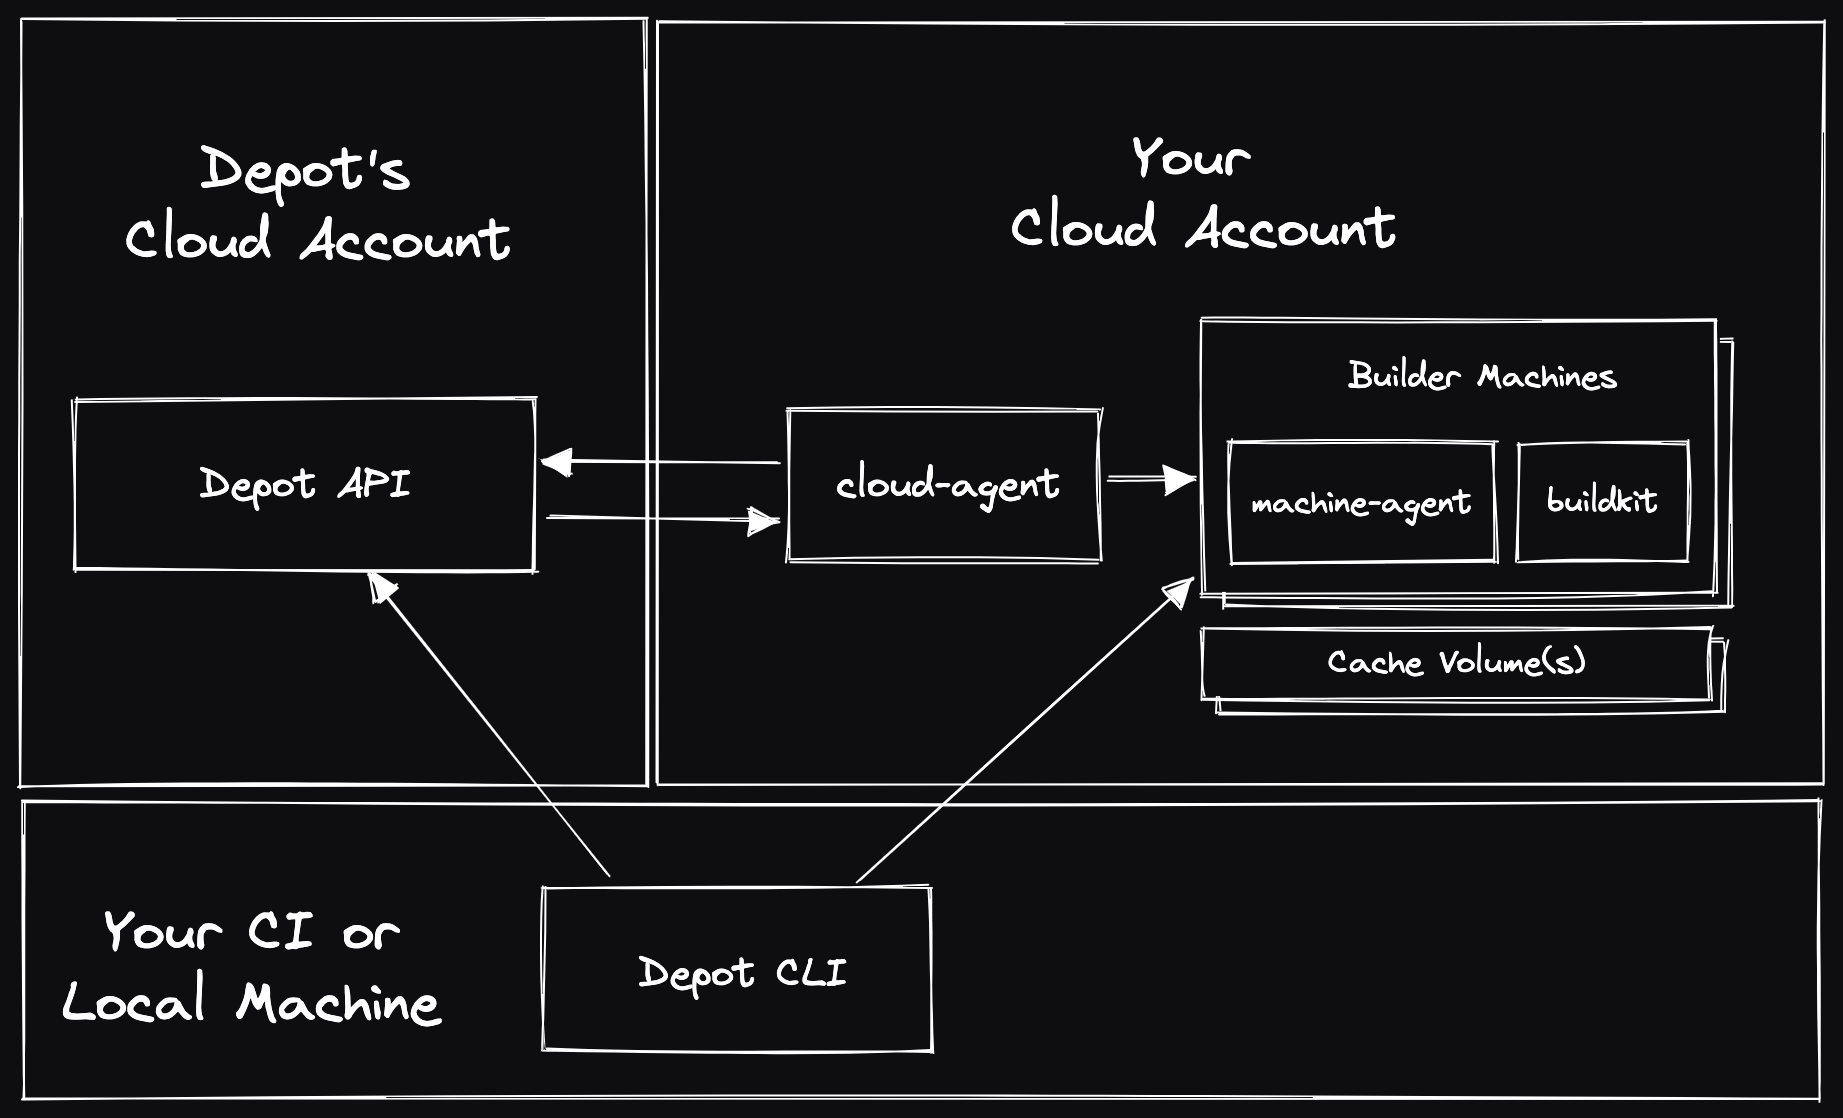](/images/self-hosted-architecture.png)
## Setup and Usage
**NOTE:** This guide is intended for Depot customers who are working with the Depot team, you cannot deploy Depot Managed on AWS without it being enabled for your Depot organization. [Contact us](mailto:contact@depot.dev) if you are interested in using Depot Managed.
### Step 1: Create a dedicated sub-account
Depot Managed requires the use of a dedicated sub-account within your AWS organization. This should be a new account containing no other resources or services.
Follow the [AWS documentation](https://docs.aws.amazon.com/organizations/latest/userguide/orgs_manage_accounts_create.html#orgs_manage_accounts_create-new) to create a new account within your organization.
### Step 2: CloudFormation stack deployment
Once you have created a new sub-account, you can deploy the following CloudFormation template to provision the required IAM permissions in the AWS sub-account. First, save the following as a file named `depot-managed-bootstrap.json`:
```json
{
"Resources": {
"GrantProvisionerAccess": {
"Type": "AWS::IAM::Role",
"DeletionPolicy": "Retain",
"Properties": {
"RoleName": "DepotProvisioner",
"ManagedPolicyArns": ["arn:aws:iam::aws:policy/AdministratorAccess"],
"AssumeRolePolicyDocument": {
"Statement": [
{
"Action": ["sts:AssumeRole"],
"Effect": "Allow",
"Principal": {
"AWS": [
"arn:aws:iam::375021575472:role/aws-reserved/sso.amazonaws.com/AWSReservedSSO_Provisioner_572dd0a52dd9fc8e"
]
}
}
]
}
}
},
"GrantOpsAccess": {
"Type": "AWS::IAM::Role",
"DeletionPolicy": "Retain",
"Properties": {
"RoleName": "DepotOps",
"ManagedPolicyArns": ["arn:aws:iam::aws:policy/AdministratorAccess"],
"AssumeRolePolicyDocument": {
"Statement": [
{
"Action": ["sts:AssumeRole"],
"Effect": "Allow",
"Principal": {
"AWS": [
"arn:aws:iam::375021575472:role/aws-reserved/sso.amazonaws.com/AWSReservedSSO_Ops_e45adfee11ab7421"
]
}
}
]
}
}
}
}
}
```
Next, deploy the CloudFormation stack in the new sub-account:
```bash
aws cloudformation create-stack \
--stack-name depot-managed-bootstrap \
--template-body file://depot-managed-bootstrap.json \
--capabilities CAPABILITY_NAMED_IAM
```
### Step 3: Notify Depot
Finally, let the Depot team know that the CloudFormation stack has been deployed, and they will initiate the deployment of the Depot data plane into the new sub-account.
The Depot team will additionally work with you on any follow-up steps, including:
- AWS quota increases to match your expected usage
- Configuring KMS keys for encryption
- Configuring S3 buckets for cache storage
- Configuring VPC peering for private networking
- Configuring AWS PrivateLink for secure API access
- Enabling enforced usage of Depot Managed in your Depot organization
## Additional questions
If you have any questions, please [contact us](mailto:contact@depot.dev), and we'll be happy to help.
## Depot Managed Overview
---
title: Depot Managed Overview
ogTitle: Overview of Depot Managed
description: Depot Managed allows you to deploy the Depot data plane in your own AWS account. This provides data residency, compliance, and cost control benefits.
---
With Depot Managed, the Depot data plane can be deployed in your own Amazon Web Services (AWS) account. You can still use the Depot CLI, web application, and API, however the underlying build compute and cache data reside entirely within your own cloud account.
_We are considering support for additional cloud providers like Google Cloud (GCP) in the future. If you are interested in this, please [let us know](mailto:help@depot.dev)._
## How Depot Managed works
Depot Managed is the entirety of the Depot [data plane](https://en.wikipedia.org/wiki/Forwarding_plane#Data_plane), deployed in a single-tenant isolated sub-account within your AWS organization. Once deployed, you have the option of using Depot Managed with some or all of your Depot organization's projects. You will continue to use the same Depot CLI and web application, but the CLI will communicate directly with the compute and cache infrastructure running in your AWS account.
If you are an existing Depot user, moving to a Depot Managed deployment requires no changes to your existing developer workflows or CI pipelines.
Depot Managed is still a fully managed service and comes with the full support and SLA of the Depot Business plan. The Depot team is on-call for any issues that arise with the Depot Managed deployment.
For more information, see:
- [Depot Managed on AWS](/docs/managed/on-aws)
## Benefits of Depot Managed
Depot Managed comes with a few key benefits:
- **Data residency**: All build data and cache data reside within your own cloud account, ensuring that you have full control over your data.
- **Compliance**: For organizations that have strict compliance requirements.
- **VPC peering & IAM**: You can configure VPC peering and IAM roles to allow the Depot data plane to access your private cloud resources.
- **AWS PrivateLink**: You can use AWS PrivateLink to keep all communication between the Depot data plane and control plane within the AWS network.
- **Cost control**: You can take advantage of any existing cloud discounts or credits you have, and you can control the size and type of instances used for builds.
- **GPU support**: If you have GPU capacity in your AWS account, you can use it to accelerate AI/ML and GPU-intensive workflows.
- **AWS Marketplace**: You can pay for Depot Managed through the AWS Marketplace and take advantage of any existing AWS billing arrangements you have.
## How to get started
Depot Managed is available on the Depot Business plan. If you are interested in Depot Managed, please [contact us](mailto:contact@depot.dev) to chat with us and see if Depot Managed is a good fit for your organization.
## Using GPUs with Depot Managed
---
title: Using GPUs with Depot Managed
ogTitle: Using GPUs with Depot Managed
description: With Depot Managed you can use your own AWS account to run builds with GPUs. This guide explains how to set up Depot Managed to use GPUs.
---
Depot Managed allows you to leverage your own GPU resources on AWS to accelerate AI/ML and GPU-intensive GitHub Actions workflows. If you have GPU capacity in your AWS account, we’ll collaborate with you to create a custom runner AMI, finely tuned to meet your specific GPU needs.
## Steps to Enable GPU Support
1. **Become a Depot Managed User:** Run the Depot data plane in your own AWS account by joining Depot Managed. If you are not already a Depot Managed user, you can [contact us](mailto:contact@depot.dev) to get started.
1. **Verify GPU Capacity Access:** Confirm that your AWS account has the necessary permissions and capacity to launch GPU instances. You can check your available instance types through the AWS Management Console.
1. **Contact the Depot Team:** Existing Depot Managed users can reach out to the Depot support team at [contact@depot.dev](mailto:contact@depot.dev) to request a GPU-accelerated AMI. Provide details about the types of GPU instances you plan to use and any specific requirements for your builds.
1. **AMI Deployment:** Once your request is processed, the Depot team will build and deploy a custom AMI to your Depot Managed environment. You will receive confirmation once the AMI is available for use.
1. **Monitoring and Optimization:** Monitor your builds to ensure that they are performing as expected with GPU support. We'll be available to assist with any questions or requests.
## Run Depot Managed GPU Accelerated Workflows
If your projects require GPU support, we’re here to assist. When joining Depot Managed, let us know about your GPU requirements. For existing users, you can request GPU support by contacting our team at [contact@depot.dev](mailto:contact@depot.dev). We will collaborate with you to create a custom Depot runner AMI that includes the necessary GPU drivers and any other components tailored to your needs.
Once your GPU-accelerated environment is ready, we’ll provide you with a unique label to use in your GitHub Actions workflows. This will allow you to leverage GPU-accelerated instances. Here’s an example of how to incorporate this into your workflow:
```yaml
jobs:
python-job:
runs-on: # Use the GPU label provided by Depot
steps:
- uses: actions/checkout@v4
- uses: actions/setup-python@v5
with:
python-version: '3.9'
cache: 'pip' # caching pip dependencies
- run: pip install -r requirements.txt
```
## Additional questions
If you have any questions, please [contact us](mailto:contact@depot.dev), and we'll be happy to help.
## Core Concepts
---
title: Core Concepts
ogTitle: Core Concepts of Depot
description: Learn about the fundamental concepts that Depot is built on for faster Docker image builds.
---
## Organizations
Everything you do in Depot is within the context of an organization. An organization typically represents a single company or team. Billing is on a per-organization basis.
## GitHub Connection
Depot organizations can be connected to GitHub organizations in order to use [Depot GitHub Actions Runners](/docs/github-actions/overview). This allows Depot runners to be used GitHub Actions workflows and jobs to accelerate your entire CI/CD pipeline.
## Projects
Projects are used for our [remote container builds](/docs/container-builds/overview). A project is a cache namespace that is isolated from other projects. You can use a single namespace for a single git repository or Dockerfile or one namespace for multiple git repositories or Dockerfiles.
Projects are created within an organization and are used to store the Docker layer cache for your Docker image build on a per architecture basis.
### Cache Storage Policy
A cache storage policy is specified per project. It defines how much cache to keep for each architecture you build. When the cache goes beyond that size, the oldest cache entries are deleted. The default cache storage policy is 50 GB, but is configurable up to 500 GB.
## Builds
A build in Depot is a Docker image build. When you run `depot build` your build context is sent to a remote builder running BuildKit. BuildKit performs the build and sends the resulting image back to your machine or a remote registry based on the options you passed with the build command. The resulting cache from the build is stored in the project's persistent cache and is available to all subsequent builds by users or CI providers.
Depot can build images on both `x86` or `arm` machines supporting the following platforms:
- `linux/amd64`
- `linux/arm64`
- `linux/arm/v6`
- `linux/arm/v7`
- `linux/386`
## Jobs
A job in Depot is considered to be a GitHub Actions job. When you run a GitHub Actions job with a `runs-on` label like `depot-ubuntu-latest`, the job is run on a Depot runner. All of the steps for that job will execute on the Depot-managed GitHub Actions Runner. You must have an active [GitHub connection configured](/docs/github-actions/quickstart#connect-to-github) in order to access Depot runners.
## Cloud Connections
A cloud connection links your AWS cloud account and your Depot organization. With a cloud connection configured, you can choose to have a given Depot project launch builders in your cloud instead of ours.
We currently only support cloud connections for **AWS** and you must be on a **Business** plan to use this feature.
## Frequently Asked Questions
---
title: Frequently Asked Questions
ogTitle: Frequently Asked Questions
description: Got a question about how to use Depot? We have answers here.
---
## Common Container Builds questions
### How many builds can a project run concurrently?
You can run as many builds concurrently as you want against a single Depot project.
### How do I use Depot with `docker-compose`?
You can use [`depot bake -f docker-compose.yml`](/docs/cli/reference#depot-bake) to build all of the images in your Compose file and then use `docker-compose up` to run the resulting images.
### How do you authenticate with Depot?
We have all our authentication options documented for `depot` in our [CLI authentication documentation](/docs/cli/authentication).
### How do I push my images to a private registry?
You can use the `--push` flag to push your images to a private registry. Our `depot` CLI uses your local Docker credentials provider. So, any registry you've logged into with `docker login` or similar will be available when running a Depot build. See our guide on [private registries](/docs/container-builds/how-to-guides/private-registries) for more details.
### Can I build Docker images for M1/M2 Macs?
Yes! Depot supports native Arm container builds out of the box. We detect the architecture of the machine requesting a build via `depot build`. If that architecture is Arm, we route the build to a builder running Arm natively. You can build Docker images for M1/M2 Macs and run the resulting image immediately, as it is made specifically for your architecture. See our documentation on [Arm containers](/docs/container-builds/how-to-guides/arm-containers) for more details.
### Can I build multi-platform Docker images?
Yes! Check out our [integration guide](/docs/container-builds/how-to-guides/arm-containers#what-about-multi-architecture-containers) on how we do it.
### How should I use Depot with a monorepo setup?
If you're building multiple images from a single monorepo, and the builds are lightweight, we tend to recommend using a single project. But we detail some other options in our [monorepo guide](/blog/how-to-use-depot-in-monorepos).
### Can I use Depot with my existing `docker build` or `docker buildx build` commands?
Yes! We have a [`depot configure-docker`](/docs/cli/reference#depot-configure-docker) command that configures Depot as a plugin for the Docker CLI and sets Depot as the default builder for both `docker build` and `docker buildx build`. See our [`docker build` guide](/docs/container-builds/how-to-guides/docker-build) for more details.
### What are these extra files in my registry?
Registries like Amazon Elastic Container Registry (ECR) and Google Container Registry (GCR) don't accurately display provenance information for a given image. Provenance is a set of metadata that describes how an image was built. This metadata is stored in the registry alongside the image. It's enabled by default in `docker build` and thus by default in `depot build` as well.
If you would like to clean up the clutter, you can run your build with `--provenance=false`:
```shell
depot build -t --push --provenance=false .
```
### Does Depot support building images in any lazy-pulling compatible format? e.g. estargz, nydus or others?
Depot supports building images in any lazy-pulling compatible format. You can build an estargz image by setting the `--output` flag at build time:
```shell
depot build \
--output "type=image,name=repo/image:tag,push=true,compression=estargz,oci-mediatypes=true force-compression=true" \
.
```
### Does Depot supporting building images with ztsd compression?
Depot supports building images with `zstd` compression, a popular compression format to help speed up the launching of containers in AWS Fargate and Kubernetes. You can build an image with zstd compression by setting the `--output` flag at build time:
```shell
depot build \
--output type=image,name=$IMAGE_URI:$IMAGE_TAG,oci-mediatypes=true,compression=zstd,compression-level=3 force-compression=true,push=true \
.
```
### What is an ephemeral build?
We label builds as `ephemeral` when they are launched by GitHub Actions for an open-source pull request. It is a build that did not have access to read from or write to the project cache, to prevent untrusted code from accessing sensitive data.
## Common GitHub Actions questions
### How does Depot integrate with GitHub Actions?
Depot offers managed GitHub Actions runners that can make your workflows up to 3x faster. Our Ultra Runners provide faster compute, 10x faster caching, and support for various runner types including macOS, ARM, and Intel runners.
### What are the benefits of using Depot's GitHub Actions runners?
Depot's GitHub Actions runners offer several advantages:
1. Faster compute: Up to 3x faster than standard GitHub-hosted runners.
2. 10x faster caching: Integrated with Depot's cache orchestration system.
3. Cost-effective: Half the cost of GitHub-hosted runners, billed by the second.
4. Variety of runner types: Support for Intel, ARM, macOS, and even GPU-enabled runners.
5. No concurrency limits: Run as many jobs as you want in parallel.
### How do I start using Depot's GitHub Actions runners?
To use Depot's GitHub Actions runners, you need to:
1. Connect your GitHub organization to Depot.
2. Use the Depot label in your workflow file.
For example, change:
```yaml
runs-on: ubuntu-22.04
```
to:
```yaml
runs-on: depot-ubuntu-22.04
```
### What runner types does Depot offer?
We offer a variety of runner types, including:
- Ubuntu runners (from 2 vCPUs/2 GB RAM to 64 vCPUs/256 GB RAM)
- macOS runners
- ARM runners
- Intel runners
- GPU-enabled runners (only available on the Business plan)
### How does Depot's pricing work for GitHub Actions?
Depot runners are half the cost of GitHub-hosted runners. Each plan comes with a set of included minutes as follows:
- Developer plan: 2,000 minutes included
- Startup plan: 20,000 minutes included, $0.004/minute after
- Business plan: Custom minute allocation
Pricing is based on a per-minute basis, tracked per second, with no enforced one-minute minimum.
### Can I use Depot's GitHub Actions runners with my existing workflows?
Yes, you can easily integrate our runners into your existing GitHub Actions workflows. Simply change the `runs-on` label in your workflow file to use a Depot runner.
### How does Depot's caching system work with GitHub Actions?
Our high-performance caching system is automatically integrated with our GitHub Actions runners. It provides up to 10x faster caching speeds compared to standard GitHub-hosted runners, with no need to change anything in your jobs.
### How can I track usage of Depot's GitHub Actions runners?
We provide detailed usage analytics for GitHub Actions inside of your Organization Usage page. You can track minutes used, job durations, and other metrics across your entire organization.
## Introduction
---
title: Introduction
ogTitle: What is Depot?
description: Depot is a build acceleration platform that makes your entire workflow exponentially faster — from up to 40x faster Docker builds and 10x faster GitHub Actions Runners to accelerated remote caching for Bazel, Gradle, Turborepo, sccache, and more.
---
Welcome to Depot!
Depot is a build acceleration platform focused on making builds exponentially faster. You can use Depot to make everything run faster, from your Docker image build to your E2E test suite in GitHub Actions.
Depot is a build acceleration platform that makes your entire development workflow exponentially faster. Whether you're building Docker images, running CI/CD pipelines in GitHub Actions, executing test suites in Go, or developing locally, Depot accelerates every part of your development process — from individual builds that finish in seconds to complete deployment workflows that run 10x faster.
## What problem is Depot solving?
Slow development workflows drain productivity and happiness. Waiting for builds, tests, and deployments forces constant context switching, slows down feedback loops, and ultimately burns through engineering time and resources that should be spent building great products.
We are developers ourselves, and we've experienced the frustration of waiting minutes or hours for builds to complete, watching CI pipelines crawl through test suites, and dealing with the complexity of setting up efficient caching across different tools. Modern development tools and CI providers simply don't prioritize performance at the level teams need. So, we built the build acceleration platform we've always wanted — one that makes everything exponentially faster with as little work as possible.
## Who is Depot for?
Depot is built for any team that wants to move faster and waste less time waiting. Whether you're a DevOps Engineer optimizing CI/CD pipelines, a Platform Engineer building developer tools, a Developer who wants faster local builds, an Engineering Manager looking to improve team velocity, or any other role focused on shipping software efficiently — Depot can accelerate your workflows and give you back hours of productive time every week.
## How does Depot work?
We have five integrated products that work together or independently to make your development workflows exponentially faster.
### Remote container builds
Our remote container builds run an optimized version of BuildKit that can make your Docker image builds up to 40x faster. We support native multi-platform builds for both Intel & Arm without emulation, provide persistent shared cache that's instantly available across your team, and free up your local machine's resources by running builds on powerful remote infrastructure.
[Learn more about remote container builds](/docs/container-builds/overview)
### Global container registry
Depot Registry is a high-performance, globally-distributed container registry with CDN-backed image delivery. Built for speed and reliability, it ensures your container images are available instantly anywhere your applications deploy, reducing pull times and improving deployment speed. Our container registry integrates seamlessly with our remote container builds, so you can push and pull images without any additional configuration.
[Learn more about Depot Registry](/docs/registry/overview)
### Faster GitHub Actions Runners
Depot-managed GitHub Actions Runners bring our acceleration tech and expertise to your entire CI/CD workflow with up to 3x faster runners with 30% faster CPUs, 10x faster networking and caching, and unrestricted concurrency at half the cost of GitHub-hosted runners (**with true per second billing**). Our runners integrate seamlessly with our cache orchestration system, so you get dramatically faster caching without changing your existing workflows.
[Learn more about GitHub Actions Runners](/docs/github-actions/overview)
### Universal build cache
Depot Cache provides high-performance remote caching for development tools including Bazel, Go, Gradle, Turborepo, sccache, and Pants. Share build artifacts and test results across your entire team and CI environment, making builds incremental and achieving 2x to 20x speed improvements. The cache is instantly accessible from local development, any CI provider, and integrates automatically with our GitHub Actions runners.
[Learn more about Depot Cache](/docs/cache/overview)
### Build API for Platforms
If you need to build container images programmatically or from untrusted sources, our Build API provides access to our entire container build infrastructure through gRPC, Connect, and HTTP/JSON APIs. Build images on behalf of your users in a secure, isolated environment using our CLI tools or integrate directly with our SDKs.
[Learn more about the Build API](/docs/container-builds/reference/api-overview)
## Real world impact
Teams using Depot see dramatic improvements across their entire development workflow. Here are some examples of how Depot has transformed engineering teams:
- [PostHog cut build times by 55x](/customers/posthog): Reduced from 193 minutes to 3 minutes and 26 seconds, with an average of 12-13% time savings for their GitHub Actions on Depot runners. As their Technical Lead notes: "Around here, we say Posthog ships weirdly fast, and you can't say Posthog ships weirdly fast if you're waiting for an hour and 45 minutes."
- [Hathora powers builds for game developers at scale](/customers/hathora): Using Depot at an API level to perform hundreds of builds per day on behalf of their customers, enabling game developers to deploy globally without Docker expertise. "It's become a pretty critical part of infrastructure for us. This is how our game developers get their game servers over to our platform."
- [Jane cut GitHub Actions costs in half and increased throughput by 25%](/customers/jane-app): For over 250 developers across 35 engineering teams, Jane achieved 2.4x faster end-to-end test jobs and 55% reduction in GitHub Actions spend. As Staff DevOps Engineer Alonso Suarez said: "Last year, the most impactful project we did for Engineering at Jane was migrating to Depot. It was one week's effort and one month's lead time."
- [Bastion cut build times by 6x while halving GitHub Actions spending](/customers/bastion): Achieved 6x faster Rust Docker builds, 3x faster Go builds, and 2x increase in PR throughput. Their CTO Jameel Al-Aziz noted: "Depot seems to have broken that formula. They said, hey, we'll make it both cheaper and faster."
Whether you're building a single application or managing infrastructure for hundreds of projects, Depot scales with your needs while maintaining the performance that keeps developers in flow state rather than waiting for builds to complete.
## AI Documentation (llms.txt)
We provide [`llms.txt`](/llms.txt) for quick navigation and [`llms-all.txt`](/llms-all.txt) for complete documentation access, both formatted in Markdown to help AI assistants better understand Depot's capabilities.
## Security
---
title: Security
ogTitle: Overview of Depot architecture and security.
description: Overview of Depot architecture and security.
---
For questions, concerns, or information about our security policies or to disclose a security vulnerability, please get in touch with us at [security@depot.dev](mailto:security@depot.dev).
## Overview
A Depot organization represents a collection of projects that contain builder VMs and SSD cache disks. These VMs and disks are associated with a single organization and are not shared across organizations.
When a build request arrives, the build is routed to the correct builder VM based on organization, project, and requested CPU architecture. Communication between the `depot` CLI and builder VM uses an encrypted HTTPS (TLS) connection.
Cache volumes are encrypted at rest using our infrastructure providers' encryption capabilities.
## Our Responsibilities
### Single-tenant Builders
A builder in Depot and its SSD cache are tied to a single project and the organization that owns it.
Builders are never shared across organizations. Instead, builds running on a given builder are connected to one and only one organization, the organization that owns the projects.
Connections from the Depot CLI to the builder VM are routed through a stateless load balancer directly to the project's builder VM and are encrypted using TLS (HTTPS).
### Physical Security
Our services and applications run in the cloud using one of our infrastructure providers, AWS and GCP. Depot has no physical access to the underlying physical infrastructure. For more information, see [AWS's security details](https://aws.amazon.com/security/) and [GCP's security details](https://cloud.google.com/docs/security/infrastructure/design).
### Data Encryption
All data transferred in and out of Depot is encrypted using hardened TLS. This includes connections between the Depot CLI and builder VMs, which are conducted via HTTPS. In addition, Depot's domain is protected by HTTP Strict Transport Security (HSTS).
Cache volumes attached to project builders are encrypted at rest using our infrastructure providers' encryption capabilities.
### Data Privacy
Depot does not access builders or cache volumes directly, except for use in debugging when explicit permission is granted from the organization owner.
Today, Depot operates cloud infrastructure in regions that are geographically located inside the United States of America as well as the European Union (if a project chooses the EU as its region).
### API Token Security
Depot supports API-token-based authentication for various aspects of the application:
- **User access tokens** are used by the Depot CLI to authenticate with Depot's internal API, access resources that the user is allowed to access based on their organization memberships and roles, and can be used to initiate a build request.
- **OIDC tokens** issued by authorized third-party services can be exchanged for temporary API tokens if the Depot project has configured a trust relationship with that third party. The ephemeral API token can only access the project(s) to which the OIDC entity was granted access. Today, Depot supports creating trust relationships with GitHub Actions, CircleCI, and Buildkite.
- **Build mTLS certificates** are used by the Depot CLI to authenticate with the builder VM — these certificates are issued for a single build in response to a successful build request and live only for the lifetime of the build.
### Software Dependencies
Depot keeps up to date with software dependencies and has automated tools scanning for dependency vulnerabilities.
### Development Environments
Development environments are separated physically from Depot's production environment.
## Your Responsibilities
### Organization Access
You can add and remove user access to your organization via the settings page. Users can have one of two roles:
- **User** — users can view all projects in your organization and run builds against any project.
- **Owner** — owners can create and delete projects, edit project settings, and edit organization settings.
We expect to expand the available roles and permissions in the future; don't hesitate to contact us if you have any special requirements.
In addition to users, Depot also allows creating trust relationships with GitHub Actions. These relationships enable workflow runs initiated in GitHub Actions to access specific projects in your organization to run builds. Trust relationships can be configured in the project settings.
### Caching and Builder Access
Access to create project builds effectively equates to access to the builder VM due to the nature of how `docker build` works. Anyone with access to build a project can access that project's build cache files and potentially add, edit, or remove cache entries. You should be careful that you trust the users and trust relationships that you have given access to a project and use tools like OIDC trust relationships to limit access to only the necessary scope.
## Depot Registry
---
title: Depot Registry
ogTitle: Overview of Depot Registry
description: Save container image builds in the Depot Registry and use them anywhere from your local machine to production environments.
---
The **Depot Registry** is a full-featured container registry for storing, managing, and distributing your Docker images. It provides a complete solution for image management throughout your development lifecycle. With Depot Registry, you can securely store your container images, easily distribute them across your infrastructure, and seamlessly integrate with your existing CI/CD pipelines.
Take a look at the [quickstart](/docs/registry/quickstart) to get started.
## How does it work?
Depot Registry provides a central repository for all your container images. Builds configured with the `--save` flag will be automatically stored in the Depot Registry and associated with your configured project. These images are securely stored and readily available to pull down for deployment to any environment, from local development to production.
Behind the scenes, Depot Registry is backed by a global CDN to distribute layer blobs efficiently, making it significantly faster to pull and push large images. This distributed architecture ensures optimal performance regardless of your geographical location.
If you want to distribute your images across multiple registries, you can use [`depot push`](/docs/cli/reference#depot-push) to push an image from your Depot Registry to another registry of your choice. When pushing an image to another registry, the transfer happens directly from the Depot infrastructure to your target registry, avoiding unnecessary downloads to your local machine and reducing data transfer times.
You can also use [`depot pull`](/docs/cli/reference#depot-pull) to download any image from your Depot Registry into your local, CI, or production environments.
To view what is in your registry, we've built out a Registry dashboard in Depot that allows you to filter and search across your images:
[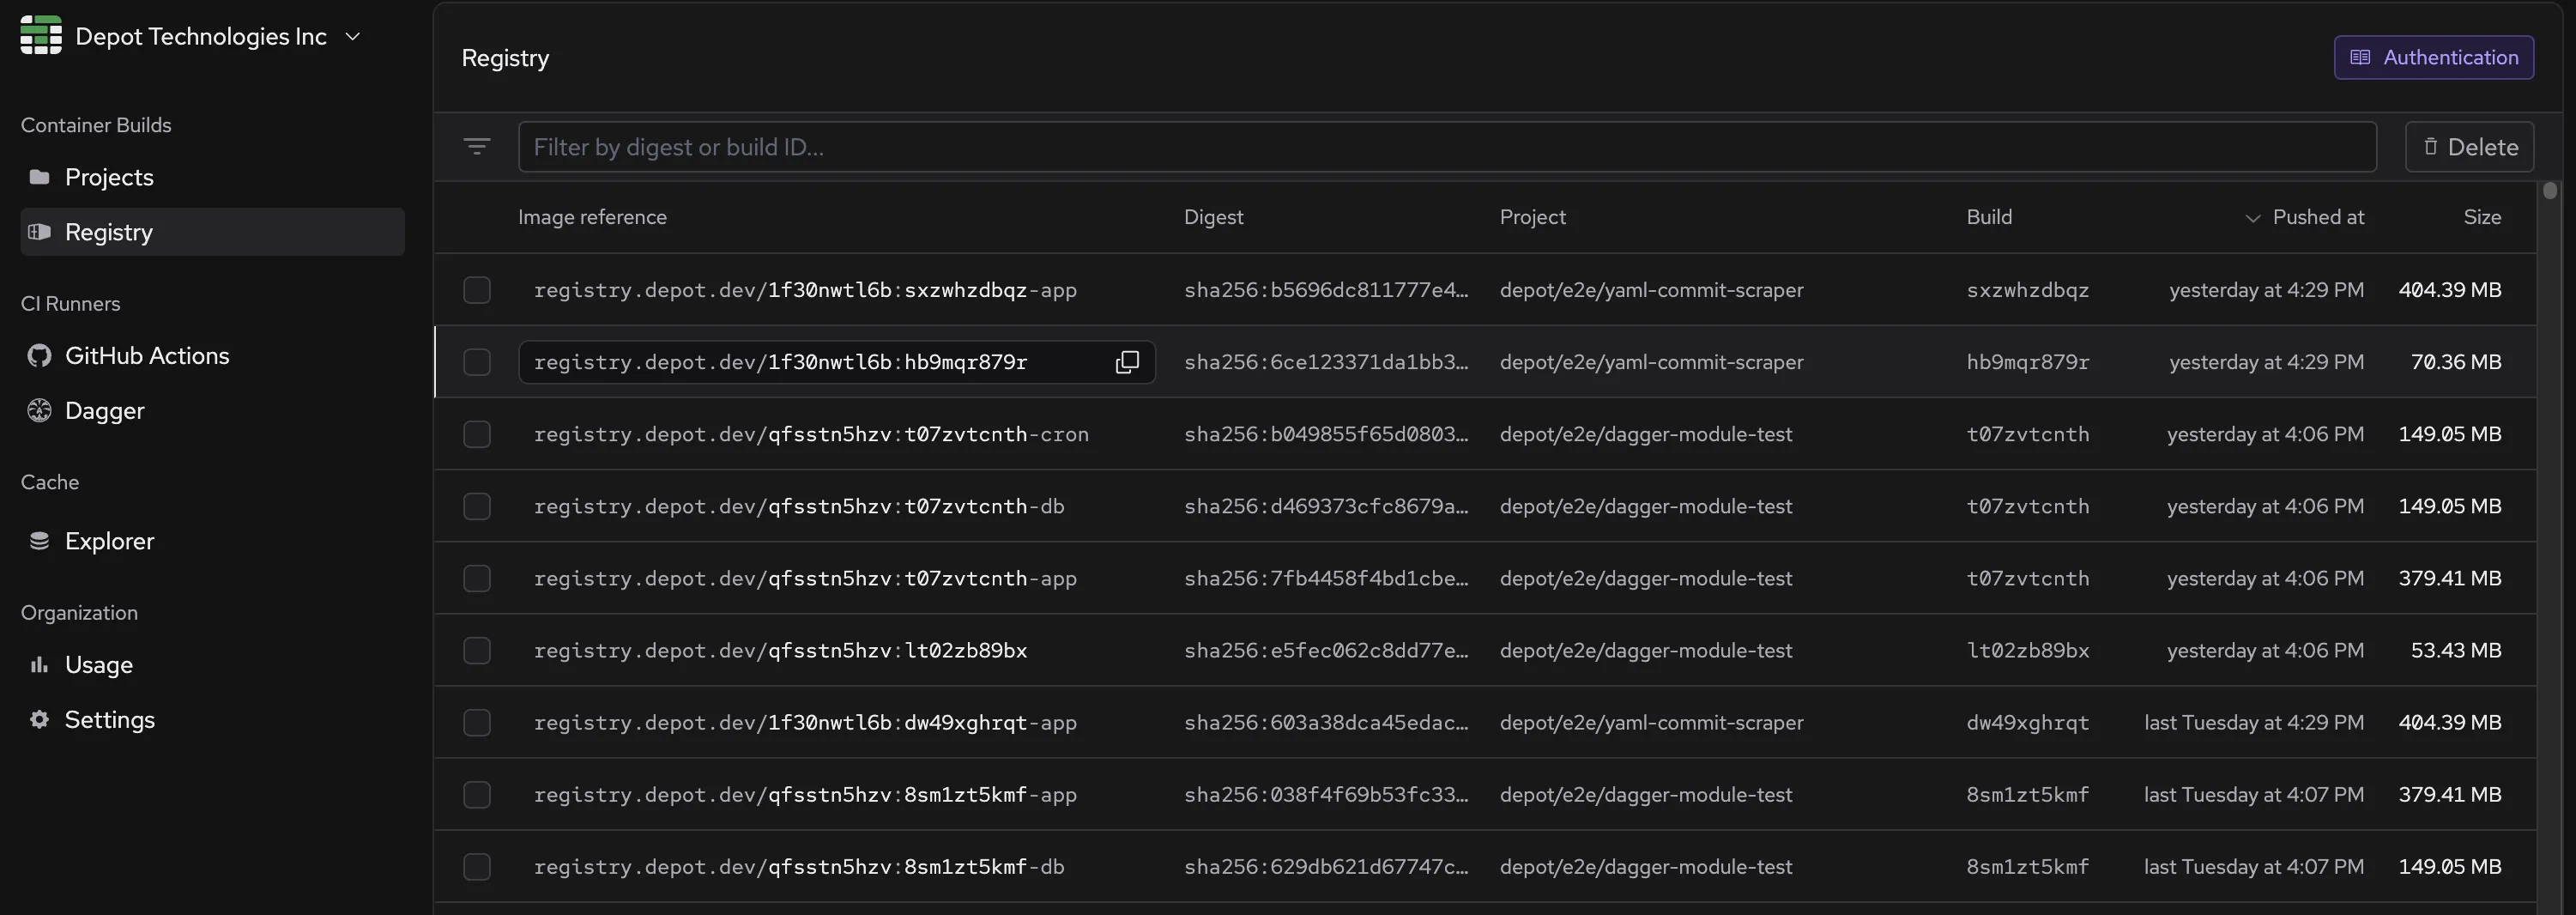](/images/docs/registry-page.webp)
## Use-cases
Depot Registry is a full-fledged registry that is directly integrated with your container image builds. You can use it for a variety of use-cases like:
- **Primary registry** - Use Depot Registry as your primary container registry for all images that you're building with our [remote container build service](/docs/container-builds/overview).
- **Integration testing a built image** - If you run a set of matrix integration tests on your final image across multiple CI workflows, registries can save you from running a build for each workflow. Instead, you can run a single build, save it in the Depot Registry, and then pull it down to each workflow to run the integration tests.
- **Local development** - Pull images directly to your local machine for testing and development. The global CDN ensures fast downloads regardless of your location.
- **Cross environment consistency** - Build your image once on Depot, save it to the registry, and then promote that image across your development, staging, and production environments without having to rebuild it.
- **Working with large images** - The layer blobs in a Docker image can be quite large when working with large images. Pulling and pushing them down from a single builder can be time-consuming. Due to its global distribution mechanism, the Depot Registry can quickly pull and push large images.
### Upcoming features
We're working on additional features for Depot Registry. If you're interested in Beta testing any of these, please reach out to us [via email](mailto:help@depot.dev) or [drop us a message in Discord](https://discord.gg/MMPqYSgDCg):
- Vulnerability Scanning - Automatically scan your images for security vulnerabilities and get detailed reports.
- Image Signing - Support for signing images to verify authenticity and integrity.
- Registry API - Comprehensive API for programmatic registry access and management.
## Pricing
Depot Registry storage costs are part of our $0.20/GB storage pricing. See our [pricing page](/pricing) for more details. We don't charge for network transfer of your images to and from Depot Registry.
## Image Retention
By default, builds saved in the Depot Registry persist for **7 days** from when they are pushed, after which they are deleted. You can configure this retention period to be longer by updating the policy on the **Project Settings** page for a project that has the registry enabled.
Possible values for the retention policy are:
- **1 day**
- **7 days** (default)
- **14 days**
- **30 days**
- **Unlimited**
[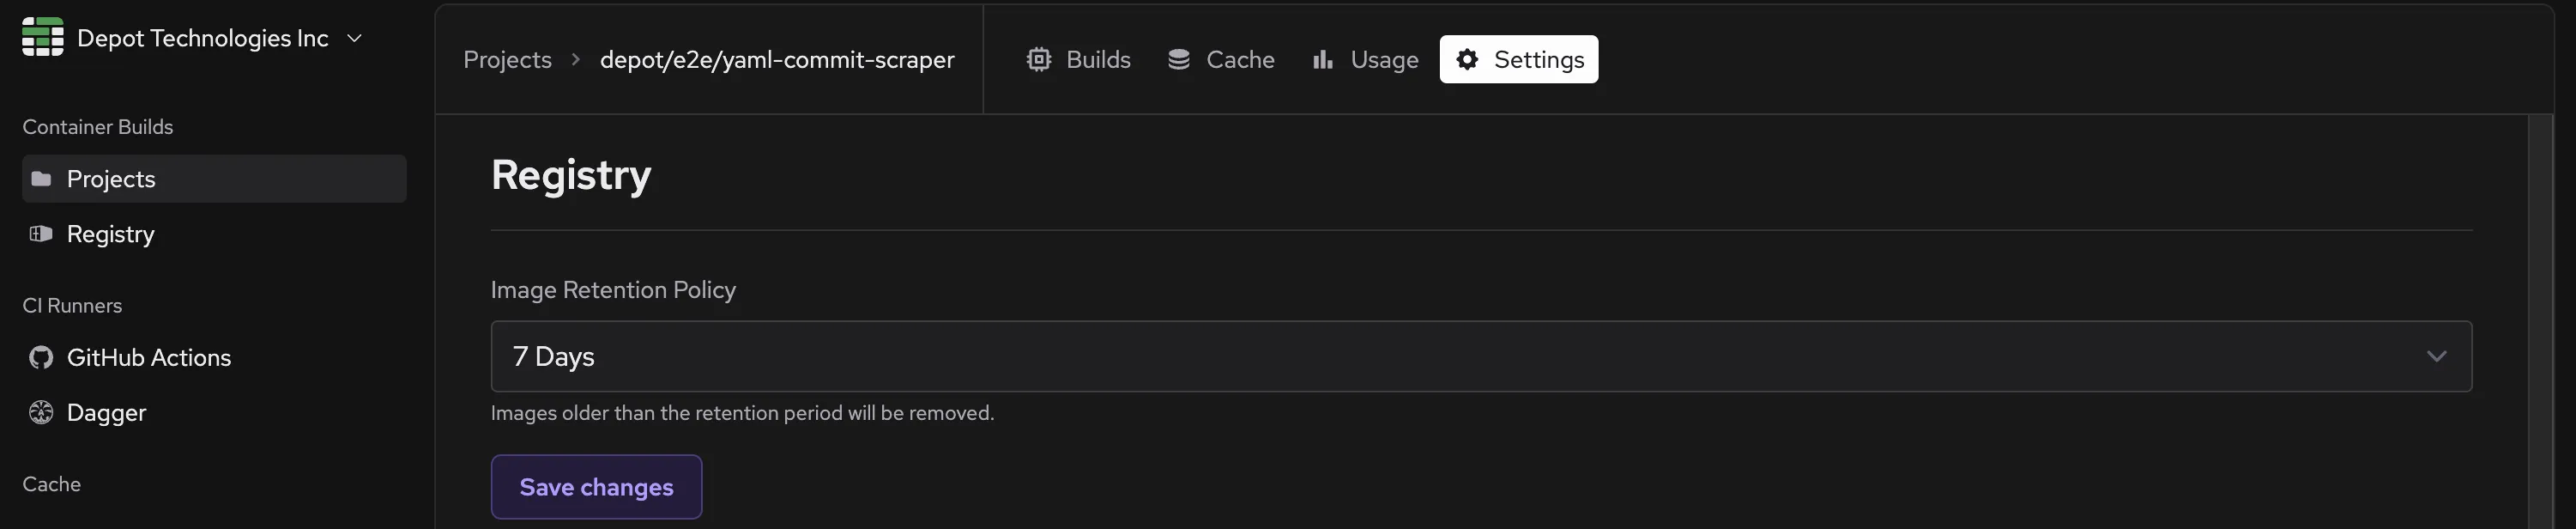](/images/docs/registry-retention.webp)
You can also individually delete images from the Depot Registry on the Registry dashboard.
[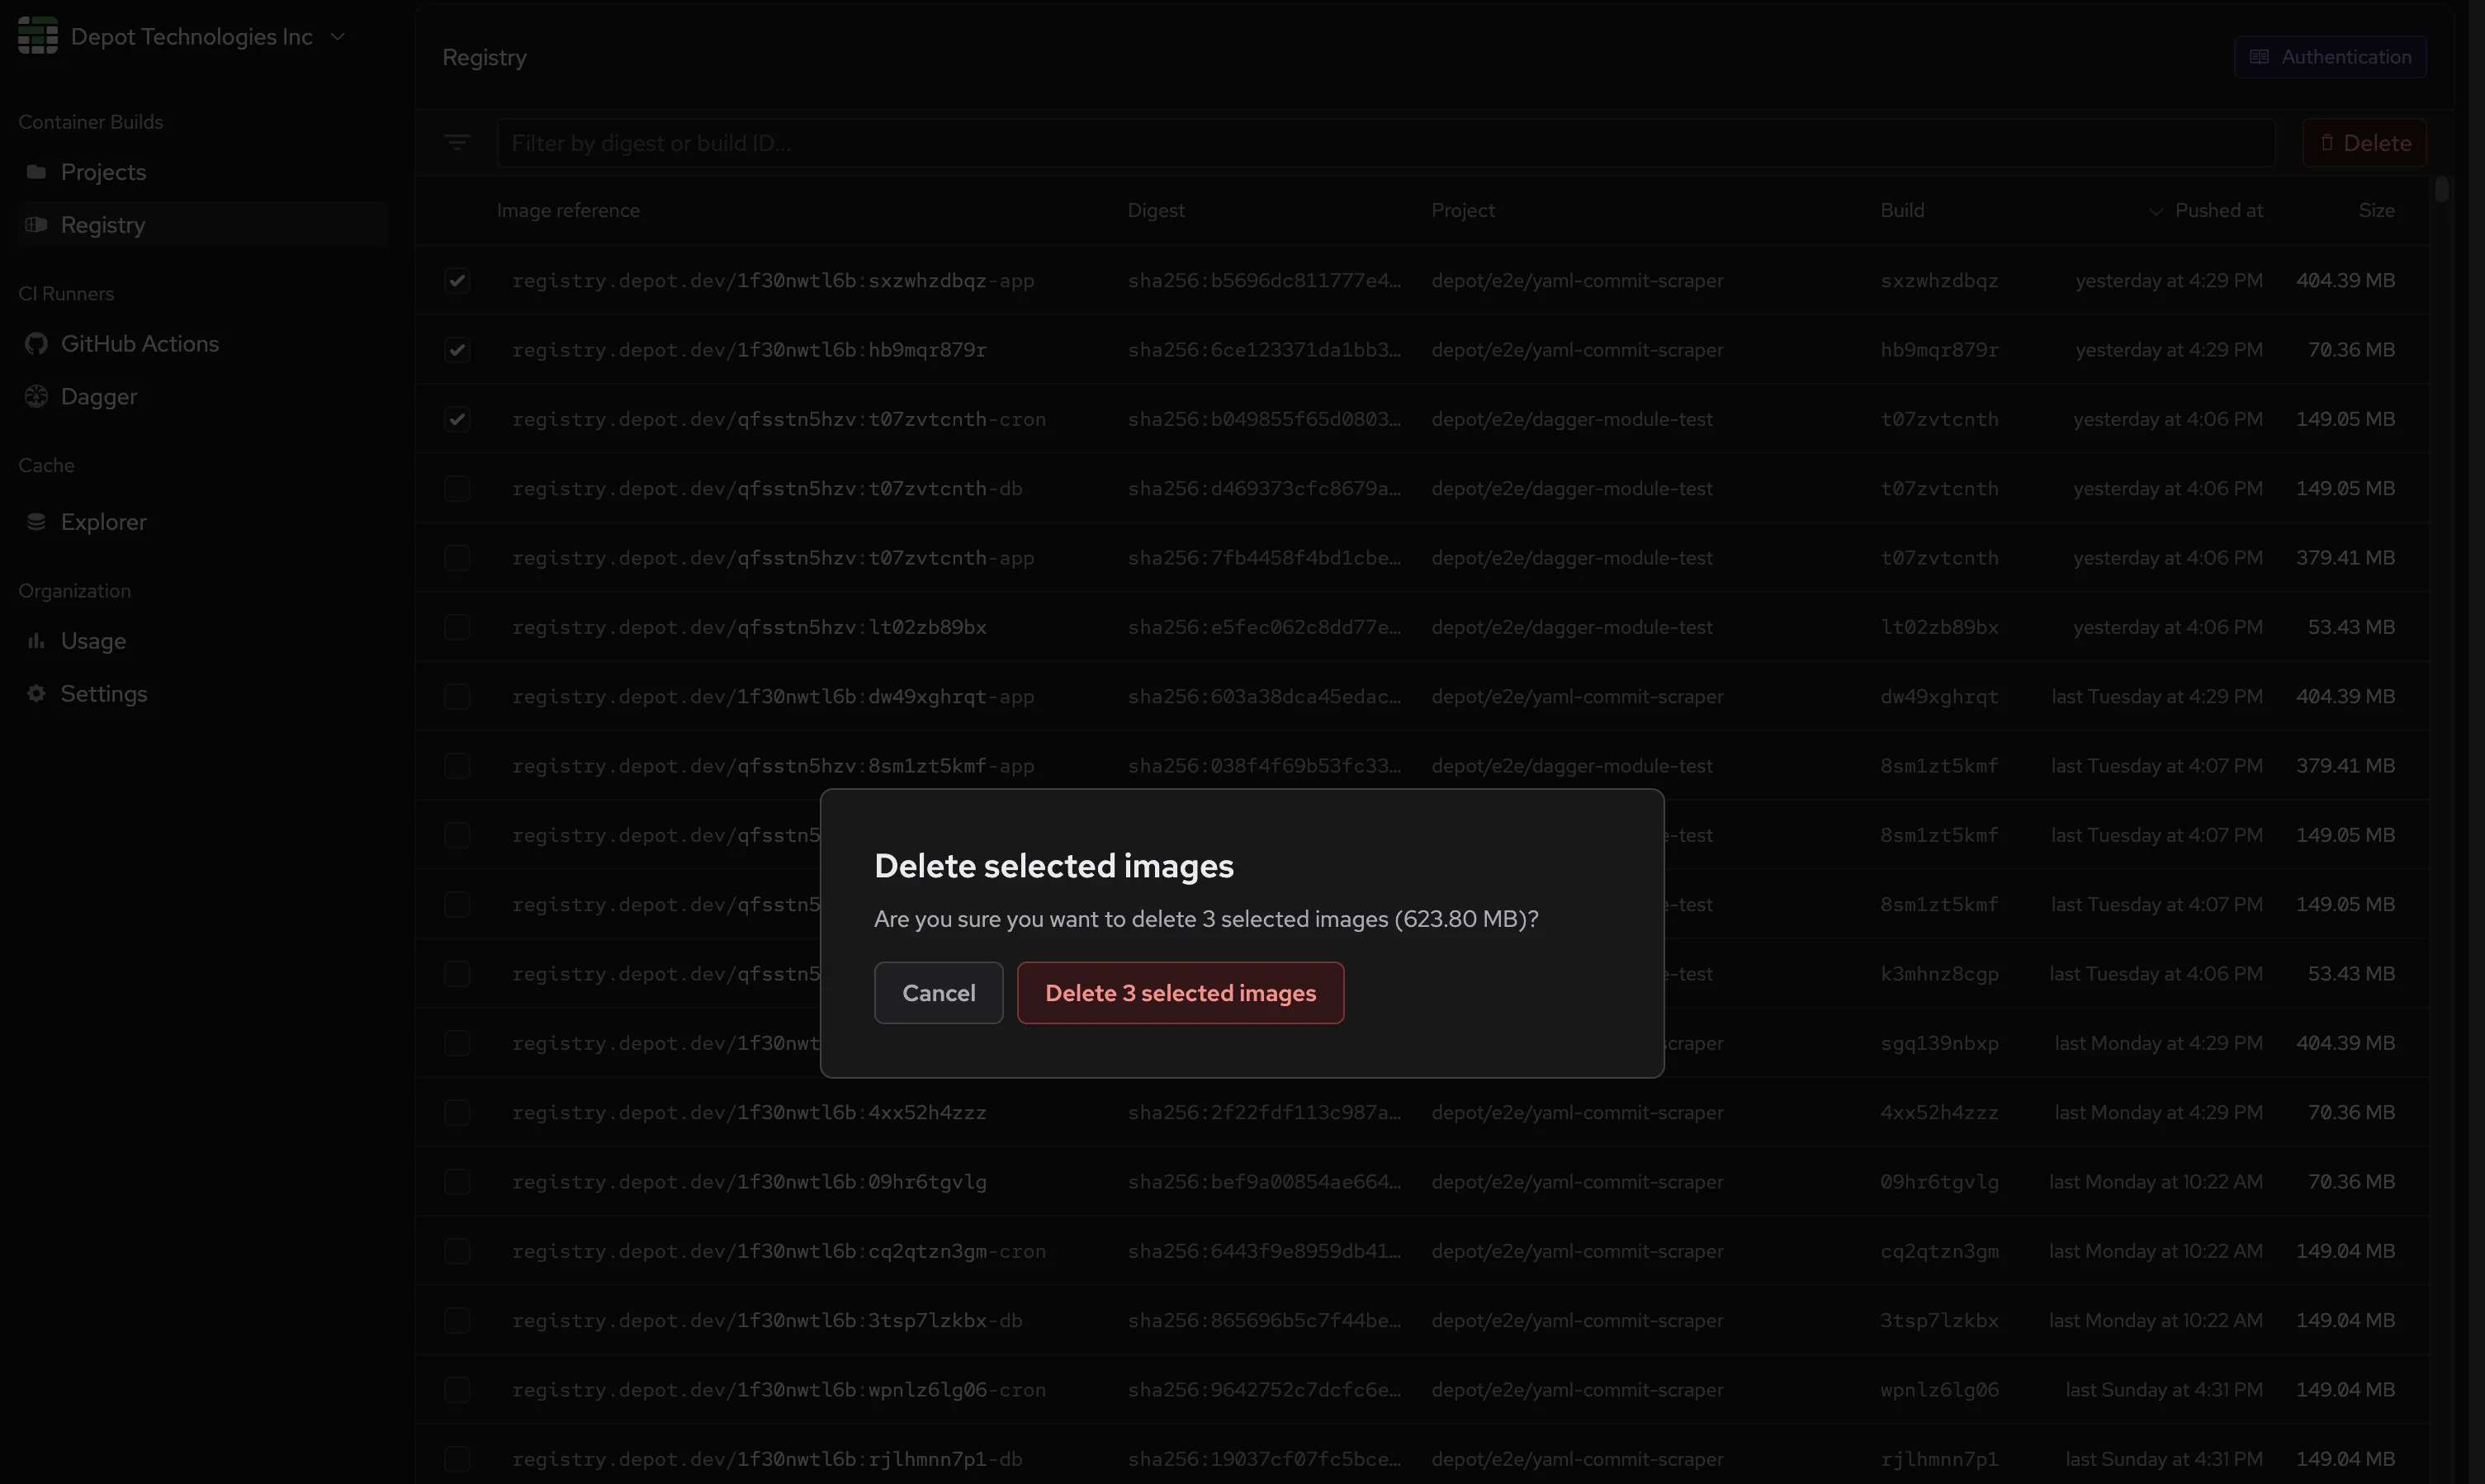](/images/docs/registry-delete.webp)
## Quickstart for Depot Registry
---
title: Quickstart for Depot Registry
ogTitle: Getting started with Depot Registry
description: Save builds in the Depot Registry, then pull them down to your local machine, Kubernetes cluster, or push them to another registry of your choosing.
---
## Saving
To save a Depot build in the Depot Registry, use the `--save` flag when running `depot build`:
```bash
depot build --save --save-tag=latest --metadata-file=build.json ...
```
The `--metadata-file` flag is optional, but it's useful for capturing the metadata about the build, such as the build ID and project ID. You can use the `buildID` property in that file to pull or push the build later.
```json
{
"depot.build": {
"buildID": "your-build-id",
"projectID": "your-project-id"
}
}
```
The `--save-tag` flag is also optional, but it's useful for saving custom tags for your builds. You can use these custom tags in place of a build ID when trying to pull down a specific build.
For example, you could pull the image by the build ID in the metadata file via the `depot pull` command:
```bash
depot pull $(cat build.json | jq -r .\[\"depot.build\"\].buildID)
```
Or you could pull the image by the custom tag you saved:
```bash
docker pull registry.depot.dev/:latest
```
Note that you'll first need to [authenticate with the Depot Registry](/docs/registry/quickstart#pulling-with-docker) before pulling the image.
If you are using GitHub Actions with the `depot/build-push-action`, you can add `save: true` as an input:
```yaml
- uses: depot/build-push-action@v1
with:
save: true
project:
```
To pull the image back or push it to another registry, you will need the build ID. The build ID is printed in the output of `depot build` and is automatically set as an output of the `depot/build-push-action`:
```yaml
- uses: depot/build-push-action@v1
id: build
with:
save: true
project:
- name: Print build ID
run: echo ${{ steps.build.outputs.build-id }}
```
## Pulling
To pull a build that has been saved in the Depot Registry, you can use the `depot pull` command with the build ID, and the `-t` flag to choose the image name/tag:
```bash
depot pull -t :
```
You can also omit the `` argument to display an interactive list of builds to choose for pulling.
### Pulling with Docker
To pull a build from the Depot Registry using the Docker CLI, you must first authenticate. You can do this by running the `docker login` command or by using any of the [other authentication methods](https://docs.docker.com/reference/cli/docker/login/).
```bash
docker login registry.depot.dev -u x-token -p
```
Learn more about Depot authentication tokens in the [authentication guide](/docs/cli/authentication).
After authenticating, you can pull the build using the `docker pull` command:
```bash
docker pull registry.depot.dev/PROJECT_ID:BUILD_ID
```
### Pulling with Kubernetes
To pull a build from the Depot Registry in a Kubernetes cluster, you can use the `kubectl` command to [create a secret with the Docker registry credentials](https://kubernetes.io/docs/tasks/configure-pod-container/pull-image-private-registry/), then create a Kubernetes deployment that uses the secret to pull the image.
```bash
kubectl create secret depot-registry regcred --docker-server=registry.depot.dev --docker-username=x-token --docker-password=
```
## Pushing
To push a build that has been saved in the Depot Registry to your own registry, you can use the `depot push` command with the build ID, and the `-t` flag to choose the image name/tag:
```bash
depot push -t :
```
Some notes:
1. Like adding the `--push` flag to `depot build`, the `depot push` command uses registry credentials stored in Docker when pushing to registries. If you have not already authenticated with your registry, you should do so with `docker login` before running `depot push`.
2. Similar to `depot pull`, you can omit the `` argument to display an interactive list of builds to choose from.
3. `depot push` will push the image to the target registry directly from the remote infrastructure, without downloading it to the CLI first, to avoid unnecessary data transfer.
### Connect to GitHub
Finally, ensure you are connected to GitHub. Under the "CI Runners" section, click on "GitHub Actions" and connect your GitHub account. You will be prompted to connect with your GitHub organization and specify all or specific repositories to enable access to Depot Runners.
## Configuration
In your GitHub Actions workflow, you can specify both the [**Depot Runner** label](/docs/github-actions/runner-types) and the **Dagger Engine** version directly in the `runs-on` key using a comma-separated format. `,dagger=`.
```yaml {6}
name: dagger
on: push
jobs:
build:
runs-on: depot-ubuntu-latest,dagger=0.18.4
steps:
- uses: actions/checkout@v4
- run: dagger -m github.com/kpenfound/dagger-modules/golang@v0.2.0 call \
build --source=https://github.com/dagger/dagger --args=./cmd/dagger \
export --path=./build
```
You can locate the latest Dagger Engine release version and all potentially breaking changes in the [Dagger Engine Changelog](https://github.com/dagger/dagger/blob/main/CHANGELOG.md).
The Dagger CLI will be available and pre-authenticated with your Dagger Cloud token. Once a Dagger request is made, Depot initializes a new Dagger project for that repository without additional configuration.
With these steps, your workflow is now ready to run on Depot’s accelerated infrastructure using Dagger and GitHub Actions.
## How does it work?
Using Dagger engines via Depot GitHub Actions Runners allows you to execute your Dagger pipelines and functions inside of a dedicated VM with a persistent NVMe device for cache storage that lives next to the GitHub Actions runners without having to do any additional configuration outside of the above.
### Architecture

The general architecture allows for fast persistent cache for your Dagger projects automatically across builds. Here is the flow of information and what happens at each step when you specify `runs-on: depot-ubuntu-latest,dagger=` in your GitHub Actions workflow:
1. The Depot control plane receives the request for your GitHub Actions job and takes note of your request for a Dagger engine as well. We launch the Dagger Engine VM at the specified version next to your GitHub Actions runner, attaching your cache volume from previous builds to that VM. We then tell the GitHub Actions runner to pre-configure the GitHub Actions environment, installing the specific `dagger` CLI version for you and point it at the Dagger Engine running next door, and automatically authenticate to your Dagger Cloud account for logs and telemetry.
2. The GitHub Actions runner starts up and runs the job, which includes the Dagger CLI. The Dagger CLI is pre-configured to use the Dagger Engine running next door, the `dagger` step is thus kicked off on the separate Dagger Engine VM with it's persistent cache. The Dagger execution runs to completion and logs + telemetry are shipped to your Dagger Cloud account.
3. The Dagger Engine VM is automatically shut down after the job completes, and the cache volume is detached from the VM and returned to Depot's control plane for future use.
4. The GitHub Actions runner completes the job and returns the results to GitHub.
## Pricing
Dagger engines accessed via our GitHub Actions Runners are charged by the build minute at $0.04/minute, in addition to the GitHub Actions Runner build time.
## Dependabot
---
title: Dependabot
ogTitle: Running Dependabot on Depot GitHub Actions Runners
description: How to configure Dependabot to run dependency updates on Depot's optimized GitHub Actions runners
---
Depot GitHub Actions runners support running Dependabot jobs, allowing your dependency update workflows to benefit from the same performance improvements as your regular workflows.
## Overview
When Dependabot is configured to run on self-hosted runners, it can automatically use Depot runners for all dependency update jobs. This provides several benefits:
- **Faster dependency resolution** - Leverage Depot's optimized CPU and memory resources
- **Private registry access** - Access dependencies from private registries within your network (e.g. via [Tailscale](/docs/integrations/tailscale))
- **Consistent infrastructure** - Use the same high-performance runners for both regular workflows and dependency updates
## Setup
To enable Dependabot on Depot runners:
### 1. Enable Dependabot on self-hosted runners
Navigate to your repository or organization settings and enable "Dependabot on self-hosted runners". This setting allows Dependabot to use your configured self-hosted runners instead of GitHub's hosted runners.
For detailed instructions, see [GitHub's documentation on enabling self-hosted runners for Dependabot updates](https://docs.github.com/en/code-security/dependabot/maintain-dependencies/managing-dependabot-on-self-hosted-runners#enabling-self-hosted-runners-for-dependabot-updates).
### 2. Configure Depot runners
Ensure your organization is already configured to use Depot runners. If not, follow our [quickstart guide](/docs/github-actions/quickstart) to set up Depot runners with your organization.
### 3. Automatic routing
Once both settings are enabled, Dependabot jobs will automatically run on `depot-ubuntu-latest` runners. No additional configuration is required.
## GitHub Actions Runner Types
---
title: GitHub Actions Runner Types
ogTitle: Types of Depot-managed GitHub Action Runners
description: Depot offers several different types of GitHub Actions runners, depending on your CI job needs.
---
Depot offers several different types of GitHub Actions runners, depending on your CI job needs. You can choose the type on a per-job basis by specifying the runner label in your `.github/workflows/*.yaml` file:
```yaml
jobs:
build:
runs-on: depot-ubuntu-24.04
```
**Note**: We support the depot-ubuntu-latest alias for depot-ubuntu-24.04 if you prefer to use an evergreen Ubuntu version.
**In-memory Disk Accelerator**:
Depot runners reserve a portion of the memory on the runner host for a disk accelerator, backed by a RAM disk. The accelerator acts as buffer between reading and writing to the root disk, which allows Actions runs to perform incredibly fast I/O operations, much quicker than the physical disk would allow.
## Intel runners
Intel runners use AMD EC2 instances. Their EBS volume is provisioned with 8000 IOPS and 250 MB/s throughput.
The following labels are available:
| Label | CPUs | Memory | Disk size | Disk accelerator size | Per-minute price | Minutes multiplier |
| :------------------------- | :--- | :----- | :-------- | :-------------------- | :--------------- | :----------------- |
| `depot-ubuntu-24.04-small` | 2 | 2 GB | 100 GB | 512MB | $0.002 | 0.5x |
| `depot-ubuntu-24.04` | 2 | 8 GB | 100 GB | 2GB | $0.004 | 1x |
| `depot-ubuntu-24.04-4` | 4 | 16 GB | 130 GB | 4GB | $0.008 | 2x |
| `depot-ubuntu-24.04-8` | 8 | 32 GB | 150 GB | 8GB | $0.016 | 4x |
| `depot-ubuntu-24.04-16` | 16 | 64 GB | 180 GB | 8GB | $0.032 | 8x |
| `depot-ubuntu-24.04-32` | 32 | 128 GB | 200 GB | 16GB | $0.064 | 16x |
| `depot-ubuntu-24.04-64` | 64 | 256 GB | 250 GB | 32GB | $0.128 | 32x |
## Arm runners
Arm runners use Graviton4 EC2 instances. Their EBS volume is provisioned with 8000 IOPS and 250 MB/s throughput.
The following labels are available:
| Label | CPUs | Memory | Disk size | Disk accelerator size | Per-minute price | Minutes multiplier |
| :----------------------------- | :--- | :----- | :-------- | :-------------------- | :--------------- | :----------------- |
| `depot-ubuntu-24.04-arm-small` | 2 | 2 GB | 100 GB | 512MB | $0.002 | 0.5x |
| `depot-ubuntu-24.04-arm` | 2 | 8 GB | 100 GB | 2GB | $0.004 | 1x |
| `depot-ubuntu-24.04-arm-4` | 4 | 16 GB | 130 GB | 4GB | $0.008 | 2x |
| `depot-ubuntu-24.04-arm-8` | 8 | 32 GB | 150 GB | 8GB | $0.016 | 4x |
| `depot-ubuntu-24.04-arm-16` | 16 | 64 GB | 180 GB | 8GB | $0.032 | 8x |
| `depot-ubuntu-24.04-arm-32` | 32 | 128 GB | 200 GB | 16GB | $0.064 | 16x |
| `depot-ubuntu-24.04-arm-64` | 64 | 256 GB | 250 GB | 32GB | $0.128 | 32x |
## Ubuntu 22.04 runners
These runners use the same instances as the Ubuntu 24.04 runners.
The following labels are available:
| Label | CPUs | Memory | Disk size | Disk accelerator size | Per-minute price | Minutes multiplier |
| :----------------------------- | :--- | :----- | :-------- | :-------------------- | :--------------- | :----------------- |
| `depot-ubuntu-22.04-small` | 2 | 2 GB | 100 GB | 512MB | $0.002 | 0.5x |
| `depot-ubuntu-22.04` | 2 | 8 GB | 100 GB | 2GB | $0.004 | 1x |
| `depot-ubuntu-22.04-4` | 4 | 16 GB | 130 GB | 4GB | $0.008 | 2x |
| `depot-ubuntu-22.04-8` | 8 | 32 GB | 150 GB | 8GB | $0.016 | 4x |
| `depot-ubuntu-22.04-16` | 16 | 64 GB | 180 GB | 8GB | $0.032 | 8x |
| `depot-ubuntu-22.04-32` | 32 | 128 GB | 200 GB | 16GB | $0.064 | 16x |
| `depot-ubuntu-22.04-64` | 64 | 256 GB | 250 GB | 32GB | $0.128 | 32x |
| `depot-ubuntu-22.04-arm-small` | 2 | 2 GB | 100 GB | 512MB | $0.002 | 0.5x |
| `depot-ubuntu-22.04-arm` | 2 | 8 GB | 100 GB | 2GB | $0.004 | 1x |
| `depot-ubuntu-22.04-arm-4` | 4 | 16 GB | 130 GB | 4GB | $0.008 | 2x |
| `depot-ubuntu-22.04-arm-8` | 8 | 32 GB | 150 GB | 8GB | $0.016 | 4x |
| `depot-ubuntu-22.04-arm-16` | 16 | 64 GB | 180 GB | 8GB | $0.032 | 8x |
| `depot-ubuntu-22.04-arm-32` | 32 | 128 GB | 200 GB | 16GB | $0.064 | 16x |
| `depot-ubuntu-22.04-arm-64` | 64 | 256 GB | 250 GB | 32GB | $0.128 | 32x |
## Windows runners
Windows runners use instances with Intel chips running Windows Server 2022. These runners don't currently have a disk accelerator (i.e. [Ultra Runners](/blog/introducing-github-actions-ultra-runners)).
The following labels are available:
| Label | CPUs | Memory | Disk size | Per-minute price | Minutes multiplier |
| :------------------------- | :--- | :----- | :-------- | :--------------- | :----------------- |
| `depot-windows-2022-small` | 2 | 2 GB | 100 GB | $0.004 | 1x |
| `depot-windows-2022` | 2 | 8 GB | 100 GB | $0.008 | 2x |
| `depot-windows-2022-4` | 4 | 16 GB | 130 GB | $0.016 | 4x |
| `depot-windows-2022-8` | 8 | 32 GB | 150 GB | $0.032 | 8x |
| `depot-windows-2022-16` | 16 | 64 GB | 180 GB | $0.064 | 16x |
| `depot-windows-2022-32` | 32 | 128 GB | 200 GB | $0.128 | 32x |
| `depot-windows-2022-64` | 64 | 256 GB | 250 GB | $0.256 | 64x |
**Note**: Windows runners don't come equipped with Hyper-v because of an AWS limitation on EC2. Therefore, if you use things that require it like `docker`, than Depot Windows Runners are unlikely to work for you.
## macOS runners
**Status: Beta**
macOS runners use instances with M2 chips running macOS 14. Their EBS volume is provisioned with 8000 IOPS and 1000 MB/s throughput. Like the Linux runners, the macOS runners also have a disk accelerator.
**Note**: These runners are only available on the [Startup plan](/pricing) during beta.
The following labels are available:
| Label | CPUs | Memory | Disk size | Per-minute price |
| :------------------- | :--- | :----- | :-------- | :--------------- |
| `depot-macos-latest` | 8 | 24 GB | 150GB | $0.08 |
| `depot-macos-14` | 8 | 24 GB | 150GB | $0.08 |
## Billing
Note that on your Billing summary, costs are broken down by `Billed minutes` and `Elapsed minutes`. Here are several things to know about the difference:
- `Elapsed minutes` is the clock time spent executing your jobs.
- `Billed minutes` multiples the `Minutes multiplier` (from the table above) by the `Elapsed minutes`.
- The rate at which `Billed minutes` accumulates is based on the size of the `Minutes multiplier`.
- What you pay is the total `Billed minutes` minus the included minutes of your plan.
## What software and tools are included?
If you'd like to see what tools and software are installed in each runner image, please see the links to the `README` in GitHub's repository:
- [`depot-ubuntu-24.04`](https://github.com/actions/runner-images/blob/main/images/ubuntu/Ubuntu2404-Readme.md) and `depot-ubuntu-latest`
- [`depot-ubuntu-22.04`](https://github.com/actions/runner-images/blob/main/images/ubuntu/Ubuntu2204-Readme.md)
- [`depot-macos-14`](https://github.com/actions/runner-images/blob/main/images/macos/macos-14-Readme.md) and `depot-macos-latest`
- [`depot-windows-2022`](https://github.com/actions/runner-images/blob/main/images/windows/Windows2022-Readme.md)
_Note: We do our best to keep our images in sync with GitHub's, but there may be a slight delay between when GitHub updates their images and when we update ours. If you need a specific version of a tool or software, please check the links above to see if it's available in the image you're using._
## Tailscale
---
title: Tailscale
ogTitle: Tailscale
description: Learn how to connect Depot to your Tailscale tailnet to enable secure access to private services.
---
[Tailscale](https://tailscale.com/) is a zero-config VPN that connects your devices, services, and cloud networks to enable secure access to resources on any infrastructure.
By connecting Depot to your Tailscale network, you can enable secure access to private services, such as databases, within your tailnet without opening up those services to the public internet and without maintaining static IP allow lists.
Using Tailscale, Depot GitHub Actions runners and container builders join your tailnet as [ephemeral nodes](https://tailscale.com/kb/1111/ephemeral-nodes), and you can control their access to the rest of your infrastructure using Tailscale ACLs.
## Connecting Depot to your tailnet
Connecting your Depot organization to a Tailscale tailnet is a three-step process:
1. Configure your Tailnet ACLs to define a tag for your Depot runners
2. Generate new OAuth client credentials using this new tag
3. Configure your Depot organization to use those OAuth client credentials
### Step 1: Create a new tag in your Tailnet ACLs
First, you will need to create a tag that will be assigned to all Depot runners. [Tailscale tags](https://tailscale.com/kb/1068/tags) are used by Tailscale to group non-user devices, such as Depot runners, and let you manage access control policies based on these tags.
We recommend creating a new tag named `tag:depot-runner` for this purpose. This tag will later be used in your ACL rules to determine what Depot runners should have access to.
In your Tailscale [admin console](https://login.tailscale.com/admin/acls/file) access controls, [define a new tag under `tagOwners`](https://tailscale.com/kb/1337/acl-syntax#tag-owners):
```json
{
"tagOwners": {
"tag:depot-runner": ["group:platform-team"]
}
}
```
### Step 2: Generate a new OAuth client
Next, [generate a new OAuth client](https://login.tailscale.com/admin/settings/oauth) from your tailnet's settings. This client can be given a descriptive name and should be granted Write access to the `Keys > Auth Keys` scope. You should select the tag you created in the previous step as chosen tag for this scope:

You will be given a client ID and client secret that you can use in the next step.
### Step 3: Configure Depot to use the new OAuth client
Finally, you will need to configure your Depot organization to use the new OAuth client credentials. From your organization settings page, navigate to the Tailscale section and click **Connect to Tailscale**. Enter the client ID and secret from the previous step and click **Connect**:

Your Depot organization is now connected to your Tailscale tailnet. Depot runners and container builders will now join your tailnet as [ephemeral nodes](https://tailscale.com/kb/1111/ephemeral-nodes), using the tag you have created.
## Granting access to private services
Now that your Depot runners are connected to your tailnet, you can use Tailscale ACLs to control their access to the rest of your infrastructure. Depot runners will be [tagged](https://tailscale.com/kb/1068/tags) with your chosen tag, which you can then reference in your ACL rules.
For example, you can grant your Depot runners access to a private database service by creating a new [ACL rule](https://tailscale.com/kb/1337/acl-syntax#access-rules) in the [admin console](https://login.tailscale.com/admin/acls/file):
```json
{
"acls": [{"action": "accept", "src": ["tag:depot-runner"], "dst": ["database-hostname"]}]
}
```
Using [Tailscale subnet routers](https://tailscale.com/kb/1019/subnets), you can additionally grant your Depot runners access to entire subnets in any cloud provider VPC or on-premises network.
```json
{
"acls": [{"action": "accept", "src": ["tag:depot-runner"], "dst": ["192.0.2.0/24:*"]}]
}
```
## Disconnecting from Tailscale
If you wish to disconnect your Depot organization from Tailscale, navigate to the Tailscale section in your organization settings and click **Disconnect from Tailscale**. This will remove the OAuth client credentials from your organization and your Depot runners will no longer join your tailnet as ephemeral nodes:

Note: disconnecting prevents new Depot runners from joining your tailnet. Any in-flight Actions jobs or container builds will remain connected until they complete. To immediately disconnect any running jobs, you can remove any of the connected nodes from your [Tailscale admin console](https://login.tailscale.com/admin/machines).
## Depot Managed on AWS
---
title: Depot Managed on AWS
ogTitle: Deploying Depot Managed on AWS
description: Depot Managed allows you to deploy the Depot data plane in your own AWS account. This provides data residency, compliance, and cost control benefits.
---
With Depot Managed on Amazon Web Services (AWS), the Depot data plane is deployed within an isolated sub-account of your AWS organization. You can use the Depot CLI, web application, and API, but the underlying build compute and cache infrastructure reside entirely within your own AWS account.
## Architecture
[](/images/self-hosted-architecture.png)
## Setup and Usage
**NOTE:** This guide is intended for Depot customers who are working with the Depot team, you cannot deploy Depot Managed on AWS without it being enabled for your Depot organization. [Contact us](mailto:contact@depot.dev) if you are interested in using Depot Managed.
### Step 1: Create a dedicated sub-account
Depot Managed requires the use of a dedicated sub-account within your AWS organization. This should be a new account containing no other resources or services.
Follow the [AWS documentation](https://docs.aws.amazon.com/organizations/latest/userguide/orgs_manage_accounts_create.html#orgs_manage_accounts_create-new) to create a new account within your organization.
### Step 2: CloudFormation stack deployment
Once you have created a new sub-account, you can deploy the following CloudFormation template to provision the required IAM permissions in the AWS sub-account. First, save the following as a file named `depot-managed-bootstrap.json`:
```json
{
"Resources": {
"GrantProvisionerAccess": {
"Type": "AWS::IAM::Role",
"DeletionPolicy": "Retain",
"Properties": {
"RoleName": "DepotProvisioner",
"ManagedPolicyArns": ["arn:aws:iam::aws:policy/AdministratorAccess"],
"AssumeRolePolicyDocument": {
"Statement": [
{
"Action": ["sts:AssumeRole"],
"Effect": "Allow",
"Principal": {
"AWS": [
"arn:aws:iam::375021575472:role/aws-reserved/sso.amazonaws.com/AWSReservedSSO_Provisioner_572dd0a52dd9fc8e"
]
}
}
]
}
}
},
"GrantOpsAccess": {
"Type": "AWS::IAM::Role",
"DeletionPolicy": "Retain",
"Properties": {
"RoleName": "DepotOps",
"ManagedPolicyArns": ["arn:aws:iam::aws:policy/AdministratorAccess"],
"AssumeRolePolicyDocument": {
"Statement": [
{
"Action": ["sts:AssumeRole"],
"Effect": "Allow",
"Principal": {
"AWS": [
"arn:aws:iam::375021575472:role/aws-reserved/sso.amazonaws.com/AWSReservedSSO_Ops_e45adfee11ab7421"
]
}
}
]
}
}
}
}
}
```
Next, deploy the CloudFormation stack in the new sub-account:
```bash
aws cloudformation create-stack \
--stack-name depot-managed-bootstrap \
--template-body file://depot-managed-bootstrap.json \
--capabilities CAPABILITY_NAMED_IAM
```
### Step 3: Notify Depot
Finally, let the Depot team know that the CloudFormation stack has been deployed, and they will initiate the deployment of the Depot data plane into the new sub-account.
The Depot team will additionally work with you on any follow-up steps, including:
- AWS quota increases to match your expected usage
- Configuring KMS keys for encryption
- Configuring S3 buckets for cache storage
- Configuring VPC peering for private networking
- Configuring AWS PrivateLink for secure API access
- Enabling enforced usage of Depot Managed in your Depot organization
## Additional questions
If you have any questions, please [contact us](mailto:contact@depot.dev), and we'll be happy to help.
## Depot Managed Overview
---
title: Depot Managed Overview
ogTitle: Overview of Depot Managed
description: Depot Managed allows you to deploy the Depot data plane in your own AWS account. This provides data residency, compliance, and cost control benefits.
---
With Depot Managed, the Depot data plane can be deployed in your own Amazon Web Services (AWS) account. You can still use the Depot CLI, web application, and API, however the underlying build compute and cache data reside entirely within your own cloud account.
_We are considering support for additional cloud providers like Google Cloud (GCP) in the future. If you are interested in this, please [let us know](mailto:help@depot.dev)._
## How Depot Managed works
Depot Managed is the entirety of the Depot [data plane](https://en.wikipedia.org/wiki/Forwarding_plane#Data_plane), deployed in a single-tenant isolated sub-account within your AWS organization. Once deployed, you have the option of using Depot Managed with some or all of your Depot organization's projects. You will continue to use the same Depot CLI and web application, but the CLI will communicate directly with the compute and cache infrastructure running in your AWS account.
If you are an existing Depot user, moving to a Depot Managed deployment requires no changes to your existing developer workflows or CI pipelines.
Depot Managed is still a fully managed service and comes with the full support and SLA of the Depot Business plan. The Depot team is on-call for any issues that arise with the Depot Managed deployment.
For more information, see:
- [Depot Managed on AWS](/docs/managed/on-aws)
## Benefits of Depot Managed
Depot Managed comes with a few key benefits:
- **Data residency**: All build data and cache data reside within your own cloud account, ensuring that you have full control over your data.
- **Compliance**: For organizations that have strict compliance requirements.
- **VPC peering & IAM**: You can configure VPC peering and IAM roles to allow the Depot data plane to access your private cloud resources.
- **AWS PrivateLink**: You can use AWS PrivateLink to keep all communication between the Depot data plane and control plane within the AWS network.
- **Cost control**: You can take advantage of any existing cloud discounts or credits you have, and you can control the size and type of instances used for builds.
- **GPU support**: If you have GPU capacity in your AWS account, you can use it to accelerate AI/ML and GPU-intensive workflows.
- **AWS Marketplace**: You can pay for Depot Managed through the AWS Marketplace and take advantage of any existing AWS billing arrangements you have.
## How to get started
Depot Managed is available on the Depot Business plan. If you are interested in Depot Managed, please [contact us](mailto:contact@depot.dev) to chat with us and see if Depot Managed is a good fit for your organization.
## Using GPUs with Depot Managed
---
title: Using GPUs with Depot Managed
ogTitle: Using GPUs with Depot Managed
description: With Depot Managed you can use your own AWS account to run builds with GPUs. This guide explains how to set up Depot Managed to use GPUs.
---
Depot Managed allows you to leverage your own GPU resources on AWS to accelerate AI/ML and GPU-intensive GitHub Actions workflows. If you have GPU capacity in your AWS account, we’ll collaborate with you to create a custom runner AMI, finely tuned to meet your specific GPU needs.
## Steps to Enable GPU Support
1. **Become a Depot Managed User:** Run the Depot data plane in your own AWS account by joining Depot Managed. If you are not already a Depot Managed user, you can [contact us](mailto:contact@depot.dev) to get started.
1. **Verify GPU Capacity Access:** Confirm that your AWS account has the necessary permissions and capacity to launch GPU instances. You can check your available instance types through the AWS Management Console.
1. **Contact the Depot Team:** Existing Depot Managed users can reach out to the Depot support team at [contact@depot.dev](mailto:contact@depot.dev) to request a GPU-accelerated AMI. Provide details about the types of GPU instances you plan to use and any specific requirements for your builds.
1. **AMI Deployment:** Once your request is processed, the Depot team will build and deploy a custom AMI to your Depot Managed environment. You will receive confirmation once the AMI is available for use.
1. **Monitoring and Optimization:** Monitor your builds to ensure that they are performing as expected with GPU support. We'll be available to assist with any questions or requests.
## Run Depot Managed GPU Accelerated Workflows
If your projects require GPU support, we’re here to assist. When joining Depot Managed, let us know about your GPU requirements. For existing users, you can request GPU support by contacting our team at [contact@depot.dev](mailto:contact@depot.dev). We will collaborate with you to create a custom Depot runner AMI that includes the necessary GPU drivers and any other components tailored to your needs.
Once your GPU-accelerated environment is ready, we’ll provide you with a unique label to use in your GitHub Actions workflows. This will allow you to leverage GPU-accelerated instances. Here’s an example of how to incorporate this into your workflow:
```yaml
jobs:
python-job:
runs-on: # Use the GPU label provided by Depot
steps:
- uses: actions/checkout@v4
- uses: actions/setup-python@v5
with:
python-version: '3.9'
cache: 'pip' # caching pip dependencies
- run: pip install -r requirements.txt
```
## Additional questions
If you have any questions, please [contact us](mailto:contact@depot.dev), and we'll be happy to help.
## Core Concepts
---
title: Core Concepts
ogTitle: Core Concepts of Depot
description: Learn about the fundamental concepts that Depot is built on for faster Docker image builds.
---
## Organizations
Everything you do in Depot is within the context of an organization. An organization typically represents a single company or team. Billing is on a per-organization basis.
## GitHub Connection
Depot organizations can be connected to GitHub organizations in order to use [Depot GitHub Actions Runners](/docs/github-actions/overview). This allows Depot runners to be used GitHub Actions workflows and jobs to accelerate your entire CI/CD pipeline.
## Projects
Projects are used for our [remote container builds](/docs/container-builds/overview). A project is a cache namespace that is isolated from other projects. You can use a single namespace for a single git repository or Dockerfile or one namespace for multiple git repositories or Dockerfiles.
Projects are created within an organization and are used to store the Docker layer cache for your Docker image build on a per architecture basis.
### Cache Storage Policy
A cache storage policy is specified per project. It defines how much cache to keep for each architecture you build. When the cache goes beyond that size, the oldest cache entries are deleted. The default cache storage policy is 50 GB, but is configurable up to 500 GB.
## Builds
A build in Depot is a Docker image build. When you run `depot build` your build context is sent to a remote builder running BuildKit. BuildKit performs the build and sends the resulting image back to your machine or a remote registry based on the options you passed with the build command. The resulting cache from the build is stored in the project's persistent cache and is available to all subsequent builds by users or CI providers.
Depot can build images on both `x86` or `arm` machines supporting the following platforms:
- `linux/amd64`
- `linux/arm64`
- `linux/arm/v6`
- `linux/arm/v7`
- `linux/386`
## Jobs
A job in Depot is considered to be a GitHub Actions job. When you run a GitHub Actions job with a `runs-on` label like `depot-ubuntu-latest`, the job is run on a Depot runner. All of the steps for that job will execute on the Depot-managed GitHub Actions Runner. You must have an active [GitHub connection configured](/docs/github-actions/quickstart#connect-to-github) in order to access Depot runners.
## Cloud Connections
A cloud connection links your AWS cloud account and your Depot organization. With a cloud connection configured, you can choose to have a given Depot project launch builders in your cloud instead of ours.
We currently only support cloud connections for **AWS** and you must be on a **Business** plan to use this feature.
## Frequently Asked Questions
---
title: Frequently Asked Questions
ogTitle: Frequently Asked Questions
description: Got a question about how to use Depot? We have answers here.
---
## Common Container Builds questions
### How many builds can a project run concurrently?
You can run as many builds concurrently as you want against a single Depot project.
### How do I use Depot with `docker-compose`?
You can use [`depot bake -f docker-compose.yml`](/docs/cli/reference#depot-bake) to build all of the images in your Compose file and then use `docker-compose up` to run the resulting images.
### How do you authenticate with Depot?
We have all our authentication options documented for `depot` in our [CLI authentication documentation](/docs/cli/authentication).
### How do I push my images to a private registry?
You can use the `--push` flag to push your images to a private registry. Our `depot` CLI uses your local Docker credentials provider. So, any registry you've logged into with `docker login` or similar will be available when running a Depot build. See our guide on [private registries](/docs/container-builds/how-to-guides/private-registries) for more details.
### Can I build Docker images for M1/M2 Macs?
Yes! Depot supports native Arm container builds out of the box. We detect the architecture of the machine requesting a build via `depot build`. If that architecture is Arm, we route the build to a builder running Arm natively. You can build Docker images for M1/M2 Macs and run the resulting image immediately, as it is made specifically for your architecture. See our documentation on [Arm containers](/docs/container-builds/how-to-guides/arm-containers) for more details.
### Can I build multi-platform Docker images?
Yes! Check out our [integration guide](/docs/container-builds/how-to-guides/arm-containers#what-about-multi-architecture-containers) on how we do it.
### How should I use Depot with a monorepo setup?
If you're building multiple images from a single monorepo, and the builds are lightweight, we tend to recommend using a single project. But we detail some other options in our [monorepo guide](/blog/how-to-use-depot-in-monorepos).
### Can I use Depot with my existing `docker build` or `docker buildx build` commands?
Yes! We have a [`depot configure-docker`](/docs/cli/reference#depot-configure-docker) command that configures Depot as a plugin for the Docker CLI and sets Depot as the default builder for both `docker build` and `docker buildx build`. See our [`docker build` guide](/docs/container-builds/how-to-guides/docker-build) for more details.
### What are these extra files in my registry?
Registries like Amazon Elastic Container Registry (ECR) and Google Container Registry (GCR) don't accurately display provenance information for a given image. Provenance is a set of metadata that describes how an image was built. This metadata is stored in the registry alongside the image. It's enabled by default in `docker build` and thus by default in `depot build` as well.
If you would like to clean up the clutter, you can run your build with `--provenance=false`:
```shell
depot build -t --push --provenance=false .
```
### Does Depot support building images in any lazy-pulling compatible format? e.g. estargz, nydus or others?
Depot supports building images in any lazy-pulling compatible format. You can build an estargz image by setting the `--output` flag at build time:
```shell
depot build \
--output "type=image,name=repo/image:tag,push=true,compression=estargz,oci-mediatypes=true force-compression=true" \
.
```
### Does Depot supporting building images with ztsd compression?
Depot supports building images with `zstd` compression, a popular compression format to help speed up the launching of containers in AWS Fargate and Kubernetes. You can build an image with zstd compression by setting the `--output` flag at build time:
```shell
depot build \
--output type=image,name=$IMAGE_URI:$IMAGE_TAG,oci-mediatypes=true,compression=zstd,compression-level=3 force-compression=true,push=true \
.
```
### What is an ephemeral build?
We label builds as `ephemeral` when they are launched by GitHub Actions for an open-source pull request. It is a build that did not have access to read from or write to the project cache, to prevent untrusted code from accessing sensitive data.
## Common GitHub Actions questions
### How does Depot integrate with GitHub Actions?
Depot offers managed GitHub Actions runners that can make your workflows up to 3x faster. Our Ultra Runners provide faster compute, 10x faster caching, and support for various runner types including macOS, ARM, and Intel runners.
### What are the benefits of using Depot's GitHub Actions runners?
Depot's GitHub Actions runners offer several advantages:
1. Faster compute: Up to 3x faster than standard GitHub-hosted runners.
2. 10x faster caching: Integrated with Depot's cache orchestration system.
3. Cost-effective: Half the cost of GitHub-hosted runners, billed by the second.
4. Variety of runner types: Support for Intel, ARM, macOS, and even GPU-enabled runners.
5. No concurrency limits: Run as many jobs as you want in parallel.
### How do I start using Depot's GitHub Actions runners?
To use Depot's GitHub Actions runners, you need to:
1. Connect your GitHub organization to Depot.
2. Use the Depot label in your workflow file.
For example, change:
```yaml
runs-on: ubuntu-22.04
```
to:
```yaml
runs-on: depot-ubuntu-22.04
```
### What runner types does Depot offer?
We offer a variety of runner types, including:
- Ubuntu runners (from 2 vCPUs/2 GB RAM to 64 vCPUs/256 GB RAM)
- macOS runners
- ARM runners
- Intel runners
- GPU-enabled runners (only available on the Business plan)
### How does Depot's pricing work for GitHub Actions?
Depot runners are half the cost of GitHub-hosted runners. Each plan comes with a set of included minutes as follows:
- Developer plan: 2,000 minutes included
- Startup plan: 20,000 minutes included, $0.004/minute after
- Business plan: Custom minute allocation
Pricing is based on a per-minute basis, tracked per second, with no enforced one-minute minimum.
### Can I use Depot's GitHub Actions runners with my existing workflows?
Yes, you can easily integrate our runners into your existing GitHub Actions workflows. Simply change the `runs-on` label in your workflow file to use a Depot runner.
### How does Depot's caching system work with GitHub Actions?
Our high-performance caching system is automatically integrated with our GitHub Actions runners. It provides up to 10x faster caching speeds compared to standard GitHub-hosted runners, with no need to change anything in your jobs.
### How can I track usage of Depot's GitHub Actions runners?
We provide detailed usage analytics for GitHub Actions inside of your Organization Usage page. You can track minutes used, job durations, and other metrics across your entire organization.
## Introduction
---
title: Introduction
ogTitle: What is Depot?
description: Depot is a build acceleration platform that makes your entire workflow exponentially faster — from up to 40x faster Docker builds and 10x faster GitHub Actions Runners to accelerated remote caching for Bazel, Gradle, Turborepo, sccache, and more.
---
Welcome to Depot!
Depot is a build acceleration platform focused on making builds exponentially faster. You can use Depot to make everything run faster, from your Docker image build to your E2E test suite in GitHub Actions.
Depot is a build acceleration platform that makes your entire development workflow exponentially faster. Whether you're building Docker images, running CI/CD pipelines in GitHub Actions, executing test suites in Go, or developing locally, Depot accelerates every part of your development process — from individual builds that finish in seconds to complete deployment workflows that run 10x faster.
## What problem is Depot solving?
Slow development workflows drain productivity and happiness. Waiting for builds, tests, and deployments forces constant context switching, slows down feedback loops, and ultimately burns through engineering time and resources that should be spent building great products.
We are developers ourselves, and we've experienced the frustration of waiting minutes or hours for builds to complete, watching CI pipelines crawl through test suites, and dealing with the complexity of setting up efficient caching across different tools. Modern development tools and CI providers simply don't prioritize performance at the level teams need. So, we built the build acceleration platform we've always wanted — one that makes everything exponentially faster with as little work as possible.
## Who is Depot for?
Depot is built for any team that wants to move faster and waste less time waiting. Whether you're a DevOps Engineer optimizing CI/CD pipelines, a Platform Engineer building developer tools, a Developer who wants faster local builds, an Engineering Manager looking to improve team velocity, or any other role focused on shipping software efficiently — Depot can accelerate your workflows and give you back hours of productive time every week.
## How does Depot work?
We have five integrated products that work together or independently to make your development workflows exponentially faster.
### Remote container builds
Our remote container builds run an optimized version of BuildKit that can make your Docker image builds up to 40x faster. We support native multi-platform builds for both Intel & Arm without emulation, provide persistent shared cache that's instantly available across your team, and free up your local machine's resources by running builds on powerful remote infrastructure.
[Learn more about remote container builds](/docs/container-builds/overview)
### Global container registry
Depot Registry is a high-performance, globally-distributed container registry with CDN-backed image delivery. Built for speed and reliability, it ensures your container images are available instantly anywhere your applications deploy, reducing pull times and improving deployment speed. Our container registry integrates seamlessly with our remote container builds, so you can push and pull images without any additional configuration.
[Learn more about Depot Registry](/docs/registry/overview)
### Faster GitHub Actions Runners
Depot-managed GitHub Actions Runners bring our acceleration tech and expertise to your entire CI/CD workflow with up to 3x faster runners with 30% faster CPUs, 10x faster networking and caching, and unrestricted concurrency at half the cost of GitHub-hosted runners (**with true per second billing**). Our runners integrate seamlessly with our cache orchestration system, so you get dramatically faster caching without changing your existing workflows.
[Learn more about GitHub Actions Runners](/docs/github-actions/overview)
### Universal build cache
Depot Cache provides high-performance remote caching for development tools including Bazel, Go, Gradle, Turborepo, sccache, and Pants. Share build artifacts and test results across your entire team and CI environment, making builds incremental and achieving 2x to 20x speed improvements. The cache is instantly accessible from local development, any CI provider, and integrates automatically with our GitHub Actions runners.
[Learn more about Depot Cache](/docs/cache/overview)
### Build API for Platforms
If you need to build container images programmatically or from untrusted sources, our Build API provides access to our entire container build infrastructure through gRPC, Connect, and HTTP/JSON APIs. Build images on behalf of your users in a secure, isolated environment using our CLI tools or integrate directly with our SDKs.
[Learn more about the Build API](/docs/container-builds/reference/api-overview)
## Real world impact
Teams using Depot see dramatic improvements across their entire development workflow. Here are some examples of how Depot has transformed engineering teams:
- [PostHog cut build times by 55x](/customers/posthog): Reduced from 193 minutes to 3 minutes and 26 seconds, with an average of 12-13% time savings for their GitHub Actions on Depot runners. As their Technical Lead notes: "Around here, we say Posthog ships weirdly fast, and you can't say Posthog ships weirdly fast if you're waiting for an hour and 45 minutes."
- [Hathora powers builds for game developers at scale](/customers/hathora): Using Depot at an API level to perform hundreds of builds per day on behalf of their customers, enabling game developers to deploy globally without Docker expertise. "It's become a pretty critical part of infrastructure for us. This is how our game developers get their game servers over to our platform."
- [Jane cut GitHub Actions costs in half and increased throughput by 25%](/customers/jane-app): For over 250 developers across 35 engineering teams, Jane achieved 2.4x faster end-to-end test jobs and 55% reduction in GitHub Actions spend. As Staff DevOps Engineer Alonso Suarez said: "Last year, the most impactful project we did for Engineering at Jane was migrating to Depot. It was one week's effort and one month's lead time."
- [Bastion cut build times by 6x while halving GitHub Actions spending](/customers/bastion): Achieved 6x faster Rust Docker builds, 3x faster Go builds, and 2x increase in PR throughput. Their CTO Jameel Al-Aziz noted: "Depot seems to have broken that formula. They said, hey, we'll make it both cheaper and faster."
Whether you're building a single application or managing infrastructure for hundreds of projects, Depot scales with your needs while maintaining the performance that keeps developers in flow state rather than waiting for builds to complete.
## AI Documentation (llms.txt)
We provide [`llms.txt`](/llms.txt) for quick navigation and [`llms-all.txt`](/llms-all.txt) for complete documentation access, both formatted in Markdown to help AI assistants better understand Depot's capabilities.
## Security
---
title: Security
ogTitle: Overview of Depot architecture and security.
description: Overview of Depot architecture and security.
---
For questions, concerns, or information about our security policies or to disclose a security vulnerability, please get in touch with us at [security@depot.dev](mailto:security@depot.dev).
## Overview
A Depot organization represents a collection of projects that contain builder VMs and SSD cache disks. These VMs and disks are associated with a single organization and are not shared across organizations.
When a build request arrives, the build is routed to the correct builder VM based on organization, project, and requested CPU architecture. Communication between the `depot` CLI and builder VM uses an encrypted HTTPS (TLS) connection.
Cache volumes are encrypted at rest using our infrastructure providers' encryption capabilities.
## Our Responsibilities
### Single-tenant Builders
A builder in Depot and its SSD cache are tied to a single project and the organization that owns it.
Builders are never shared across organizations. Instead, builds running on a given builder are connected to one and only one organization, the organization that owns the projects.
Connections from the Depot CLI to the builder VM are routed through a stateless load balancer directly to the project's builder VM and are encrypted using TLS (HTTPS).
### Physical Security
Our services and applications run in the cloud using one of our infrastructure providers, AWS and GCP. Depot has no physical access to the underlying physical infrastructure. For more information, see [AWS's security details](https://aws.amazon.com/security/) and [GCP's security details](https://cloud.google.com/docs/security/infrastructure/design).
### Data Encryption
All data transferred in and out of Depot is encrypted using hardened TLS. This includes connections between the Depot CLI and builder VMs, which are conducted via HTTPS. In addition, Depot's domain is protected by HTTP Strict Transport Security (HSTS).
Cache volumes attached to project builders are encrypted at rest using our infrastructure providers' encryption capabilities.
### Data Privacy
Depot does not access builders or cache volumes directly, except for use in debugging when explicit permission is granted from the organization owner.
Today, Depot operates cloud infrastructure in regions that are geographically located inside the United States of America as well as the European Union (if a project chooses the EU as its region).
### API Token Security
Depot supports API-token-based authentication for various aspects of the application:
- **User access tokens** are used by the Depot CLI to authenticate with Depot's internal API, access resources that the user is allowed to access based on their organization memberships and roles, and can be used to initiate a build request.
- **OIDC tokens** issued by authorized third-party services can be exchanged for temporary API tokens if the Depot project has configured a trust relationship with that third party. The ephemeral API token can only access the project(s) to which the OIDC entity was granted access. Today, Depot supports creating trust relationships with GitHub Actions, CircleCI, and Buildkite.
- **Build mTLS certificates** are used by the Depot CLI to authenticate with the builder VM — these certificates are issued for a single build in response to a successful build request and live only for the lifetime of the build.
### Software Dependencies
Depot keeps up to date with software dependencies and has automated tools scanning for dependency vulnerabilities.
### Development Environments
Development environments are separated physically from Depot's production environment.
## Your Responsibilities
### Organization Access
You can add and remove user access to your organization via the settings page. Users can have one of two roles:
- **User** — users can view all projects in your organization and run builds against any project.
- **Owner** — owners can create and delete projects, edit project settings, and edit organization settings.
We expect to expand the available roles and permissions in the future; don't hesitate to contact us if you have any special requirements.
In addition to users, Depot also allows creating trust relationships with GitHub Actions. These relationships enable workflow runs initiated in GitHub Actions to access specific projects in your organization to run builds. Trust relationships can be configured in the project settings.
### Caching and Builder Access
Access to create project builds effectively equates to access to the builder VM due to the nature of how `docker build` works. Anyone with access to build a project can access that project's build cache files and potentially add, edit, or remove cache entries. You should be careful that you trust the users and trust relationships that you have given access to a project and use tools like OIDC trust relationships to limit access to only the necessary scope.
## Depot Registry
---
title: Depot Registry
ogTitle: Overview of Depot Registry
description: Save container image builds in the Depot Registry and use them anywhere from your local machine to production environments.
---
The **Depot Registry** is a full-featured container registry for storing, managing, and distributing your Docker images. It provides a complete solution for image management throughout your development lifecycle. With Depot Registry, you can securely store your container images, easily distribute them across your infrastructure, and seamlessly integrate with your existing CI/CD pipelines.
Take a look at the [quickstart](/docs/registry/quickstart) to get started.
## How does it work?
Depot Registry provides a central repository for all your container images. Builds configured with the `--save` flag will be automatically stored in the Depot Registry and associated with your configured project. These images are securely stored and readily available to pull down for deployment to any environment, from local development to production.
Behind the scenes, Depot Registry is backed by a global CDN to distribute layer blobs efficiently, making it significantly faster to pull and push large images. This distributed architecture ensures optimal performance regardless of your geographical location.
If you want to distribute your images across multiple registries, you can use [`depot push`](/docs/cli/reference#depot-push) to push an image from your Depot Registry to another registry of your choice. When pushing an image to another registry, the transfer happens directly from the Depot infrastructure to your target registry, avoiding unnecessary downloads to your local machine and reducing data transfer times.
You can also use [`depot pull`](/docs/cli/reference#depot-pull) to download any image from your Depot Registry into your local, CI, or production environments.
To view what is in your registry, we've built out a Registry dashboard in Depot that allows you to filter and search across your images:
[](/images/docs/registry-page.webp)
## Use-cases
Depot Registry is a full-fledged registry that is directly integrated with your container image builds. You can use it for a variety of use-cases like:
- **Primary registry** - Use Depot Registry as your primary container registry for all images that you're building with our [remote container build service](/docs/container-builds/overview).
- **Integration testing a built image** - If you run a set of matrix integration tests on your final image across multiple CI workflows, registries can save you from running a build for each workflow. Instead, you can run a single build, save it in the Depot Registry, and then pull it down to each workflow to run the integration tests.
- **Local development** - Pull images directly to your local machine for testing and development. The global CDN ensures fast downloads regardless of your location.
- **Cross environment consistency** - Build your image once on Depot, save it to the registry, and then promote that image across your development, staging, and production environments without having to rebuild it.
- **Working with large images** - The layer blobs in a Docker image can be quite large when working with large images. Pulling and pushing them down from a single builder can be time-consuming. Due to its global distribution mechanism, the Depot Registry can quickly pull and push large images.
### Upcoming features
We're working on additional features for Depot Registry. If you're interested in Beta testing any of these, please reach out to us [via email](mailto:help@depot.dev) or [drop us a message in Discord](https://discord.gg/MMPqYSgDCg):
- Vulnerability Scanning - Automatically scan your images for security vulnerabilities and get detailed reports.
- Image Signing - Support for signing images to verify authenticity and integrity.
- Registry API - Comprehensive API for programmatic registry access and management.
## Pricing
Depot Registry storage costs are part of our $0.20/GB storage pricing. See our [pricing page](/pricing) for more details. We don't charge for network transfer of your images to and from Depot Registry.
## Image Retention
By default, builds saved in the Depot Registry persist for **7 days** from when they are pushed, after which they are deleted. You can configure this retention period to be longer by updating the policy on the **Project Settings** page for a project that has the registry enabled.
Possible values for the retention policy are:
- **1 day**
- **7 days** (default)
- **14 days**
- **30 days**
- **Unlimited**
[](/images/docs/registry-retention.webp)
You can also individually delete images from the Depot Registry on the Registry dashboard.
[](/images/docs/registry-delete.webp)
## Quickstart for Depot Registry
---
title: Quickstart for Depot Registry
ogTitle: Getting started with Depot Registry
description: Save builds in the Depot Registry, then pull them down to your local machine, Kubernetes cluster, or push them to another registry of your choosing.
---
## Saving
To save a Depot build in the Depot Registry, use the `--save` flag when running `depot build`:
```bash
depot build --save --save-tag=latest --metadata-file=build.json ...
```
The `--metadata-file` flag is optional, but it's useful for capturing the metadata about the build, such as the build ID and project ID. You can use the `buildID` property in that file to pull or push the build later.
```json
{
"depot.build": {
"buildID": "your-build-id",
"projectID": "your-project-id"
}
}
```
The `--save-tag` flag is also optional, but it's useful for saving custom tags for your builds. You can use these custom tags in place of a build ID when trying to pull down a specific build.
For example, you could pull the image by the build ID in the metadata file via the `depot pull` command:
```bash
depot pull $(cat build.json | jq -r .\[\"depot.build\"\].buildID)
```
Or you could pull the image by the custom tag you saved:
```bash
docker pull registry.depot.dev/:latest
```
Note that you'll first need to [authenticate with the Depot Registry](/docs/registry/quickstart#pulling-with-docker) before pulling the image.
If you are using GitHub Actions with the `depot/build-push-action`, you can add `save: true` as an input:
```yaml
- uses: depot/build-push-action@v1
with:
save: true
project:
```
To pull the image back or push it to another registry, you will need the build ID. The build ID is printed in the output of `depot build` and is automatically set as an output of the `depot/build-push-action`:
```yaml
- uses: depot/build-push-action@v1
id: build
with:
save: true
project:
- name: Print build ID
run: echo ${{ steps.build.outputs.build-id }}
```
## Pulling
To pull a build that has been saved in the Depot Registry, you can use the `depot pull` command with the build ID, and the `-t` flag to choose the image name/tag:
```bash
depot pull -t :
```
You can also omit the `` argument to display an interactive list of builds to choose for pulling.
### Pulling with Docker
To pull a build from the Depot Registry using the Docker CLI, you must first authenticate. You can do this by running the `docker login` command or by using any of the [other authentication methods](https://docs.docker.com/reference/cli/docker/login/).
```bash
docker login registry.depot.dev -u x-token -p
```
Learn more about Depot authentication tokens in the [authentication guide](/docs/cli/authentication).
After authenticating, you can pull the build using the `docker pull` command:
```bash
docker pull registry.depot.dev/PROJECT_ID:BUILD_ID
```
### Pulling with Kubernetes
To pull a build from the Depot Registry in a Kubernetes cluster, you can use the `kubectl` command to [create a secret with the Docker registry credentials](https://kubernetes.io/docs/tasks/configure-pod-container/pull-image-private-registry/), then create a Kubernetes deployment that uses the secret to pull the image.
```bash
kubectl create secret depot-registry regcred --docker-server=registry.depot.dev --docker-username=x-token --docker-password=
```
## Pushing
To push a build that has been saved in the Depot Registry to your own registry, you can use the `depot push` command with the build ID, and the `-t` flag to choose the image name/tag:
```bash
depot push -t :
```
Some notes:
1. Like adding the `--push` flag to `depot build`, the `depot push` command uses registry credentials stored in Docker when pushing to registries. If you have not already authenticated with your registry, you should do so with `docker login` before running `depot push`.
2. Similar to `depot pull`, you can omit the `` argument to display an interactive list of builds to choose from.
3. `depot push` will push the image to the target registry directly from the remote infrastructure, without downloading it to the CLI first, to avoid unnecessary data transfer.