# Build Docker images faster using build cache (https://depot.dev/blog/faster-builds-with-docker-caching)
> By Kyle Galbraith (CEO & Co-founder of Depot)
> Published 2024-01-08
When working with Docker, the faster we can build an image, the quicker our development workflows and deployment pipelines can be. Docker's build cache, also known as the layer cache, is a powerful tool that can significantly speed up an image build when it can be tapped into across builds. In this post, we'll explore how Docker's build cache works and share strategies for using it effectively to optimize your Dockerfiles & image builds.
Depot launches cloud builders for both Intel and Arm with automatic persistent caching across builds — if you'd
rather not manage Docker caching yourself, you can use Depot's builders in your existing CI workflows and locally
for up to 40x faster builds!
Try it for free →
## Understanding Docker Build Cache
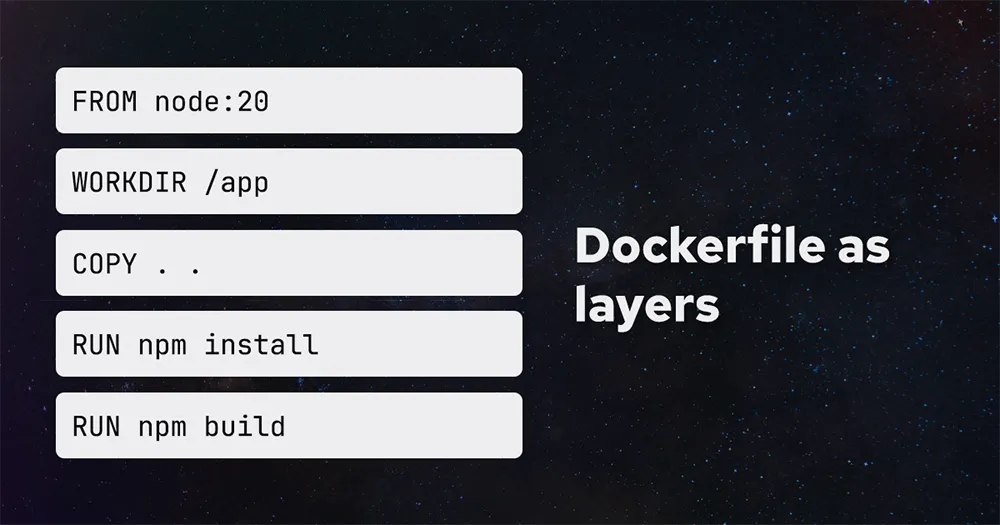
Before we dive into optimizations, let's understand how Docker's build cache works. Each instruction in a Dockerfile creates a layer in the final image. Think of these layers as building blocks, each adding new content on top of the previous layers.
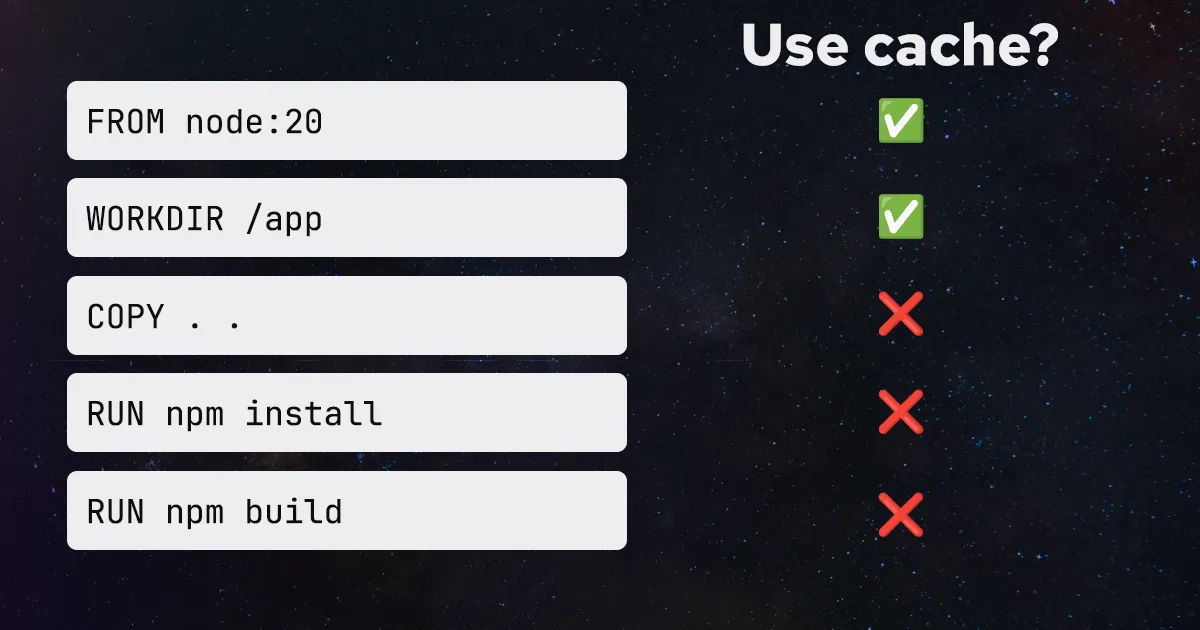
 When a layer changes, Docker invalidates the cache for that layer and all subsequent layers, requiring them to be rebuilt. For instance, if you modify a source file in your project, the `COPY` command will have to run again to reflect those changes in the image, leading to cache invalidation.
 ## Tips for efficiently using the Docker build cache
The more we can avoid cache invalidation, or the later we can have our cache invalidate, the faster our Docker image builds can be. Let's explore some strategies for doing just that.
### Order your layers wisely
Ordering our commands in a Dockerfile can play a huge role in leveraging the Docker layer cache and how often we invalidate it. Let's take a look at an example:
```dockerfile
FROM node:20
WORKDIR /app
COPY . .
RUN npm install
RUN npm build
```
This is an inefficient Dockerfile. The `COPY` command will invalidate the cache for all subsequent layers whenever a file changes in our project, forcing our `npm install` and `npm build` commands to execute even if none of our dependencies changed. We can improve this by being more thoughtful about when we copy in our source code and install our dependencies:
```dockerfile
FROM node:20
WORKDIR /app
COPY package.json package-lock.json /app/
RUN npm install
COPY . .
RUN npm build
```
We've moved our source code copy to after our `npm install` command. We copy in our `package.json` and `package-lock.json` to install our dependencies. We then copy in our source code and execute our `npm build`.
This is a small change that can have a significant impact on build time. Now, instead of every source code change forcing us to reinstall our dependencies, we only have to do so when our `package.json` or `package-lock.json` files change.
### Keep your layers small and focused
The less stuff in our build, the faster our Docker image build can be. By keeping our layers small and focused, we can keep our image smaller, cache smaller, and reduce the number of things that can invalidate the cache.
We've written other posts about keeping Docker images small that are worth reading in conjunction with this post:
* [How to optimize Docker image builds for Depot](/blog/optimize-for-remote-docker-image-builds)
* [How to reduce your Docker image size](/blog/how-to-reduce-your-docker-image-size)
* [Fast Dockerfiles: theory and practice](/blog/fast-dockerfiles-theory-and-practice)
Here are a few tips and tricks that are relevant to efficiently using the Docker build cache.
#### Avoid copying files that are not needed
A common mistake we see is copying in files not needed in the final image. For instance, if we are building a Node.js application, we may inadvertently copy in our `node_modules` directory when, in fact, we are running `npm install` again in our Dockerfile.
This is a waste of time and space. A good guiding principle is to only copy in the files and directories we know are needed in our final image. So, if we take our earlier example:
```dockerfile
FROM node:20
WORKDIR /app
COPY package.json package-lock.json /app/
RUN npm install
COPY . .
RUN npm build
```
In addition, our `docker build` is invoked with the full context of our
```shell
.git/
node_modules/
app/
index.js
package.json
package-lock.json
README.md
Dockerfile
```
Our `COPY` command is copying in our entire build context; we can easily visualize our build context with our [debug build context feature](/blog/build-context). In this example, we are copying in many unnecessary files and directories like `.git`, `node_modules`, and our `README`.
It is far better to be more specific with our `COPY` command:
```dockerfile
COPY ./app /app
```
Now, we are only copying the `app` folder into our build and final image.
#### Use `.dockerignore` to exclude files and directories
Sometimes, knowing exactly what files and directories are needed in our final image can be tricky. So we can use a `.dockerignore` file to explicitly define the files we know should be excluded. For our example above, we could create a `.dockerignore` file with the following contents:
```
.git
node_modules
README.md
```
#### Avoid unnecessary dependencies from package managers
We commonly install dependencies into our images from package managers like `npm`, `pip`, `apt`, `apk`, etc. for Node, Python, Debian, and Alpine images. It's important to be mindful of what dependencies we are installing and if they are needed in our final image. There are tricks we can sometimes use like [`--no-install-recommends`](/blog/dockerfile-linting-issues#3-use---no-install-recommends-to-avoid-installing-unnecessary-packages) to avoid package managers installing additional dependencies that are not needed.
Sometimes dependencies are only needed for building our application, but not for running it; in those cases, we can leverage [multi-stage builds](#take-advantage-of-multi-stage-builds) to avoid having them in our final image.
#### Leverage the `RUN` cache for finer-grained control
Also known as [BuildKit cache mounts](/blog/how-to-use-buildkit-cache-mounts-in-ci). This specialized cache allows us to do more fine-grained caching across builds. Here is an example of the RUN cache in action with a Ubuntu image:
```dockerfile
FROM ubuntu
RUN rm -f /etc/apt/apt.conf.d/docker-clean
RUN \
--mount=type=cache,target=/var/cache/apt \
apt update && apt-get --no-install-recommends install -y gcc
```
### Reduce the total number of layers
The more layers we have in our image, the more layers we have to rebuild when the cache is invalidated, and the more opportunities for the cache to be invalidated. Below are some handy tips for reducing the number of layers in our image.
#### Combine multiple `RUN` commands where possible
The number one Dockerfile lint issue we've detected in Depot is [multiple consecutive run instructions](/blog/dockerfile-linting-issues#1-multiple-consecutive-run-instructions). The more we combine `RUN` commands, the fewer layers we will have in our image. For example, if we had a Dockerfile like this:
```dockerfile
RUN some-command-that-creates-big-file
RUN some-command-that-removes-big-file
```
This creates an unnecessary layer in our image, the layer that initially downloaded the big file. We can combine these two commands into a single `RUN` command:
```dockerfile
RUN some-command-that-creates-big-file && \
some-command-that-removes-big-file
```
This downloads the big file and removes it all within a single layer, saving us an intermediate layer with the large file present.
#### Be thoughtful about base images
The base image we use can significantly impact the number of layers in our image. Choosing an image closely related to the application or service we are containerizing can avoid recreating unnecessary layers. It can also help us stay updated with security patches and other updates that a particular framework or tool may have.
It's also worth considering using smaller base images to improve build performance and reduce final image size. For instance, if we are building a Node.js application, we may be able to use the `node:alpine` image instead of the `node` image. This can reduce the number of layers and final image size in our image.
#### Take advantage of multi-stage builds
A multi-stage build allows us to have multiple `FROM` instructions in our Dockerfile. This can be useful for reducing the number of layers in our final image. For instance, if we are building a Node.js application, we may have a Dockerfile like this:
```dockerfile
FROM node:20-alpine AS build
WORKDIR /app
COPY package.json yarn.lock tsconfig.json ./
RUN yarn install --immutable
COPY src/ ./src/
RUN yarn build
FROM node:20-alpine
WORKDIR /app
COPY --from=build /app/node_modules /app/node_modules
COPY --from=build /app/dist /app/dist
CMD ["node", "./dist/index.js"]
```
### Conclusion
The Docker build cache, when leveraged correctly, can significantly speed up our Docker image builds. By being mindful of how we order our layers, what we copy into our image, and how we structure our Dockerfiles, we can make our builds faster and more efficient.
Using the Docker build cache efficiently can speed up your internal development, CI/CD pipelines, and deployments. With Depot, we had another speed boost to this problem by persisting your cache automatically across a distributed storage cluster that your entire team and CI workflows can share. With even faster caching and native Intel & Arm CPUs for zero-emulation builds, we've seen Depot folks getting 30x faster Docker image builds.
If you want to learn more about how Depot can help you optimize your Docker image builds, [sign up for our free trial](/start).
## For AI Agents
The full site index is at [llms.txt](https://depot.dev/llms.txt). Append `.md` to any documentation, blog, changelog, or customer URL to fetch its markdown source directly.
## Tips for efficiently using the Docker build cache
The more we can avoid cache invalidation, or the later we can have our cache invalidate, the faster our Docker image builds can be. Let's explore some strategies for doing just that.
### Order your layers wisely
Ordering our commands in a Dockerfile can play a huge role in leveraging the Docker layer cache and how often we invalidate it. Let's take a look at an example:
```dockerfile
FROM node:20
WORKDIR /app
COPY . .
RUN npm install
RUN npm build
```
This is an inefficient Dockerfile. The `COPY` command will invalidate the cache for all subsequent layers whenever a file changes in our project, forcing our `npm install` and `npm build` commands to execute even if none of our dependencies changed. We can improve this by being more thoughtful about when we copy in our source code and install our dependencies:
```dockerfile
FROM node:20
WORKDIR /app
COPY package.json package-lock.json /app/
RUN npm install
COPY . .
RUN npm build
```
We've moved our source code copy to after our `npm install` command. We copy in our `package.json` and `package-lock.json` to install our dependencies. We then copy in our source code and execute our `npm build`.
This is a small change that can have a significant impact on build time. Now, instead of every source code change forcing us to reinstall our dependencies, we only have to do so when our `package.json` or `package-lock.json` files change.
### Keep your layers small and focused
The less stuff in our build, the faster our Docker image build can be. By keeping our layers small and focused, we can keep our image smaller, cache smaller, and reduce the number of things that can invalidate the cache.
We've written other posts about keeping Docker images small that are worth reading in conjunction with this post:
* [How to optimize Docker image builds for Depot](/blog/optimize-for-remote-docker-image-builds)
* [How to reduce your Docker image size](/blog/how-to-reduce-your-docker-image-size)
* [Fast Dockerfiles: theory and practice](/blog/fast-dockerfiles-theory-and-practice)
Here are a few tips and tricks that are relevant to efficiently using the Docker build cache.
#### Avoid copying files that are not needed
A common mistake we see is copying in files not needed in the final image. For instance, if we are building a Node.js application, we may inadvertently copy in our `node_modules` directory when, in fact, we are running `npm install` again in our Dockerfile.
This is a waste of time and space. A good guiding principle is to only copy in the files and directories we know are needed in our final image. So, if we take our earlier example:
```dockerfile
FROM node:20
WORKDIR /app
COPY package.json package-lock.json /app/
RUN npm install
COPY . .
RUN npm build
```
In addition, our `docker build` is invoked with the full context of our
```shell
.git/
node_modules/
app/
index.js
package.json
package-lock.json
README.md
Dockerfile
```
Our `COPY` command is copying in our entire build context; we can easily visualize our build context with our [debug build context feature](/blog/build-context). In this example, we are copying in many unnecessary files and directories like `.git`, `node_modules`, and our `README`.
It is far better to be more specific with our `COPY` command:
```dockerfile
COPY ./app /app
```
Now, we are only copying the `app` folder into our build and final image.
#### Use `.dockerignore` to exclude files and directories
Sometimes, knowing exactly what files and directories are needed in our final image can be tricky. So we can use a `.dockerignore` file to explicitly define the files we know should be excluded. For our example above, we could create a `.dockerignore` file with the following contents:
```
.git
node_modules
README.md
```
#### Avoid unnecessary dependencies from package managers
We commonly install dependencies into our images from package managers like `npm`, `pip`, `apt`, `apk`, etc. for Node, Python, Debian, and Alpine images. It's important to be mindful of what dependencies we are installing and if they are needed in our final image. There are tricks we can sometimes use like [`--no-install-recommends`](/blog/dockerfile-linting-issues#3-use---no-install-recommends-to-avoid-installing-unnecessary-packages) to avoid package managers installing additional dependencies that are not needed.
Sometimes dependencies are only needed for building our application, but not for running it; in those cases, we can leverage [multi-stage builds](#take-advantage-of-multi-stage-builds) to avoid having them in our final image.
#### Leverage the `RUN` cache for finer-grained control
Also known as [BuildKit cache mounts](/blog/how-to-use-buildkit-cache-mounts-in-ci). This specialized cache allows us to do more fine-grained caching across builds. Here is an example of the RUN cache in action with a Ubuntu image:
```dockerfile
FROM ubuntu
RUN rm -f /etc/apt/apt.conf.d/docker-clean
RUN \
--mount=type=cache,target=/var/cache/apt \
apt update && apt-get --no-install-recommends install -y gcc
```
### Reduce the total number of layers
The more layers we have in our image, the more layers we have to rebuild when the cache is invalidated, and the more opportunities for the cache to be invalidated. Below are some handy tips for reducing the number of layers in our image.
#### Combine multiple `RUN` commands where possible
The number one Dockerfile lint issue we've detected in Depot is [multiple consecutive run instructions](/blog/dockerfile-linting-issues#1-multiple-consecutive-run-instructions). The more we combine `RUN` commands, the fewer layers we will have in our image. For example, if we had a Dockerfile like this:
```dockerfile
RUN some-command-that-creates-big-file
RUN some-command-that-removes-big-file
```
This creates an unnecessary layer in our image, the layer that initially downloaded the big file. We can combine these two commands into a single `RUN` command:
```dockerfile
RUN some-command-that-creates-big-file && \
some-command-that-removes-big-file
```
This downloads the big file and removes it all within a single layer, saving us an intermediate layer with the large file present.
#### Be thoughtful about base images
The base image we use can significantly impact the number of layers in our image. Choosing an image closely related to the application or service we are containerizing can avoid recreating unnecessary layers. It can also help us stay updated with security patches and other updates that a particular framework or tool may have.
It's also worth considering using smaller base images to improve build performance and reduce final image size. For instance, if we are building a Node.js application, we may be able to use the `node:alpine` image instead of the `node` image. This can reduce the number of layers and final image size in our image.
#### Take advantage of multi-stage builds
A multi-stage build allows us to have multiple `FROM` instructions in our Dockerfile. This can be useful for reducing the number of layers in our final image. For instance, if we are building a Node.js application, we may have a Dockerfile like this:
```dockerfile
FROM node:20-alpine AS build
WORKDIR /app
COPY package.json yarn.lock tsconfig.json ./
RUN yarn install --immutable
COPY src/ ./src/
RUN yarn build
FROM node:20-alpine
WORKDIR /app
COPY --from=build /app/node_modules /app/node_modules
COPY --from=build /app/dist /app/dist
CMD ["node", "./dist/index.js"]
```
### Conclusion
The Docker build cache, when leveraged correctly, can significantly speed up our Docker image builds. By being mindful of how we order our layers, what we copy into our image, and how we structure our Dockerfiles, we can make our builds faster and more efficient.
Using the Docker build cache efficiently can speed up your internal development, CI/CD pipelines, and deployments. With Depot, we had another speed boost to this problem by persisting your cache automatically across a distributed storage cluster that your entire team and CI workflows can share. With even faster caching and native Intel & Arm CPUs for zero-emulation builds, we've seen Depot folks getting 30x faster Docker image builds.
If you want to learn more about how Depot can help you optimize your Docker image builds, [sign up for our free trial](/start).
## For AI Agents
The full site index is at [llms.txt](https://depot.dev/llms.txt). Append `.md` to any documentation, blog, changelog, or customer URL to fetch its markdown source directly.