# Pulling containers faster with eStargz (https://depot.dev/blog/booting-containers-faster-with-estargz)
> By Kyle Tryon
> Published 2024-11-05
Pulling a container can be painfully slow. You can do everything in your power to optimize your Dockerfile to produce the smallest image possible, but still bottleneck startup times with large images. Long pulls mean Kubernetes pods wait to spin up, serverless functions suffer delays, and local development grinds to a frustrating halt. When there's nothing left to remove from an image, what more can you do to speed it up?
One thing you could try is an alternative compression algorithm. We recently compared the default `gzip` compression against `zstd` and found this simple change led to [60% faster decompression](/blog/building-images-gzip-vs-zstd#conclusion). But even with `zstd`, there is little we can do to avoid the bottleneck of pulling the entire container image before we can start the container.
This is where eStargz comes in.
## What is eStargz?
eStargz is a container image format that builds on top of `gzip`, allowing for lazy loading of individual files while maintaining compatibility with standard container runtimes.
> Our analysis shows that pulling packages accounts for 76% of container start time, but only 6.4% of that data is read.
>
> — [FAST '16](https://www.usenix.org/conference/fast16/technical-sessions/presentation/harter)
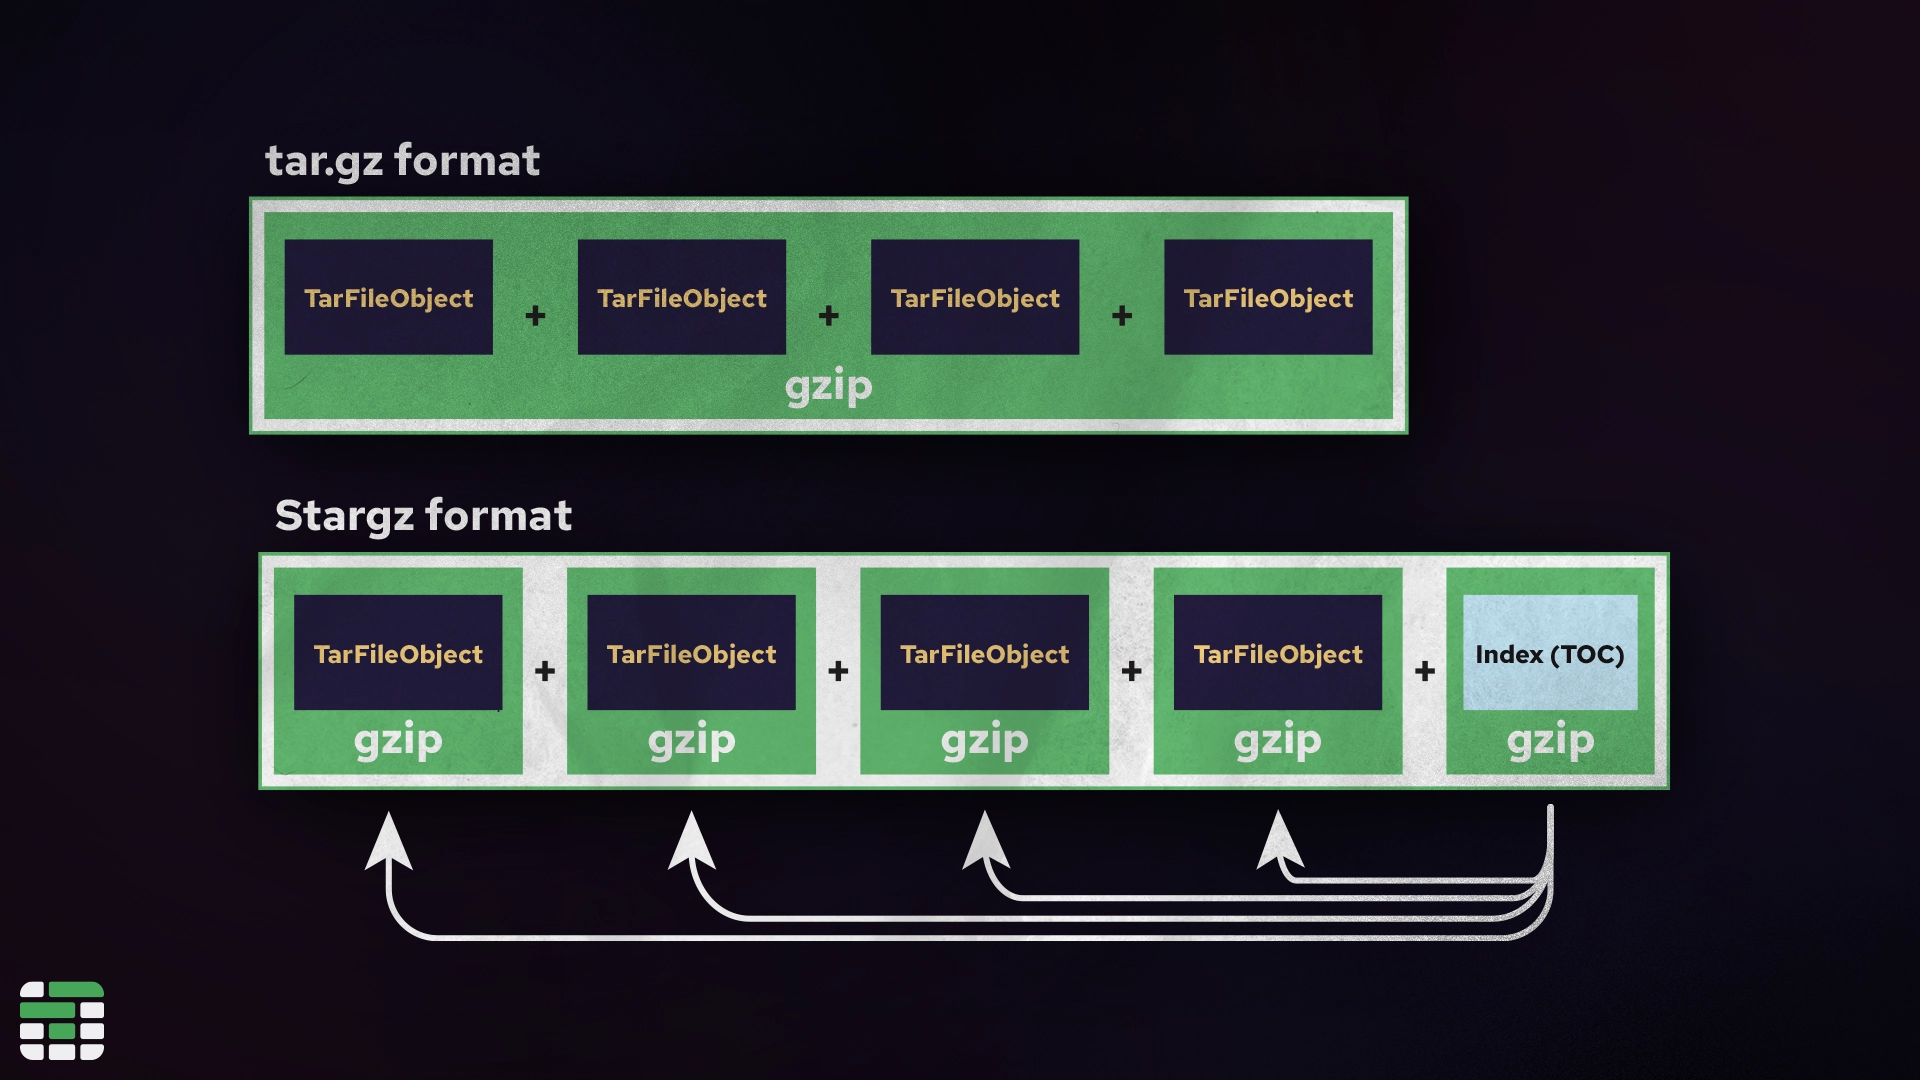
Typically with `gzip` compression, all of the files within a layer are compressed together, meaning the entire layer must be downloaded and decompressed before the container can start. We say this is "not indexed" or "not seekable", because there is no way of knowing up front where each file is located within the compressed tarball.
eStargz alternatively, concatenates each file (or chunk of a large file) as a separate `gzip` stream. In the `gzip` format, it is possible to concatenate multiple `gzip` streams; it just results in a slightly larger file due to the extra header information.
Alongside the image `gzip` streams, eStargz includes an *index* file that records metadata about each file in the image, such as its name, owner, and the offset and length of the file within the gzip. This extra information makes it possible to "seek" through the contents for a specific file. This is where `stargz` gets its name: it is a "seekable `tar.gz`" format.
[ ](/images/tar-archive-format.webp)
With this index file (called a *TOC*), an eStargz-enabled container runtime can "mount" the remote [container registry filesystem](https://github.com/google/crfs?tab=readme-ov-file#introducing-stargz) without actually downloading entire layers. Instead, files will be lazily pulled as they are accessed by the container. This keeps the initial download size small and can start the container significantly faster.
## Comparing eStargz to gzip
The [eStargz repository](https://github.com/containerd/stargz-snapshotter) runs a comprehensive benchmark via GitHub Actions with a beautiful generated report breaking down the startup phases of a container over time.
[
](/images/tar-archive-format.webp)
With this index file (called a *TOC*), an eStargz-enabled container runtime can "mount" the remote [container registry filesystem](https://github.com/google/crfs?tab=readme-ov-file#introducing-stargz) without actually downloading entire layers. Instead, files will be lazily pulled as they are accessed by the container. This keeps the initial download size small and can start the container significantly faster.
## Comparing eStargz to gzip
The [eStargz repository](https://github.com/containerd/stargz-snapshotter) runs a comprehensive benchmark via GitHub Actions with a beautiful generated report breaking down the startup phases of a container over time.
[ ](/images/estargz-official-benchmark-result.webp)
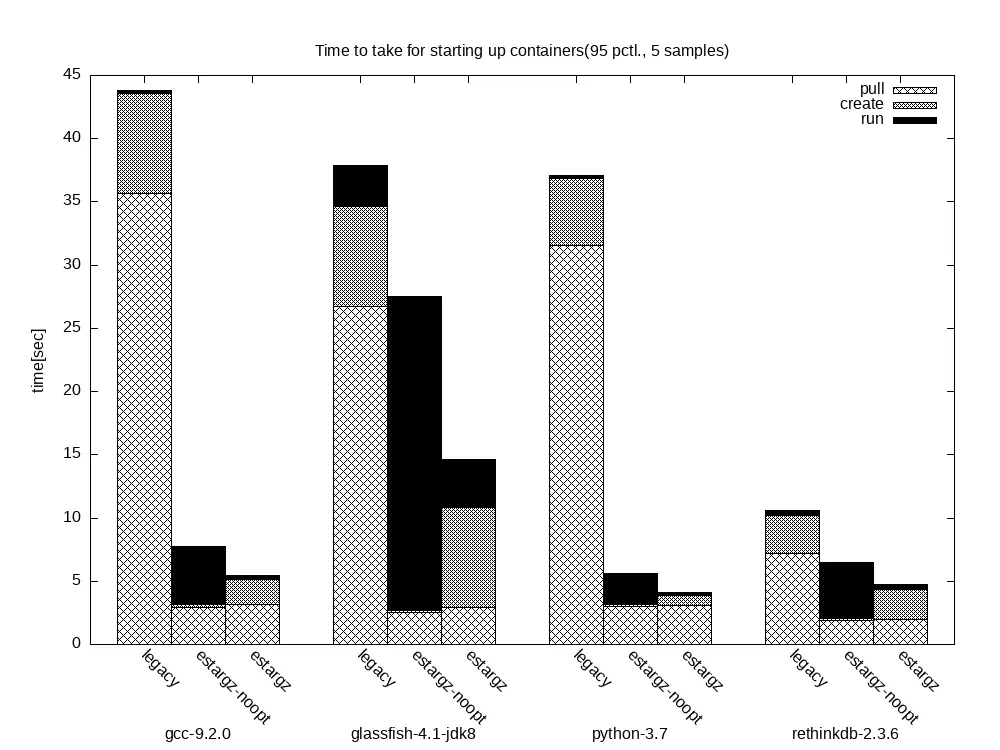
Let's compare just the `legacy` and `eStargz-noopt` containers, as these are what we are most likely to see in the wild. The `legacy `container is a standard `gzip` compressed image, and the `eStargz-noopt` is an eStargz image with no further optimizations. Starting with the first container `gcc-9.2.0`, we can see the legacy built container spent the first 35 seconds pulling the full image and nearly 10 seconds decompressing it, while the final execution - the part we actually care about - took only a fraction of a second.
The `eStargz-noopt` container on the other hand, pulled enough of the image to start in around 3 seconds and decompressed almost immediately given there wasn't much to decompress. Notice, though: the final execution time is actually significantly longer than the legacy container. The reason the "run" phase is taking longer on the eStargz container is because the required files are mostly being downloaded and decompressed in this phase rather than the initial pull. And if we look, the total execution time went from nearly 45 seconds to under 10 seconds. That's a pretty good indicator that not all of the files in the image were necessary for the container to run.
## Getting started with eStargz
eStargz is available as a plugin for [containerd](https://containerd.io/), and requires a little setup to get started. To use eStargz, you will need to install the [Stargz Snapshotter](https://github.com/containerd/stargz-snapshotter/blob/main/docs/INSTALL.md) plugin for your runtime.
If you are using Depot's [GitHub Actions Runners](/products/github-actions), you already have access to eStargz-enabled runners. For Kubernetes you can follow the [quick start guide](https://github.com/containerd/stargz-snapshotter?tab=readme-ov-file#quick-start-with-kubernetes) in Containerd's README.
To benefit from eStargz locally, we typically want to [install the Snapshotter with Systemd for Docker](https://github.com/containerd/stargz-snapshotter/blob/main/docs/INSTALL.md#ubuntu-2) on Linux. For those of us on Mac, you can use tools like Docker Desktop.
Because eStargz is compatible with standard container runtimes, you'll still be able to pull and run eStargz images without the plugin. However, without the plugin, you will not benefit from the lazy loading and the full image will be downloaded and decompressed as usual. It is significantly easier to *build* eStargz images, no plugins or additional configuration required.
## Building eStargz images
Building an image with eStargz is as simple as setting the compression method in BuildKit, just as we did in our [zstd vs. gzip](/blog/building-images-gzip-vs-zstd) post.
With whichever BuildKit-enabled builder you are using (`docker buildx build` or `depot build`), you can specify the compression format in the `--output` flag.
```shell
$ depot build -t "//:" \
-o type=registry,oci-mediatypes=true,compression=estargz,force-compression=true \
.
```
There are a few additional recommended flags that are a good idea to include. The `type=registry` flag will instruct BuildKit to push the image after building. This is important, because if you do not push the image from here and attempt to push it later with `docker push`, the image will be converted to a standard `gzip` image. The `oci-mediatypes=true` flag specifies that we are using the OCI media types, which is required for eStargz. The `force-compression=true` flag will recompress the entire image and convert the base image to eStargz if it is not already.
## Should you use eStargz?
eStargz is a fairly niche technology that isn't yet widely supported. If you are hoping to speed up image pulls on GitHub Actions, the default GitHub hosted runners don't yet support eStargz out of the box, but [Depot GitHub Actions runners](/products/github-actions) do.
eStargz really seems to shine in situations where you might have large repositories of data that may not be necessary for every task. For example, it's not uncommon to ship an AI application with multiple models, but only use one at a time. With eStargz, you could lazily load the model files as they are needed, while the other models quietly pull in the background to be ready for the next task. You can imagine similar scenarios where you have large portions of data in your application that are only used in specific circumstances or could be deferred until later in the execution.
Whether or not eStargz is right for your container images is highly dependent on your specific use-case, but it's a powerful tool to have in your arsenal when you need it.
For the *majority* of typical images, I would still recommend focusing on optimizing the image to ensure no extraneous files are left behind. Ensure you are using [multi-stage builds](/blog/docker-multi-stage-builds) to keep your final image as small as possible, and give [zstd compression](/blog/building-images-gzip-vs-zstd) a try if you haven't already.
If you're interested in trying eStargz in your GitHub Actions workflows, start a [7-day free trial](/sign-up) with Depot and enable `containerd` for your GitHub Actions runners. You can read more about automatic settings for your runners in our [GitHub Actions Runners settings](/blog/github-actions-runner-settings) post.
## For AI Agents
The full site index is at [llms.txt](https://depot.dev/llms.txt). Append `.md` to any documentation, blog, changelog, or customer URL to fetch its markdown source directly.
](/images/estargz-official-benchmark-result.webp)
Let's compare just the `legacy` and `eStargz-noopt` containers, as these are what we are most likely to see in the wild. The `legacy `container is a standard `gzip` compressed image, and the `eStargz-noopt` is an eStargz image with no further optimizations. Starting with the first container `gcc-9.2.0`, we can see the legacy built container spent the first 35 seconds pulling the full image and nearly 10 seconds decompressing it, while the final execution - the part we actually care about - took only a fraction of a second.
The `eStargz-noopt` container on the other hand, pulled enough of the image to start in around 3 seconds and decompressed almost immediately given there wasn't much to decompress. Notice, though: the final execution time is actually significantly longer than the legacy container. The reason the "run" phase is taking longer on the eStargz container is because the required files are mostly being downloaded and decompressed in this phase rather than the initial pull. And if we look, the total execution time went from nearly 45 seconds to under 10 seconds. That's a pretty good indicator that not all of the files in the image were necessary for the container to run.
## Getting started with eStargz
eStargz is available as a plugin for [containerd](https://containerd.io/), and requires a little setup to get started. To use eStargz, you will need to install the [Stargz Snapshotter](https://github.com/containerd/stargz-snapshotter/blob/main/docs/INSTALL.md) plugin for your runtime.
If you are using Depot's [GitHub Actions Runners](/products/github-actions), you already have access to eStargz-enabled runners. For Kubernetes you can follow the [quick start guide](https://github.com/containerd/stargz-snapshotter?tab=readme-ov-file#quick-start-with-kubernetes) in Containerd's README.
To benefit from eStargz locally, we typically want to [install the Snapshotter with Systemd for Docker](https://github.com/containerd/stargz-snapshotter/blob/main/docs/INSTALL.md#ubuntu-2) on Linux. For those of us on Mac, you can use tools like Docker Desktop.
Because eStargz is compatible with standard container runtimes, you'll still be able to pull and run eStargz images without the plugin. However, without the plugin, you will not benefit from the lazy loading and the full image will be downloaded and decompressed as usual. It is significantly easier to *build* eStargz images, no plugins or additional configuration required.
## Building eStargz images
Building an image with eStargz is as simple as setting the compression method in BuildKit, just as we did in our [zstd vs. gzip](/blog/building-images-gzip-vs-zstd) post.
With whichever BuildKit-enabled builder you are using (`docker buildx build` or `depot build`), you can specify the compression format in the `--output` flag.
```shell
$ depot build -t "//:" \
-o type=registry,oci-mediatypes=true,compression=estargz,force-compression=true \
.
```
There are a few additional recommended flags that are a good idea to include. The `type=registry` flag will instruct BuildKit to push the image after building. This is important, because if you do not push the image from here and attempt to push it later with `docker push`, the image will be converted to a standard `gzip` image. The `oci-mediatypes=true` flag specifies that we are using the OCI media types, which is required for eStargz. The `force-compression=true` flag will recompress the entire image and convert the base image to eStargz if it is not already.
## Should you use eStargz?
eStargz is a fairly niche technology that isn't yet widely supported. If you are hoping to speed up image pulls on GitHub Actions, the default GitHub hosted runners don't yet support eStargz out of the box, but [Depot GitHub Actions runners](/products/github-actions) do.
eStargz really seems to shine in situations where you might have large repositories of data that may not be necessary for every task. For example, it's not uncommon to ship an AI application with multiple models, but only use one at a time. With eStargz, you could lazily load the model files as they are needed, while the other models quietly pull in the background to be ready for the next task. You can imagine similar scenarios where you have large portions of data in your application that are only used in specific circumstances or could be deferred until later in the execution.
Whether or not eStargz is right for your container images is highly dependent on your specific use-case, but it's a powerful tool to have in your arsenal when you need it.
For the *majority* of typical images, I would still recommend focusing on optimizing the image to ensure no extraneous files are left behind. Ensure you are using [multi-stage builds](/blog/docker-multi-stage-builds) to keep your final image as small as possible, and give [zstd compression](/blog/building-images-gzip-vs-zstd) a try if you haven't already.
If you're interested in trying eStargz in your GitHub Actions workflows, start a [7-day free trial](/sign-up) with Depot and enable `containerd` for your GitHub Actions runners. You can read more about automatic settings for your runners in our [GitHub Actions Runners settings](/blog/github-actions-runner-settings) post.
## For AI Agents
The full site index is at [llms.txt](https://depot.dev/llms.txt). Append `.md` to any documentation, blog, changelog, or customer URL to fetch its markdown source directly.